行业网站cms长沙seo推广公司
基于Elasticsearch+Fluentd+Kibana的日志收集分析系统搭建与应用
随着互联网技术的发展,原来的单机发展到多机再到大规模集群,nginx,tomcat,openStack,docker容器等等,一个系统由大量的服务构成,其中每个应用与服务的日志分析管理也变得越来越重要。本文将介绍如何使用fd+es+ka搭建日志收集系统。
关于具体介绍请参考官网:
Fluentd: http://www.fluentd.org/
Elasticsearch: https://www.elastic.co/products/elasticsearch
Kibana:https://www.elastic.co/products/kibana
对于为什么没有采用ELK的搭配不在本文讨论范围,有兴趣的可以自己了解下。
1. 安装Fluentd
Fluentd的官方文档介绍的非常详细,如果在今后的使用过程当中遇到问题可直接查阅官方文档http://docs.fluentd.org/。
step1 安装
$ curl -L https://toolbelt.treasuredata.com/sh/install-redhat-td-agent2.sh | sh如果无法使用在线安装可手动下载rpm包进行安装。本文使用版本td-agent-2.3.0-0.el6.x86_64.rpm
step2 启动
$ /etc/init.d/td-agent start
Starting td-agent: [  OK  ]
$ /etc/init.d/td-agent status
td-agent (pid  21678) is running...
关于更详细的安装请参考 http://docs.fluentd.org/articles/install-by-rpm#
2. 安装Elasticsearch
$ curl -O https://download.elastic.co/elasticsearch/elasticsearch/elasticsearch-1.7.1.tar.gz$ tar zxvf elasticsearch-1.7.1.tar.gz
$ cd elasticsearch-1.7.1/
$ ./bin/elasticsearch启动后可看到类似如下数据
[INFO ][node                     ] [Alexander Lexington] version[1.7.1], pid[1078], build[b88f43f/2015-07-29T09:54:16Z]
[INFO ][node                     ] [Alexander Lexington] initializing ...
[INFO ][plugins                  ] [Alexander Lexington] loaded [], sites []
[INFO ][env                      ] [Alexander Lexington] using [1] data paths, mounts [[/ (/dev/mapper/VolGroup-lv_root)]], net usable_space [28.8gb], net total_space [35gb], types [ext4]
[INFO ][node                     ] [Alexander Lexington] initialized
[INFO ][node                     ] [Alexander Lexington] starting ...
[INFO ][transport                ] [Alexander Lexington] bound_address {inet[/0:0:0:0:0:0:0:0:9300]}, publish_address {inet[/10.22.205.101:9300]}
[INFO ][discovery                ] [Alexander Lexington] elasticsearch/6usA_fpmSeiW5GpYOZgIRQ
[INFO ][cluster.service          ] [Alexander Lexington] new_master [Alexander Lexington][6usA_fpmSeiW5GpYOZgIRQ][rabbitmq-101][inet[/10.22.205.101:9300]], reason: zen-disco-join (elected_as_master)
[INFO ][http                     ] [Alexander Lexington] bound_address {inet[/0:0:0:0:0:0:0:0:9200]}, publish_address {inet[/10.22.205.101:9200]}
[INFO ][node                     ] [Alexander Lexington] started
[INFO ][gateway                  ] [Alexander Lexington] recovered [0] indices into cluster_state
2.1 安装Elasticsearch 插件(可选)
插件为可选安装,如果只是作为一般的用户可不必要安装,如果需要对日志数据进行挖掘与分析及es使用集群相关功能,则建议安装。
(1)kopf插件 集群资源查询&数据查询
./elasticsearch-1.7.1/bin/plugin install lmenezes/elasticsearch-kopf/1.0如果无法在线安装,可手动下载zip文件并解压到以下路径即可
./elasticsearch-1.7.1/plugins/kopf安装完成后访问:http://localhost:9200/_plugin/kopf
git地址:https://github.com/lmenezes/elasticsearch-kopf
注意:kopf与es是有对应版本的安装时请安装对应版本,本文为1X。具体kopf的使用不在本文介绍之列,感兴趣的同学请google
(2)head插件主要用于es的数据查询一般配合kopf使用
./elasticsearch-1.7.1/bin/plugin install mobz/elasticsearch-head如果无法在线安装,可手动下载zip文件并解压到以下路径即可
./elasticsearch-1.7.1/plugins/head安装完成后访问:http://localhost:9200/_plugin/head

3. 安装kibana
$ curl -O https://download.elastic.co/kibana/kibana/kibana-4.1.4-linux-x64.tar.gz$ tar zxvf kibana-4.1.4-linux-x64.tar.gz
$ cd kibana-4.1.4-linux-x64/
$ ./bin/kibana注意:kibana只是一个前端展示平台需要es作为数据源,所以在启动ka的之前请确认es的连接地址是否正确!
./kibana-4.1.4-linux-x64/config/kibana.yml# The host to bind the server to.
host: "0.0.0.0"# The Elasticsearch instance to use for all your queries.
elasticsearch_url: "http://localhost:9200"修改elasticsearch_url,其他参数修改请具体参看yml的配置文件。
OK到这里三大软件已经安装完成了是否可以进行日志的采集了?No,因为需要对es支持,所以接下来我们需要安装fluentd的es插件。
4. 安装Fluentd 必要插件
(1)安装fluent-plugin-elasticsearch
/usr/sbin/td-agent-gem install fluent-plugin-elasticsearch(2)安装fluentd type 插件
/usr/sbin/td-agent-gem install fluent-plugin-typecast(2)安装secure-forward 插件(非必须但常用)
/usr/sbin/td-agent-gem install fluent-plugin-secure-forward注意:对于插件的安装大家可能会遇到问题,就是gem源始终连接不上。。。没办法在天朝。这里可以使用taobao的源代替官方的源。
sudo gem sources -l
sudo gem sources -r http://rubygems.org
sudo gem sources -r https://rubygems.org
sudo gem sources -a https://ruby.taobao.org/
如果gem都没有安装怎么办?那就安装喽~
wget http://production.cf.rubygems.org/rubygems/rubygems-2.2.2.tgz
...
ruby setup.rb
到这里可算把软件和相关插件安装完毕了,下面将以采集nginx access日志为例。
设备清单
- 虚机101centos6.5: nginx所在服务器,es,fd,ka所在服务器 client agent
- 虚机102centos6.5 :fd及插件所在服务器server agent,负责文件存储nginx日志,并转发101es存储
5. nginx日志采集
(1)修改虚机101 fluentd 配置
/etc/td-agent/td-agent.conf- 添加tail 源
<source>type tailpath /var/log/nginx/access.logformat /^(?<remote>[^ ]*) - - \[(?<time>[^\]]*)\] "(?<method>\S+)(?: +(?<path>[^\"]*) +\S*)?" (?<status>[^ ]*) (?<body_bytes_sent>[^ ]*) "(?<http_referer>[^\"]*)" ClientVersion "(?<clientVersion>[^ ]*)" "(?<userAgent>[^\"]*)" "(?<remoteHost>[^ ]*)" "(?<http_x_forwarded_for>[^\"]*)" upstream_response_time "(?<upstream_response_time>[^ ]*)" request_time "(?<request_time>[^ ]*)"\s$/time_format %d/%b/%Y:%H:%M:%S %ztypes remote:ip,time:time,method:string,path:string,status:integer:body_bytes_sent:integer,http_referer:string,userAgent:string,remoteHost:string,http_x_forwarded_for:string,upstream_response_time:string,request_time:floattag 101nginx.access.logpos_file /var/log/td-agent/pos/nginx.access.log.pos
</source>- 添加tag match 把采集的日志转发到虚机102
<match *.access.log>type forwardflush_interval 60sbuffer_type filebuffer_path /var/log/td-agent/buffer/*<server>host 10.22.205.102port 24224</server>
</match>
注意:相关配置参数具体参考fluentd官方文档,再次赞下fluentd文档写的很详细很好!关于日志format的正则可以使用http://fluentular.herokuapp.com/ 来测试格式化的正确性
(2)修改虚机102 fluentd 配置
/etc/td-agent/td-agent.conf- 102只做转发存储,顾只配置match
<match *.access.log>type copy<store>type file path /var/log/swq_test/nginx-access/time_slice_format ./nginx-access/%Y/%m/%d/%Y%m%d%H.nginx.accesscompress gzipflush_interval 10mtime_format %Y-%m-%dT%H:%M:%S%zbuffer_path /var/log/swq_test/buffer/nginx_access_bufferbuffer_type filebuffer_chunk_limit 50m</store><store>type elasticsearchhost 10.22.205.101port 9200include_tag_key truetag_key @log_namelogstash_format trueflush_interval 10s</store>
</match>
这里102对匹配到的日志做了2个操作:(1). 以时间文件夹路径本地存储nginx日志 (2). 转发获得的日志到101的es上。
重启101,102 fluentd 大功告成!
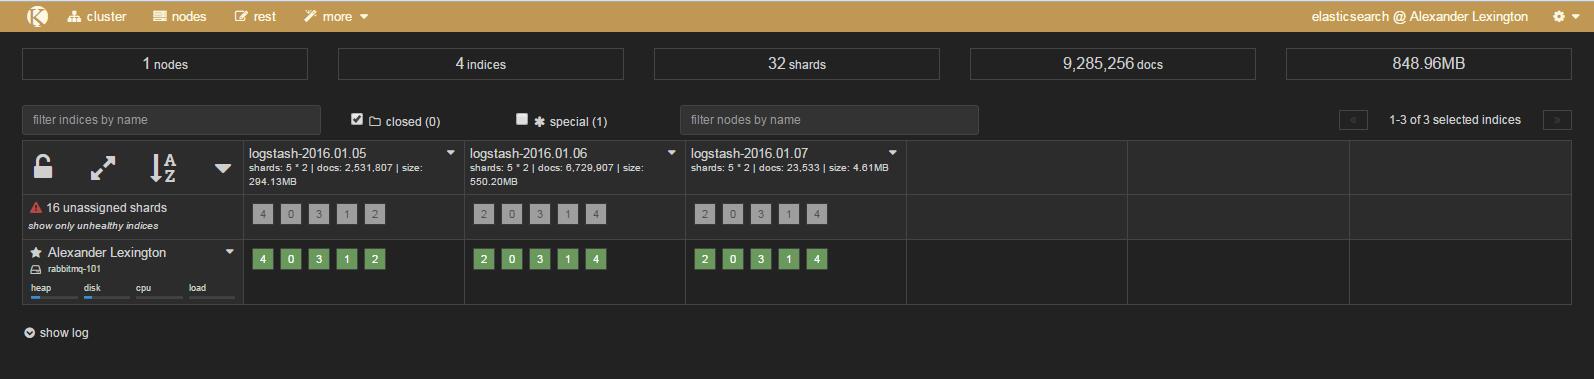
/etc/init.d/td-agent restartkibana discover:

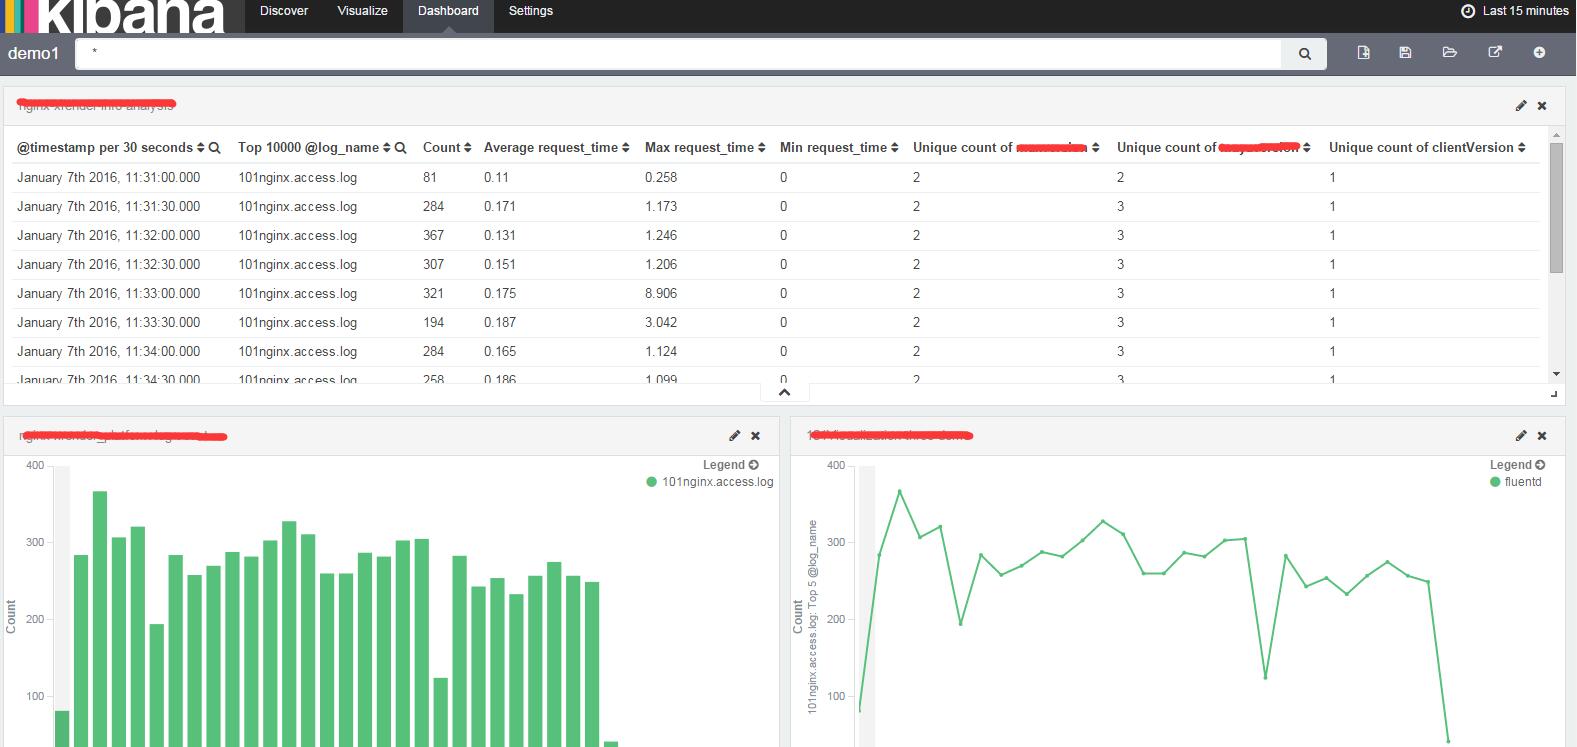
kibana demo dashboard:
本文只是敲门砖简单的引入,EFK的更多功能各位学习挖掘。