免费可商用素材网站/公司网站搭建流程
本文均属自己阅读源码的点滴总结,转账请注明出处谢谢。
欢迎和大家交流。qq:1037701636 email:gzzaigcn2012@gmail.com
Android源码版本Version:4.2.2; 硬件平台 全志A31
接着前面的BootAnimation的启动过程,可以看到内部会涉及很多OpenGL ES的相关操作,OpenGL ES通过之前创建的具备有SurfaceTexture等的Surface类,来操作远端的SF来完成相关的图像渲染。
这里主要涉及到ANativeWindow的2个核心回调函数,OpenGL ES在应用层的eglSwapBuffers就是调用了QueueBuffer和DequeueBuffer两个函数来完成的。
在介绍上面两个函数的实现时,有必要把BufferQueue这个类再提出来。他是由应用程序在客户端通过和服务端的Client交互,提交消息给SurfaceFlinger处理时创建的Layer对象时在SurfaceTextureLayer类构造中创建的:
BufferQueue中有一个成员变量BufferSlot mSlots[NUM_BUFFER_SLOTS];即一个BufferQueue实际上最大可以有32个Buffer,即一个应用程序申请的Surface在SF端的Layer可以有32个图像缓存区。而这32个图形缓存区都有上面的mSlots维护着,每个Buffer有以下几种可变的状态,由BufferState mBufferState维护:
分别是FREE,DEQUEUED,QUEUE,ACQUIRED这4个状态,分别是空闲,出列被填充数据,入列代表有了数据,最终将入列后有了图形数据的缓冲区进行渲染。
step1:先来看dequeueBuffer函数,可以理解为生产者,会用来申请Buffer并进行应用程序端的图像绘制。
int SurfaceTextureClient::dequeueBuffer(android_native_buffer_t** buffer,int* fenceFd) {ATRACE_CALL();ALOGV("SurfaceTextureClient::dequeueBuffer");Mutex::Autolock lock(mMutex);int buf = -1;int reqW = mReqWidth ? mReqWidth : mUserWidth;int reqH = mReqHeight ? mReqHeight : mUserHeight;sp<Fence> fence;status_t result = mSurfaceTexture->dequeueBuffer(&buf, fence, reqW, reqH,mReqFormat, mReqUsage);//调用远程的BnSurfaceTexture来完成BufferQueue的操作if (result < 0) {ALOGV("dequeueBuffer: ISurfaceTexture::dequeueBuffer(%d, %d, %d, %d)""failed: %d", mReqWidth, mReqHeight, mReqFormat, mReqUsage,result);return result;}sp<GraphicBuffer>& gbuf(mSlots[buf].buffer);//对应到客户端的mSlots中,buf为SF侧分配到的idif (result & ISurfaceTexture::RELEASE_ALL_BUFFERS) {freeAllBuffers();}if ((result & ISurfaceTexture::BUFFER_NEEDS_REALLOCATION) || gbuf == 0) {result = mSurfaceTexture->requestBuffer(buf, &gbuf);//返回的result是在重新分配后找到对应的缓冲区信息,需要进行requestif (result != NO_ERROR) {ALOGE("dequeueBuffer: ISurfaceTexture::requestBuffer failed: %d",result);return result;}}if (fence.get()) {*fenceFd = fence->dup();if (*fenceFd == -1) {ALOGE("dequeueBuffer: error duping fence: %d", errno);// dup() should never fail; something is badly wrong. Soldier on// and hope for the best; the worst that should happen is some// visible corruption that lasts until the next frame.}} else {*fenceFd = -1;}*buffer = gbuf.get();//GraphicBufferreturn OK;
}
上面函数的核心在于status_t result = mSurfaceTexture->dequeueBuffer(&buf, fence, reqW, reqH,mReqFormat, mReqUsage);那么这个应用层即所谓的客户端侧的mSurfaceTexture是什么呢?这个其实就是应用程序侧在创建了SurfaceControl后获得的,即所谓的BufferQueue的Binder匿名代理(继承了BnSurfaceTexture而已)BpSurfaceTexture。从而这样建立起来的Binder通信机制,使得在ANativeWindow将最终的Buffer处理都扔回给了之前由SurfaceFlinger创建的Layer,SurfaceTexture对象中去了。
step2:现在回到BufferQueue去吧,看看是如何做调用的。
通过BpSurfaceTexture来到BnSurfaceTexture,如下:
因为BufferQueue继承了BnSurfaceTexture后,故调用BufferQueue的成员函数queueBuffer,其实也就是SurfaceFlinger再操纵着这些个Buffer。
case DEQUEUE_BUFFER: {//图像缓冲区申请CHECK_INTERFACE(ISurfaceTexture, data, reply);uint32_t w = data.readInt32();uint32_t h = data.readInt32();uint32_t format = data.readInt32();uint32_t usage = data.readInt32();int buf;sp<Fence> fence;int result = dequeueBuffer(&buf, fence, w, h, format, usage);bool hasFence = fence.get() && fence->isValid();reply->writeInt32(buf);reply->writeInt32(hasFence);if (hasFence) {reply->write(*fence.get());}reply->writeInt32(result);return NO_ERROR;} break;
status_t BufferQueue::dequeueBuffer(int *outBuf, sp<Fence>& outFence,uint32_t w, uint32_t h, uint32_t format, uint32_t usage) {
{......{ // Scope for the lockMutex::Autolock lock(mMutex);if (format == 0) {format = mDefaultBufferFormat;}// turn on usage bits the consumer requestedusage |= mConsumerUsageBits;int found = -1;int dequeuedCount = 0;bool tryAgain = true;while (tryAgain) {if (mAbandoned) {ST_LOGE("dequeueBuffer: SurfaceTexture has been abandoned!");return NO_INIT;}const int maxBufferCount = getMaxBufferCountLocked();// Free up any buffers that are in slots beyond the max buffer// count.for (int i = maxBufferCount; i < NUM_BUFFER_SLOTS; i++) {//寻找所有的slotsassert(mSlots[i].mBufferState == BufferSlot::FREE);if (mSlots[i].mGraphicBuffer != NULL) {freeBufferLocked(i);returnFlags |= ISurfaceTexture::RELEASE_ALL_BUFFERS;}}// look for a free buffer to give to the clientfound = INVALID_BUFFER_SLOT;dequeuedCount = 0;for (int i = 0; i < maxBufferCount; i++) {const int state = mSlots[i].mBufferState;if (state == BufferSlot::DEQUEUED) {dequeuedCount++;//统计已经出列的buffer个数}if (state == BufferSlot::FREE) {/* We return the oldest of the free buffers to avoid* stalling the producer if possible.  This is because* the consumer may still have pending reads of the* buffers in flight.*/if ((found < 0) ||mSlots[i].mFrameNumber < mSlots[found].mFrameNumber) {found = i;//寻址free里面帧号最小的位置Slot}}}// clients are not allowed to dequeue more than one buffer// if they didn't set a buffer count.if (!mOverrideMaxBufferCount && dequeuedCount) {ST_LOGE("dequeueBuffer: can't dequeue multiple buffers without ""setting the buffer count");return -EINVAL;}// See whether a buffer has been queued since the last// setBufferCount so we know whether to perform the min undequeued// buffers check below.if (mBufferHasBeenQueued) {// make sure the client is not trying to dequeue more buffers// than allowed.const int newUndequeuedCount = maxBufferCount - (dequeuedCount+1);const int minUndequeuedCount = getMinUndequeuedBufferCountLocked();if (newUndequeuedCount < minUndequeuedCount) {ST_LOGE("dequeueBuffer: min undequeued buffer count (%d) ""exceeded (dequeued=%d undequeudCount=%d)",minUndequeuedCount, dequeuedCount,newUndequeuedCount);return -EBUSY;}}// If no buffer is found, wait for a buffer to be released or for// the max buffer count to change.tryAgain = found == INVALID_BUFFER_SLOT;if (tryAgain) {for (int i = 0; i < maxBufferCount; i++) {BQ_LOGD("#dequeueBuffer tryAgain buf:%d state:%d", i, mSlots[i].mBufferState);}mDequeueCondition.wait(mMutex);//等待有buffer的释放}}if (found == INVALID_BUFFER_SLOT) {// This should not happen.ST_LOGE("dequeueBuffer: no available buffer slots");return -EBUSY;}const int buf = found;*outBuf = found;//找到可以使用的buffer,记录到outBuf里面ATRACE_BUFFER_INDEX(buf);const bool useDefaultSize = !w && !h;if (useDefaultSize) {// use the default sizew = mDefaultWidth;h = mDefaultHeight;}// buffer is now in DEQUEUED (but can also be current at the same time,// if we're in synchronous mode)mSlots[buf].mBufferState = BufferSlot::DEQUEUED;const sp<GraphicBuffer>& buffer(mSlots[buf].mGraphicBuffer);if ((buffer == NULL) ||(uint32_t(buffer->width)  != w) ||(uint32_t(buffer->height) != h) ||(uint32_t(buffer->format) != format) ||((uint32_t(buffer->usage) & usage) != usage))//当前找到的slots中的buffer没有缓冲区或者相关属性不匹配则从新申请{mSlots[buf].mAcquireCalled = false;mSlots[buf].mGraphicBuffer = NULL;mSlots[buf].mRequestBufferCalled = false;mSlots[buf].mEglFence = EGL_NO_SYNC_KHR;mSlots[buf].mFence.clear();mSlots[buf].mEglDisplay = EGL_NO_DISPLAY;returnFlags |= ISurfaceTexture::BUFFER_NEEDS_REALLOCATION;//重新申请}dpy = mSlots[buf].mEglDisplay;eglFence = mSlots[buf].mEglFence;outFence = mSlots[buf].mFence;mSlots[buf].mEglFence = EGL_NO_SYNC_KHR;mSlots[buf].mFence.clear();}  // end lock scopeif (returnFlags & ISurfaceTexture::BUFFER_NEEDS_REALLOCATION) {status_t error;mGraphicBufferAlloc->acquireBufferReferenceSlot(*outBuf);sp<GraphicBuffer> graphicBuffer(mGraphicBufferAlloc->createGraphicBuffer(w, h, format, usage, &error));//重新请求SF端申请一个bufferif (graphicBuffer == 0) {ST_LOGE("dequeueBuffer: SurfaceComposer::createGraphicBuffer ""failed");return error;}{ // Scope for the lockMutex::Autolock lock(mMutex);if (mAbandoned) {ST_LOGE("dequeueBuffer: SurfaceTexture has been abandoned!");return NO_INIT;}mSlots[*outBuf].mGraphicBuffer = graphicBuffer;//申请的buffer加入到当前的mSlots的成员mGraphicBuffer中}}if (eglFence != EGL_NO_SYNC_KHR) {EGLint result = eglClientWaitSyncKHR(dpy, eglFence, 0, 1000000000);// If something goes wrong, log the error, but return the buffer without// synchronizing access to it.  It's too late at this point to abort the// dequeue operation.if (result == EGL_FALSE) {ST_LOGE("dequeueBuffer: error waiting for fence: %#x", eglGetError());} else if (result == EGL_TIMEOUT_EXPIRED_KHR) {ST_LOGE("dequeueBuffer: timeout waiting for fence");}eglDestroySyncKHR(dpy, eglFence);}BQ_LOGD("#dequeueBuffer: returning slot=%d buf=%p flags=%#x %p", *outBuf,mSlots[*outBuf].mGraphicBuffer->handle, returnFlags, this);return returnFlags;
}
DeQueueuffer的内容比较多,我们分以下几个Step来进行分析。
step1:清空超过最大需求的Buffer
// Free up any buffers that are in slots beyond the max buffer// count.for (int i = maxBufferCount; i < NUM_BUFFER_SLOTS; i++) {//寻找所有的slotsassert(mSlots[i].mBufferState == BufferSlot::FREE);if (mSlots[i].mGraphicBuffer != NULL) {freeBufferLocked(i);returnFlags |= ISurfaceTexture::RELEASE_ALL_BUFFERS;}}
这里假设maxBufferCount = 2,对其余的Buffer进行图形缓存区的清除。
step2:查找一个合格的Free了的Buffer
found = INVALID_BUFFER_SLOT;dequeuedCount = 0;for (int i = 0; i < maxBufferCount; i++) {const int state = mSlots[i].mBufferState;if (state == BufferSlot::DEQUEUED) {dequeuedCount++;//统计已经出列的buffer个数}if (state == BufferSlot::FREE) {/* We return the oldest of the free buffers to avoid* stalling the producer if possible. This is because* the consumer may still have pending reads of the* buffers in flight.*/if ((found < 0) ||mSlots[i].mFrameNumber < mSlots[found].mFrameNumber) {found = i;//寻址free里面帧号最小的位置Slot}}}这里可以看到只执行2次循环,因为只需要2个图形缓存区而已。这里找到FREE的BufferSlot后,还需要查看当前的buffer所属于的帧号,这里found最终被定义为帧号小的BufferSlot.
step3:找到对应的BufferSlot的索index后,赋值给返回的outbuf参数,并切换当前状态从FREE到DEQUEUED。
step4: 实际图形缓存区的分配和申请,是实际DEqueuebuffer的重点所在
mSlots[buf].mBufferState = BufferSlot::DEQUEUED;const sp<GraphicBuffer>& buffer(mSlots[buf].mGraphicBuffer);if ((buffer == NULL) ||(uint32_t(buffer->width) != w) ||(uint32_t(buffer->height) != h) ||(uint32_t(buffer->format) != format) ||((uint32_t(buffer->usage) & usage) != usage))//当前找到的slots中的buffer没有缓冲区或者相关属性不匹配则从新申请{mSlots[buf].mAcquireCalled = false;mSlots[buf].mGraphicBuffer = NULL;mSlots[buf].mRequestBufferCalled = false;mSlots[buf].mEglFence = EGL_NO_SYNC_KHR;mSlots[buf].mFence.clear();mSlots[buf].mEglDisplay = EGL_NO_DISPLAY;returnFlags |= ISurfaceTexture::BUFFER_NEEDS_REALLOCATION;//重新申请}dpy = mSlots[buf].mEglDisplay;eglFence = mSlots[buf].mEglFence;outFence = mSlots[buf].mFence;mSlots[buf].mEglFence = EGL_NO_SYNC_KHR;mSlots[buf].mFence.clear();} // end lock scopeif (returnFlags & ISurfaceTexture::BUFFER_NEEDS_REALLOCATION) {status_t error;mGraphicBufferAlloc->acquireBufferReferenceSlot(*outBuf);sp<GraphicBuffer> graphicBuffer(mGraphicBufferAlloc->createGraphicBuffer(w, h, format, usage, &error));//重新请求SF端申请一个bufferif (graphicBuffer == 0) {ST_LOGE("dequeueBuffer: SurfaceComposer::createGraphicBuffer ""failed");return error;}{ // Scope for the lockMutex::Autolock lock(mMutex);if (mAbandoned) {ST_LOGE("dequeueBuffer: SurfaceTexture has been abandoned!");return NO_INIT;}mSlots[*outBuf].mGraphicBuffer = graphicBuffer;//申请的buffer加入到当前的mSlots的成员mGraphicBuffer中}}
这里都是在对查找到的BufferSlot进行初始化操作,可以看到只要buffer(sp<GraphicBuffer> mGraphicBuffer;是一个图形缓存类),或者需要的图形缓存的大小、格式、使用形式等与当前的BufferSlot不一样就有必要重新分配图形缓存了。
step6:图形缓存申请的实现mGraphicBufferAlloc->createGraphicBuffer()
那么这个函数是如何实现的呢?回来看看BufferQueue当初创建的时候把,在BufferQueue的构造函数里面,有一个图形缓存区分配的成员对象,他最终是由SurfaceFlinger来实现的。
sp<ISurfaceComposer> composer(ComposerService::getComposerService());mGraphicBufferAlloc = composer->createGraphicBufferAlloc();//创建GraphicBuffer virtual sp<IGraphicBufferAlloc> createGraphicBufferAlloc(){uint32_t n;Parcel data, reply;data.writeInterfaceToken(ISurfaceComposer::getInterfaceDescriptor());remote()->transact(BnSurfaceComposer::CREATE_GRAPHIC_BUFFER_ALLOC, data, &reply);//return interface_cast<IGraphicBufferAlloc>(reply.readStrongBinder());//BpGraphicBufferAlloc}status_t BnSurfaceComposer::onTransact(//内部函数由继承类SF来完成uint32_t code, const Parcel& data, Parcel* reply, uint32_t flags)
{ case CREATE_GRAPHIC_BUFFER_ALLOC: {CHECK_INTERFACE(ISurfaceComposer, data, reply);sp<IBinder> b = createGraphicBufferAlloc()->asBinder();//创建图像缓存reply->writeStrongBinder(b);} break;sp<IGraphicBufferAlloc> SurfaceFlinger::createGraphicBufferAlloc()
{sp<GraphicBufferAlloc> gba(new GraphicBufferAlloc());//图形缓存的申请return gba;
}
在上述典型的Binder交互完成后,SF在服务端侧新建了一个图形缓存分配类对象后,将新建的gba写入Binder驱动,返回到客户端益BpBinder的形式存在
实际返回的是BpGraphicBufferAlloc的Binder代理,而
因此这里通过这个匿名的Binder代理,去请求BnGraphicBufferAlloc来完成
status_t BnGraphicBufferAlloc::onTransact(uint32_t code, const Parcel& data, Parcel* reply, uint32_t flags)
{case CREATE_GRAPHIC_BUFFER: {CHECK_INTERFACE(IGraphicBufferAlloc, data, reply);uint32_t w = data.readInt32();uint32_t h = data.readInt32();PixelFormat format = data.readInt32();uint32_t usage = data.readInt32();status_t error;sp<GraphicBuffer> result =createGraphicBuffer(w, h, format, usage, &error);reply->writeInt32(error);if (result != 0) {reply->write(*result);// We add a BufferReference to this parcel to make sure the// buffer stays alive until the GraphicBuffer object on// the other side has been created.// This is needed so that the buffer handle can be// registered before the buffer is destroyed on implementations// that do not use file-descriptors to track their buffers.reply->writeStrongBinder( new BufferReference(result) );}return NO_ERROR;} break;
....
}
而之前存入的匿名binder对就是上述SF新建的GraphicBufferAlloc gba;而该类也正好继承了BpGraphicBufferAlloc这个对象,故有GraphicBufferAlloc::createGraphicBuffer来实现:
sp<GraphicBuffer> GraphicBufferAlloc::createGraphicBuffer(uint32_t w, uint32_t h,PixelFormat format, uint32_t usage, status_t* error) {sp<GraphicBuffer> graphicBuffer(new GraphicBuffer(w, h, format, usage));status_t err = graphicBuffer->initCheck();*error = err;if (err != 0 || graphicBuffer->handle == 0) {if (err == NO_MEMORY) {GraphicBuffer::dumpAllocationsToSystemLog();}ALOGE("GraphicBufferAlloc::createGraphicBuffer(w=%d, h=%d) ""failed (%s), handle=%p",w, h, strerror(-err), graphicBuffer->handle);return 0;}return graphicBuffer;
}
这里看到了一个图像缓存类GraphicBuffer,在这里所谓的图像缓存创建就是构造了这个对象
class GraphicBuffer: public ANativeObjectBase<ANativeWindowBuffer,GraphicBuffer, LightRefBase<GraphicBuffer> >, public Flattenable
{
该类继承了本地窗口缓存ANativeWindowBuffer;
GraphicBuffer::GraphicBuffer(uint32_t w, uint32_t h, PixelFormat reqFormat, uint32_t reqUsage): BASE(), mOwner(ownData), mBufferMapper(GraphicBufferMapper::get()),mInitCheck(NO_ERROR), mIndex(-1)
{width  = height = stride = format = usage  = 0;handle = NULL;mInitCheck = initSize(w, h, reqFormat, reqUsage);//内部实现缓存的申请
}
GraphicBuffer有一个mBufferMapper对象,缓存的映射,看看他的初始化:
class GraphicBufferMapper : public Singleton<GraphicBufferMapper>
{
public:static inline GraphicBufferMapper& get() { return getInstance(); }status_t registerBuffer(buffer_handle_t handle);status_t unregisterBuffer(buffer_handle_t handle);status_t lock(buffer_handle_t handle,int usage, const Rect& bounds, void** vaddr);status_t unlock(buffer_handle_t handle);// dumps information about the mapping of this handlevoid dump(buffer_handle_t handle);status_t get_phy_addess(buffer_handle_t handle, void** vaddr);private:friend class Singleton<GraphicBufferMapper>;GraphicBufferMapper();gralloc_module_t const *mAllocMod;
};
这个的get()返回的是一个GraphicBufferMapper对象,且为单列模式。
step7: 该对象将来完成图形缓存的映射,也就是图形缓存区内存映射到应用程序。看她的构造函数:
GraphicBufferMapper::GraphicBufferMapper(): mAllocMod(0)
{hw_module_t const* module;int err = hw_get_module(GRALLOC_HARDWARE_MODULE_ID, &module);ALOGE_IF(err, "FATAL: can't find the %s module", GRALLOC_HARDWARE_MODULE_ID);if (err == 0) {mAllocMod = (gralloc_module_t const *)module;}
}
很清楚这个是获取FrameBuffer的HAL模块gralloc的handle到module中,重点来看构造函数里的initSize函数:
status_t GraphicBuffer::initSize(uint32_t w, uint32_t h, PixelFormat format,uint32_t reqUsage)
{GraphicBufferAllocator& allocator = GraphicBufferAllocator::get();status_t err = allocator.alloc(w, h, format, reqUsage, &handle, &stride);//图像缓冲区的分配if (err == NO_ERROR) {this->width  = w;this->height = h;this->format = format;this->usage  = reqUsage;}return err;
}
这里又出现了一个图形缓存分配器的类,类似于GraphicBufferMapper函数,来看他的构造过程:
GraphicBufferAllocator::GraphicBufferAllocator(): mAllocDev(0)
{hw_module_t const* module;int err = hw_get_module(GRALLOC_HARDWARE_MODULE_ID, &module);//调用HAL层ALOGE_IF(err, "FATAL: can't find the %s module", GRALLOC_HARDWARE_MODULE_ID);if (err == 0) {gralloc_open(module, &mAllocDev);//获得buffer分配模块mAllocDev,使用的是GPU这个模块ID}
}
这里是打开了HAL层的gralloc模块到mAllocDev中,调用alloc函数,看看他完成了什么?
status_t GraphicBufferAllocator::alloc(uint32_t w, uint32_t h, PixelFormat format,int usage, buffer_handle_t* handle, int32_t* stride)
{
......BufferLiberatorThread::maybeWaitForLiberation();err = mAllocDev->alloc(mAllocDev, w, h, format, usage, handle, stride);if (err != NO_ERROR) {ALOGW("WOW! gralloc alloc failed, waiting for pending frees!");BufferLiberatorThread::waitForLiberation();err = mAllocDev->alloc(mAllocDev, w, h, format, usage, handle, stride);}ALOGW_IF(err, "alloc(%u, %u, %d, %08x, ...) failed %d (%s)",w, h, format, usage, err, strerror(-err));if (err == NO_ERROR) {Mutex::Autolock _l(sLock);KeyedVector<buffer_handle_t, alloc_rec_t>& list(sAllocList);int bpp = bytesPerPixel(format);if (bpp < 0) {// probably a HAL custom format. in any case, we don't know// what its pixel size is.bpp = 0;}alloc_rec_t rec;rec.w = w;rec.h = h;rec.s = *stride;rec.format = format;rec.usage = usage;rec.size = h * stride[0] * bpp;list.add(*handle, rec);}return err;
}
这里是调用了Gralloc模块的alloc回调函数来完成对内存图形缓存区的申请。
step8:回到HAL层看看gralloc模块做了什么?
static int gralloc_alloc(alloc_device_t* dev,int w, int h, int format, int usage,buffer_handle_t* pHandle, int* pStride)
{if (!pHandle || !pStride)return -EINVAL;size_t size, stride;int align = 4;int bpp = 0;switch (format) {case HAL_PIXEL_FORMAT_RGBA_8888:case HAL_PIXEL_FORMAT_RGBX_8888:case HAL_PIXEL_FORMAT_BGRA_8888:bpp = 4;break;case HAL_PIXEL_FORMAT_RGB_888:bpp = 3;break;case HAL_PIXEL_FORMAT_RGB_565:case HAL_PIXEL_FORMAT_RGBA_5551:case HAL_PIXEL_FORMAT_RGBA_4444:case HAL_PIXEL_FORMAT_RAW_SENSOR:bpp = 2;break;default:return -EINVAL;}size_t bpr = (w*bpp + (align-1)) & ~(align-1);size = bpr * h;stride = bpr / bpp;int err;if (usage & GRALLOC_USAGE_HW_FB) {err = gralloc_alloc_framebuffer(dev, size, usage, pHandle);//分配系统缓存帧} else {err = gralloc_alloc_buffer(dev, size, usage, pHandle);//分配的是内存缓存}if (err < 0) {return err;}*pStride = stride;return 0;
}
这里看到usage有一种是硬件帧缓存,另一个是开辟单独的匿名内存块。当然数据直接写入FramerBuffer是最快的,但往往一个帧缓存是远远不够的,故而这里将还会创建匿名的pmem来作为图像缓冲区,但帧缓存只有一个。这里的buffer_handle_t *pHandle最终可以理解为是图形缓存在当前应用程序mmap后的用户空间地址。使得后续的图像渲染等直接对用户空间操作即可。
到这里我们返回到了SurfaceTextureClient::dequeueBuffer函数中去,完成mSurfaceTexture->dequeueBuffer函数返回后,可以看到如果当前的在服务端从新分配了图像缓存后ISurfaceTexture::BUFFER_NEEDS_REALLOCATION,将调用requestBuffer函数,来看看为何还要这么处理?
依旧是BpSurfaceTexture来处理
virtual status_t requestBuffer(int bufferIdx, sp<GraphicBuffer>* buf) {Parcel data, reply;data.writeInterfaceToken(ISurfaceTexture::getInterfaceDescriptor());data.writeInt32(bufferIdx);status_t result =remote()->transact(REQUEST_BUFFER, data, &reply);if (result != NO_ERROR) {return result;}bool nonNull = reply.readInt32();if (nonNull) {*buf = new GraphicBuffer();//应用程序侧也新建一个图形缓存reply.read(**buf);//buf生成}result = reply.readInt32();return result;}
对应在BnSurfaceTexture侧的响应如下:
status_t BnSurfaceTexture::onTransact(uint32_t code, const Parcel& data, Parcel* reply, uint32_t flags)
{switch(code) {case REQUEST_BUFFER: {CHECK_INTERFACE(ISurfaceTexture, data, reply);int bufferIdx   = data.readInt32();sp<GraphicBuffer> buffer;int result = requestBuffer(bufferIdx, &buffer);reply->writeInt32(buffer != 0);if (buffer != 0) {reply->write(*buffer);}reply->writeInt32(result);return NO_ERROR;} break;
通过客户端传递过来的数据,即一个buffer的索引id,在BufferQueue里调用requestBuffer函数
status_t BufferQueue::requestBuffer(int slot, sp<GraphicBuffer>* buf) {int maxBufferCount = getMaxBufferCountLocked();if (slot < 0 || maxBufferCount <= slot) {ST_LOGE("requestBuffer: slot index out of range [0, %d]: %d",maxBufferCount, slot);return BAD_VALUE;} else if (mSlots[slot].mBufferState != BufferSlot::DEQUEUED) {// XXX: I vaguely recall there was some reason this can be valid, but// for the life of me I can't recall under what circumstances that's// the case.ST_LOGE("requestBuffer: slot %d is not owned by the client (state=%d)",slot, mSlots[slot].mBufferState);return BAD_VALUE;}mSlots[slot].mRequestBufferCalled = true;*buf = mSlots[slot].mGraphicBuffer;return NO_ERROR;
}
上述函数通过这个buffer的索引值,找到对应的BufferSlot后,返回的是这个他维护着的服务端的sp<GraphicBuffer> mGraphicBuffer成员,这里有必要看下最终的 reply->write(*buffer);写入过程,他的实现如下:
status_t Parcel::write(const Flattenable& val)
{    err = val.flatten(buf, len, fds, fd_count);//对buffer进行写入调用,GraphicBuffer::flatten
.............
}
之所以哪呢过将这个buffer写入在于GraphicBuffer的特殊性,该类继承了一个Flattenable类,最终调用下面的函数
status_t GraphicBuffer::flatten(void* buffer, size_t size,//发送端打包int fds[], size_t count) const
{size_t sizeNeeded = GraphicBuffer::getFlattenedSize();if (size < sizeNeeded) return NO_MEMORY;size_t fdCountNeeded = GraphicBuffer::getFdCount();if (count < fdCountNeeded) return NO_MEMORY;int* buf = static_cast<int*>(buffer);buf[0] = 'GBFR';buf[1] = width;buf[2] = height;buf[3] = stride;buf[4] = format;buf[5] = usage;buf[6] = 0;buf[7] = 0;if (handle) {buf[6] = handle->numFds;buf[7] = handle->numInts;native_handle_t const* const h = handle;memcpy(fds,     h->data,             h->numFds*sizeof(int));memcpy(&buf[8], h->data + h->numFds, h->numInts*sizeof(int));}return NO_ERROR;
}
上述函数将GraphicBuffer的信息初始化到buf数组里面,最终数据都写入到reply中返回。
而同样在requestbuffer的客户端处,是对接收到的数据的解析,解析使用下面的过程实现:
BpSurfaceTexture(const sp<IBinder>& impl): BpInterface<ISurfaceTexture>(impl){}virtual status_t requestBuffer(int bufferIdx, sp<GraphicBuffer>* buf) {Parcel data, reply;data.writeInterfaceToken(ISurfaceTexture::getInterfaceDescriptor());data.writeInt32(bufferIdx);status_t result =remote()->transact(REQUEST_BUFFER, data, &reply);if (result != NO_ERROR) {return result;}bool nonNull = reply.readInt32();if (nonNull) {*buf = new GraphicBuffer();//应用程序侧也新建一个图形缓存reply.read(**buf);//buf生成}result = reply.readInt32();return result;}
首先是新建一个应用程序客户端侧的一个GraphicBuffer对象,然后利用服务端返回的reply信息填充并初始化GraphicBuffer
status_t Parcel::read(Flattenable& val) const
{// sizeif (err == NO_ERROR) {err = val.unflatten(buf, len, fds, fd_count);//解析出信息到buffer}
...
}
status_t GraphicBuffer::unflatten(void const* buffer, size_t size,int fds[], size_t count)//接收端解析
{if (size < 8*sizeof(int)) return NO_MEMORY;int const* buf = static_cast<int const*>(buffer);if (buf[0] != 'GBFR') return BAD_TYPE;const size_t numFds = buf[6];const size_t numInts = buf[7];const size_t sizeNeeded = (8 + numInts) * sizeof(int);if (size < sizeNeeded) return NO_MEMORY;size_t fdCountNeeded = 0;if (count < fdCountNeeded) return NO_MEMORY;if (handle) {// free previous handle if anyfree_handle();}if (numFds || numInts) {width = buf[1];height = buf[2];stride = buf[3];format = buf[4];usage = buf[5];native_handle* h = native_handle_create(numFds, numInts);//创建本地的图像缓存buffermemcpy(h->data, fds, numFds*sizeof(int));//文件描述符memcpy(h->data + numFds, &buf[8], numInts*sizeof(int));//数据handle = h;} else {width = height = stride = format = usage = 0;handle = NULL;}mOwner = ownHandle;if (handle != 0) {status_t err = mBufferMapper.registerBuffer(handle);//buffer注册,即将这个图像缓存mmap映射到当前的用户进程if (err != NO_ERROR) {ALOGE("unflatten: registerBuffer failed: %s (%d)",strerror(-err), err);return err;}}return NO_ERROR;
}在flatten和unflatten函数其实就是为了满足Binder数据的通信协议Parcel而设计的(用于传输对象变量),在unflatten函数中完成了对数据的解析后获得了一个handle,利用这个handle进行了registerBuffer的操作。
status_t GraphicBufferMapper::registerBuffer(buffer_handle_t handle)
{ATRACE_CALL();status_t err;err = mAllocMod->registerBuffer(mAllocMod, handle);//Client端可以将指定的内存区域映射到自己的进程空间ALOGW_IF(err, "registerBuffer(%p) failed %d (%s)",handle, err, strerror(-err));return err;
}
这里又回到了客户端侧的,的确这里很好奇的是在服务端侧也有过GraphicBuffer的存在,而客户端侧却还要创建一个GraphicBuffer,这个原因是什么呢?
来看看Gralloc模块对registerBuffer的实现吧:
int gralloc_register_buffer(gralloc_module_t const* module,buffer_handle_t handle)
{if (private_handle_t::validate(handle) < 0)return -EINVAL;// if this handle was created in this process, then we keep it as is.int err = 0;private_handle_t* hnd = (private_handle_t*)handle;if (hnd->pid != getpid()) {void *vaddr;err = gralloc_map(module, handle, &vaddr);}return err;
}
调用gralloc模块中的gralloc_map完成mmap的相关操作:
static int gralloc_map(gralloc_module_t const* module,buffer_handle_t handle,void** vaddr)
{private_handle_t* hnd = (private_handle_t*)handle;if (!(hnd->flags & private_handle_t::PRIV_FLAGS_FRAMEBUFFER)) {size_t size = hnd->size;void* mappedAddress = mmap(0, size,PROT_READ|PROT_WRITE, MAP_SHARED, hnd->fd, 0);//将匿名共享内存mmap到用户空间if (mappedAddress == MAP_FAILED) {ALOGE("Could not mmap %s", strerror(errno));return -errno;}hnd->base = intptr_t(mappedAddress) + hnd->offset;//ALOGD("gralloc_map() succeeded fd=%d, off=%d, size=%d, vaddr=%p",//        hnd->fd, hnd->offset, hnd->size, mappedAddress);}*vaddr = (void*)hnd->base;return 0;
}
这里的逻辑应该是handle维护着映射到用户空间的虚拟地址,hnd->base就包含了这个信息,而hnd->fd应该是一个内存设备的描述符。最终这里就通过这个handle将服务端申请并分配的图形内存缓冲区(无论是帧缓存还是匿名的ashmem)共享到客户端,两者都以GrallocBuffer对象的形式存在。
到此为止分析基于OpenGL ES的ANativeWindow和ANativeWindowBuffer的dequeueBuffer的分析基本完成了,下面以2个简易的流程图来进行总结,方便自己理解,图1是OpenGL ES所需要的在应用层的Surface创建的一个过程,如果图片看不清,可以下载地址SurfaceFlinger应用端创建surface的过程图:
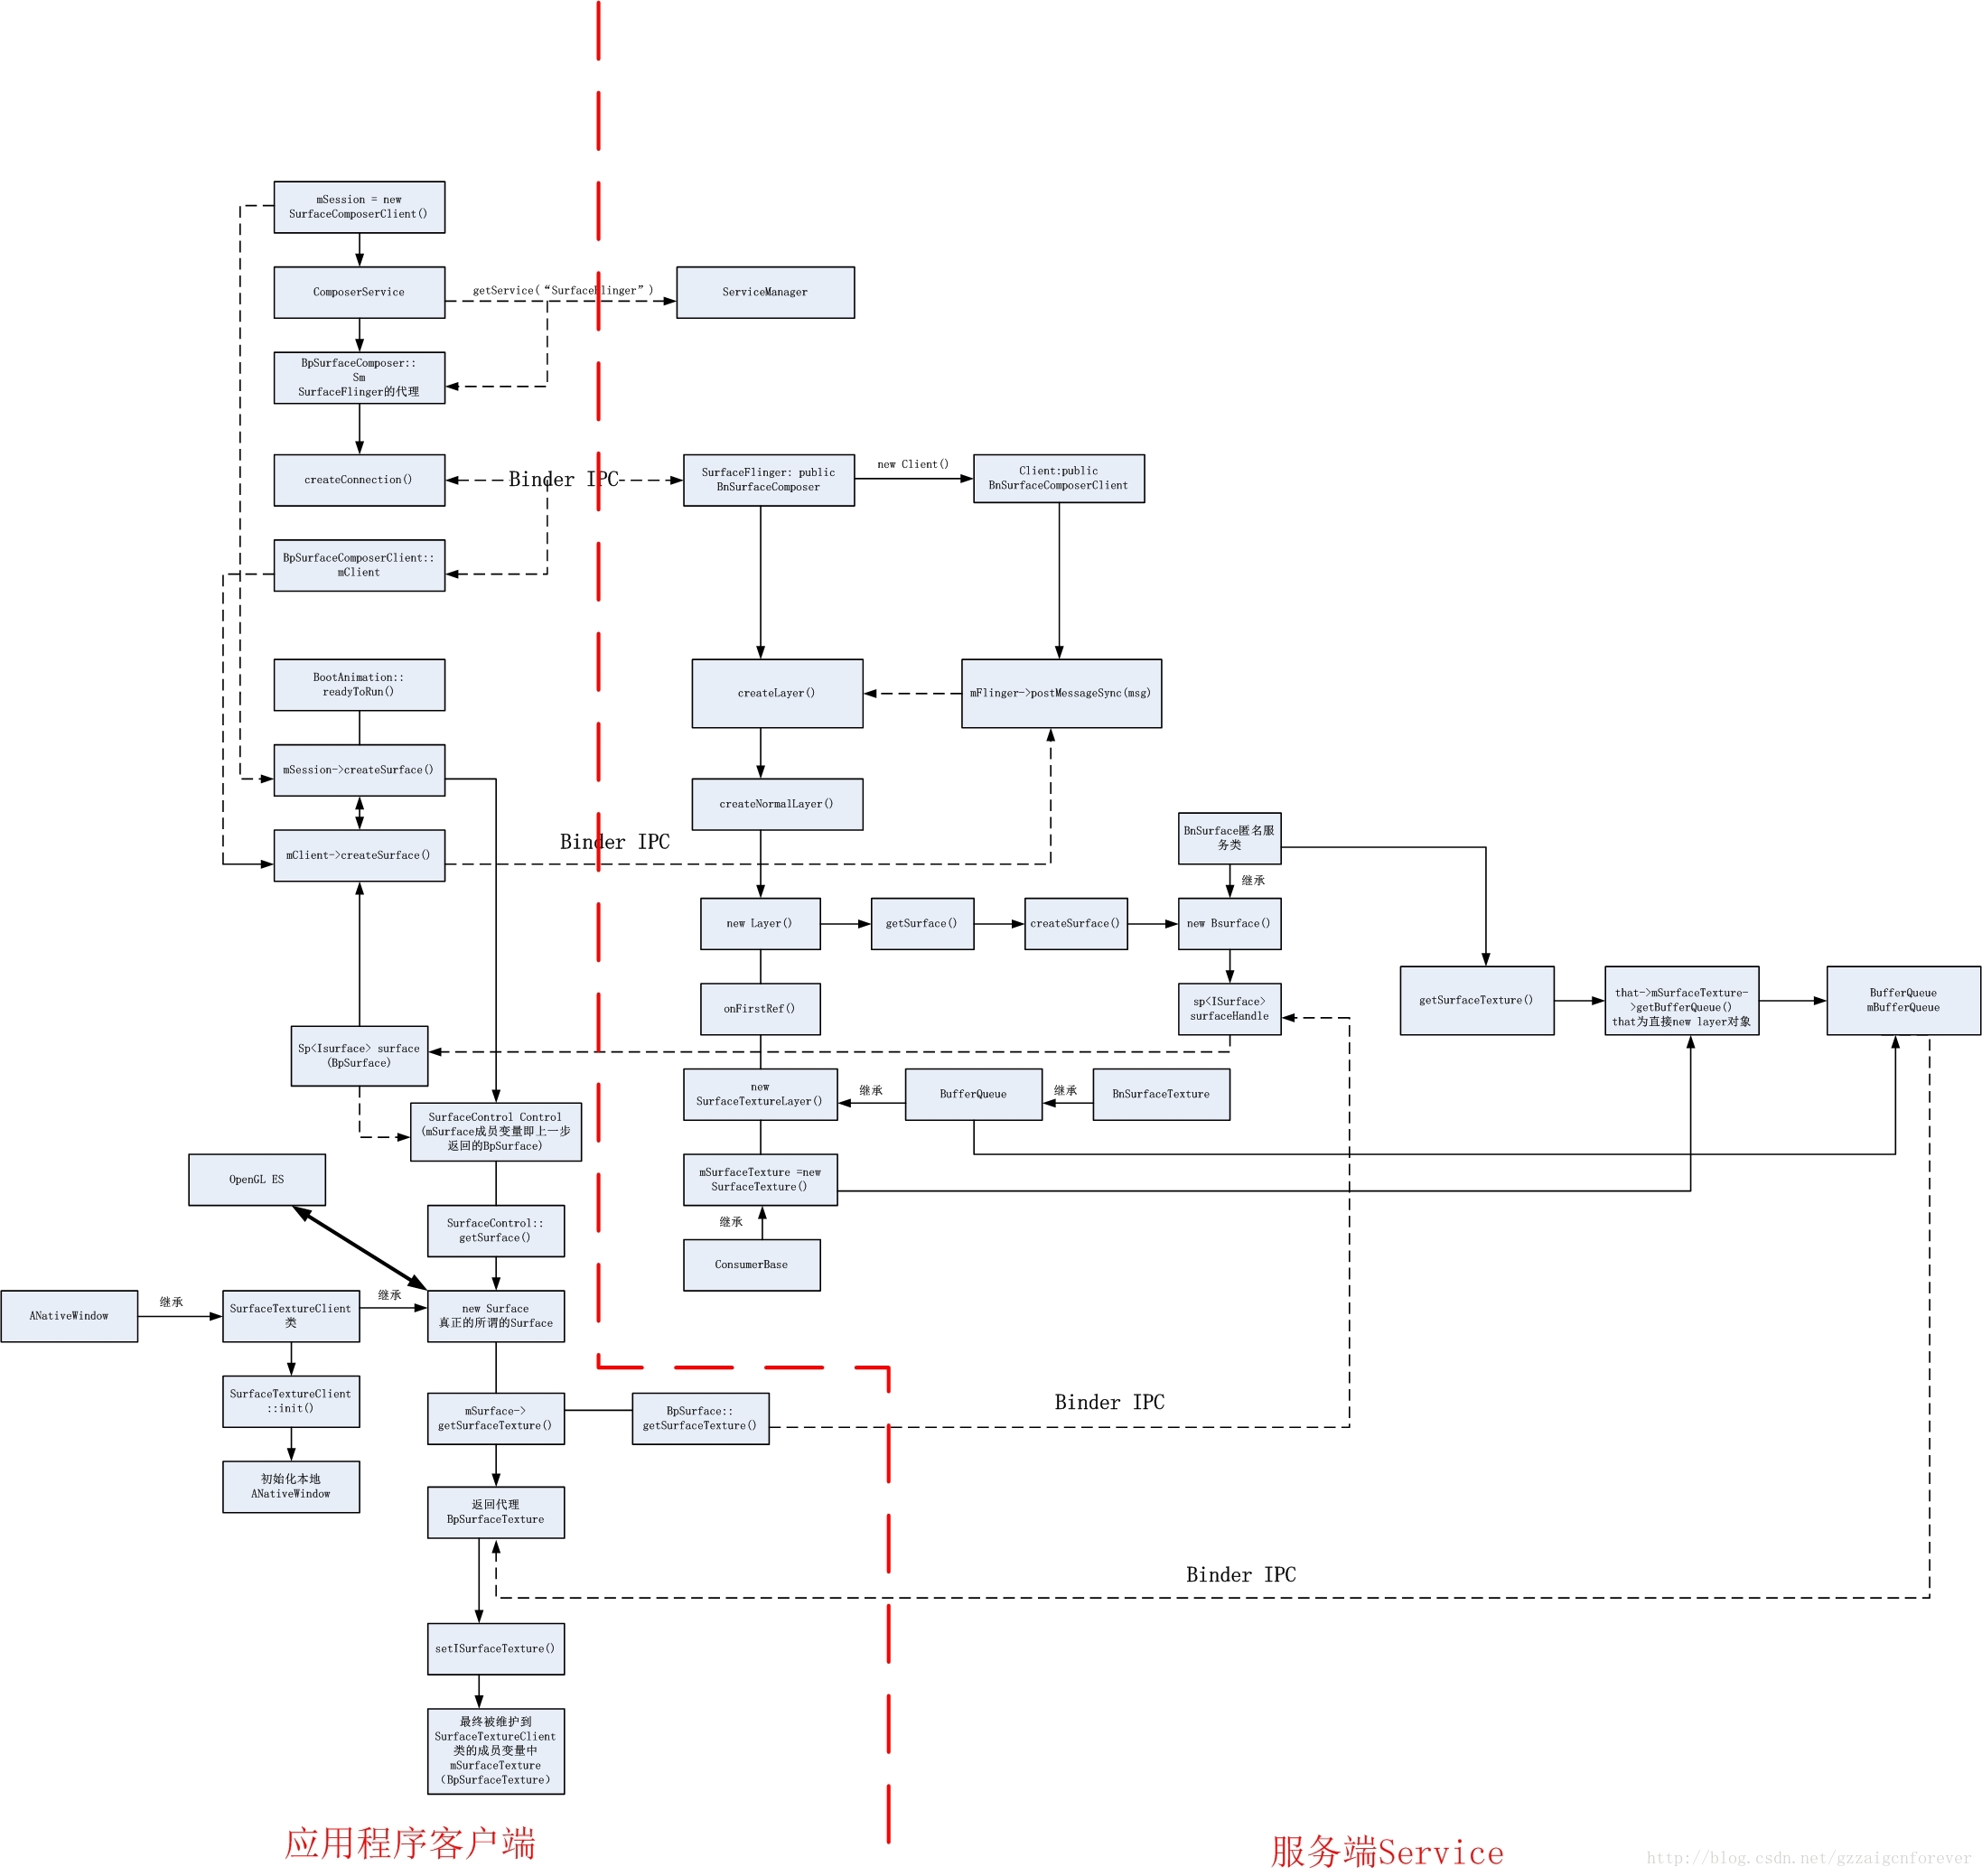
图2: 图形缓存GraphicBuffer的申请与分配图
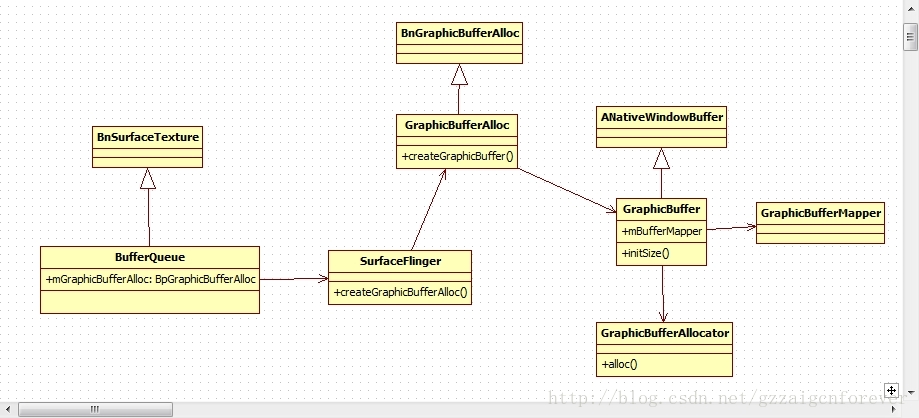
这里继续补充在应用程序侧和服务侧的GraphicBuffer,这两个图形缓存区的区别与联系:
1.在BufferQueue的构造函数中有mGraphicBufferAlloc = composer->createGraphicBufferAlloc(),显然是由SF进程来完成这个对象的创建的,故SF维护着mGraphicBufferAlloc这个匿名的本地Binder服务,并传递给BufferQueue维护。
2.BufferQueue中请求createGraphicBuffer时,还是有SF来完成,故缓存的实际创建还是有SF进程来完成的,由createGraphicBuffer里的new GraphicBuffer();在SF侧创建实际的图形缓存。
3.交给GraphicBufferAllocator来完成gralloc的图形缓存的申请并完成映射。分为gralloc_alloc_framebuffer和gralloc_alloc_buffer两种,前者是直接在帧缓存中分配出图像缓存,后者是直接申请一个匿名共享内存来做为图形缓存区。最终申请并完成映射到SF处的图像缓存以buffer_handle_t的类型维护着。
4.在服务端SF那里有了图像缓存后,应用端势必也需要有服务端图像缓冲区的信息,将实际的图像内存维护到应用侧的用户空间。这个过程是在requestBuffer来完成的:
实际是有GraphicBuffer来完成,其中GraphicBufferMapper来维护Gralloc模块的打开,以及gralloc_module_t回调registerBuffer。gralloc的registerBuffer实际就是用来用户空间注册缓存,而注册实际只是一个mmap的过程,映射到用户空间。
这样在内核中开辟的一个内存空间,在服务端被映射,在应用端也完成映射,故使得最终的操作都是同一块内存图形区域,建立了紧密的联系。