河南外贸网站建设/友情链接批量查询
- 异步的开启
- 异步的执行
- 异步的结束
- 异步的超时处理
- 异步的执行流程
文章目录
- 1.异步的开启
- 2.开启异步的流程
- 3.异步的运行
- 4.运行异步的流程
- 5.Complate(复合) 其他线程
1.异步的开启
public void testAsync(HttpServletRequest request, HttpServletResponse response) {try{AsyncContext context = request.startAsync();context.start(new Runnable(){@Overridepublic void run() {/*** Do you own logic here in business thread and set final result into response*///Complate asyn threadcontext.complete(); }});}catch(Exception ex){//Handle exception here }
}
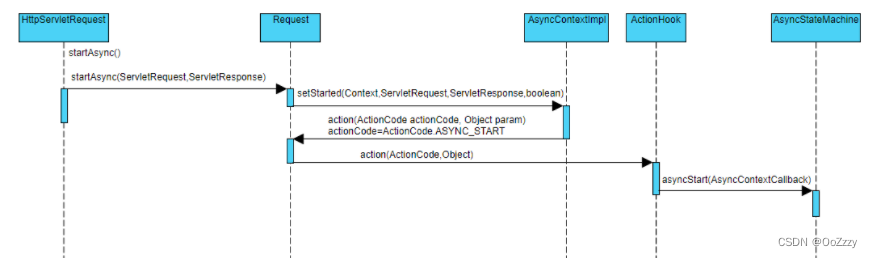
HttpServletRequest 的 startAsync() 方法开启了我们的异步调用。
2.开启异步的流程
-
异步调用的开启从
HttpServletRequest对象的startAsync()方法开始,最终到异步状态机AsyncStateMachine对象的asyncStart()方法。 -
开启异步并不会触发异步
listener的start事件,因为开启异步构造的上下文对象并没有设置 listener(可能 tomcat 异步实现者并没有考虑这个问题)。 -
异步调用的所有状态由 AsyncStateMachine 对象来保持维护,该类属于Http11Processor 对象,每个Http11Processor 对像关联处理一个底层 socket,通过这种方式来关联异步状态机和请求。
-
AsyncStateMachine 对象中异步的初始状态为 AsyncState.DISPATCHED,通过开启异步改变其状态为 AsyncState.STARTING。
HttpServletRequest startAsync() -> Request.setStarted() -> AsyncStateMachine.asyncStart()
HttpServletRequest startAsync()
protected long asyncTimeout = 30000
public AsyncContext startAsync(ServletRequest request,ServletResponse response) {if (!isAsyncSupported()) {IllegalStateException ise = new IllegalStateException(sm.getString("request.asyncNotSupported"));log.warn(sm.getString("coyoteRequest.noAsync",StringUtils.join(getNonAsyncClassNames())), ise);throw ise;}if (asyncContext == null) {asyncContext = new AsyncContextImpl(this);}asyncContext.setStarted(getContext(), request, response,request==getRequest() && response==getResponse().getResponse());asyncContext.setTimeout(getConnector().getAsyncTimeout());return asyncContext;
}
- 首先判断是否支持异步,不支持则抛异常
- 创建异步上下文对象,该上下文对象属于 HttpServletRequest 实例。
- 通过 getConnector().getAsyncTimeout() 来设置异步超时时间, 对于超时时间源码默认为 30 秒,所以如果我们的异步任务有可能大于 30 秒的时候要注意重新设置超时时间。
- 调用异步上下文对象的 setStarted() 方法来开启异步
setStarted()
public void setStarted(Context context, ServletRequest request, ServletResponse response, boolean originalRequestResponse) {synchronized (asyncContextLock) {this.request.getCoyoteRequest().action( ActionCode.ASYNC_START, this);this.context = context;context.incrementInProgressAsyncCount();this.servletRequest = request;this.servletResponse = response;this.hasOriginalRequestAndResponse = originalRequestResponse;this.event = new AsyncEvent(this, request, response);List<AsyncListenerWrapper> listenersCopy = new ArrayList<>();listenersCopy.addAll(listeners);listeners.clear();for (AsyncListenerWrapper listener : listenersCopy) {try {listener.fireOnStartAsync(event);} catch (Throwable t) {ExceptionUtils.handleThrowable(t);log.warn(sm.getString("asyncContextImpl.onStartAsyncError",listener.getClass().getName()), t);}}}
}
-
运行异步 listener 的 start 事件函数。
-
最终会调到 AsyncStateMachine 对象实例的 asyncStart() 方法。
private volatile AsyncState state = AsyncState.DISPATCHED;
synchronized void asyncStart(AsyncContextCallback asyncCtxt) {if (state == AsyncState.DISPATCHED) {generation.incrementAndGet();state = AsyncState.STARTING;this.asyncCtxt = asyncCtxt;lastAsyncStart = System.currentTimeMillis();} else {throw new IllegalStateException(sm.getString("asyncStateMachine.invalidAsyncState","asyncStart()", state));}
}
AsyncStateMachine 对象实例属于Http11Processor 类,该 processor 用来处理包装底层 socket 的 NioChannel 对象。所以异步请求的所有状态都通过 AsyncStateMachine 保存维护的。
AsyncStateMachine 对象中异步的初始状态为 AsyncState.DISPATCHED,通过开启异步改变其状态为 AsyncState.STARTING。
3.异步的运行
public void testAsync(HttpServletRequest request, HttpServletResponse response) {
try{AsyncContext context = request.startAsync();context.start(new Runnable(){@Overridepublic void run() {/*** Do you own logic here in business thread and set final result into response*///Complate asyn threadcontext.complete(); }});}catch(Exception e){//Handle exception here }
}
AsyncContext 对象的 start() 方法开启了我们的异步运行,该方法接受runnable 类型的对象,在异步线程中运行我们的逻辑。
4.运行异步的流程
AsyncContext.start()
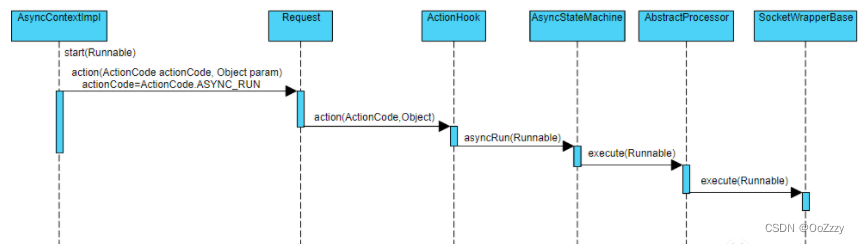
从 AsyncContext 的 star() 方法开始,一直调用到 SocketWrapperBase 对象实例的 execute() 方法,这里我们分析 execute() 核心方法:
public void execute(Runnable runnable) {Executor executor = endpoint.getExecutor();if (!endpoint.isRunning() || executor == null) {throw new RejectedExecutionException();}executor.execute(runnable);
}
- 上述方法首先通过 endpoint.getExecutor() 调用得到 tomcat 的 io 线程池。
- 将异步任务委托到 tomcat io 线程池中运行。
- 因为原生的Api中, 任务线程占用了IO线程, 所以为了使得Servlet请求的运行, 引入了线程池, 避免影响服务器吞吐率。
public void testAsync(HttpServletRequest request, HttpServletResponse response) {try{AsyncContext context = request.startAsync();ThreadPool pool = ThreadPool.getThreadPool();pool.execute(new Runnable(){@Overridepublic void run() {/*** Do you own logic here in business thread and set final result into response*///Complate asyn threadcontext.complete(); }});}catch(Exception ex){//Handle exception here }
}
AsyncContext.start() 方法会把异步任务交由 tomcat io 线程池运行,这样在大量启动异步任务的时候可能会过度占用 io 线程池,从而导致服务器吞吐率下降。所以一般建议引入业务线程池,根据场景设置好业务线程池的参数,把异步任务的执行,响应结果的设置,异步任务的结束等交由业务线程池运行。从而释放 io 线程池,避免降低吞吐率。
5.Complate(复合) 其他线程
当请求处理完成时,Web应用调用这个方法:把响应数据发送到浏览器。
这事不能由Web应用线程负责,即ctx.complete不能直接把响应数据发送到浏览器,因为这件事情应该由Tomcat线程处理。
连接器中的Endpoint组件检测到有请求数据达到时,会创建一个SocketProcessor对象交给线程池去处理,因此Endpoint的通信处理和具体请求处理在两个线程里运行。
在异步Servlet场景,Web应用通过调用ctx.complete方法时,也可生成一个新的SocketProcessor任务类,交给线程池处理。
对于异步Servlet请求来说,相应的Socket和协议处理组件Processor都被缓存起来了,并且这些对象都可以通过Request对象拿到。
public void complete() {//检查状态合法性,我们先忽略这句check();//调用Request对象的action方法,其实就是通知连接器,这个异步请求处理完了
request.getCoyoteRequest().action(ActionCode.ASYNC_COMPLETE, null);}case ASYNC_COMPLETE: {clearDispatches();if (asyncStateMachine.asyncComplete()) {processSocketEvent(SocketEvent.OPEN_READ, true);}break;
}protected void processSocketEvent(SocketEvent event, boolean dispatch) {SocketWrapperBase<?> socketWrapper = getSocketWrapper();if (socketWrapper != null) {socketWrapper.processSocket(event, dispatch);}
}public boolean processSocket(SocketWrapperBase<S> socketWrapper,SocketEvent event, boolean dispatch) {if (socketWrapper == null) {return false;}SocketProcessorBase<S> sc = processorCache.pop();if (sc == null) {sc = createSocketProcessor(socketWrapper, event);} else {sc.reset(socketWrapper, event);}// 线程池运行Executor executor = getExecutor();if (dispatch && executor != null) {executor.execute(sc);} else {sc.run();}
}
createSocketProcessor函数的第二个参数SocketEvent,这里传入OPEN_READ,控制SocketProcessor的行为,不需要再把请求发送到容器进行处理,只需要向浏览器端发送数据,并且重新在这个Socket上监听新的请求。