因为没有系统的学习过SpringBoot,在对照一个别人的SpringBoot项目,进行简单的搭建及使用。
1.首先创建SpringBoot项目之后,这里会有默认的启动类,基本不需要配置,在类的上边有注解,其中我使用到了有三个分别为
@SpringBootApplication
@ComponentScan(basePackages = {"stdu.rg.*"})
@MapperScan("stdu.rg.mapper")
第一个是创建默认生成的,第二个是扫描项目下的包,第三个是配置mybatis映射的。
2.其次就是导包,SpringBoot是在Maven项目的基础上,所以,所有的包可以通过pom.xml文件导入
<parent><groupId>org.springframework.boot</groupId><artifactId>spring-boot-starter-parent</artifactId><version>1.5.0.RELEASE</version><relativePath/> <!-- lookup parent from repository --></parent><properties><project.build.sourceEncoding>UTF-8</project.build.sourceEncoding><project.reporting.outputEncoding>UTF-8</project.reporting.outputEncoding><java.version>1.8</java.version></properties><dependencies><dependency><groupId>org.springframework.boot</groupId><artifactId>spring-boot-starter-jdbc</artifactId></dependency><dependency><groupId>org.springframework.boot</groupId><artifactId>spring-boot-starter-web</artifactId></dependency><dependency><groupId>org.mybatis.spring.boot</groupId><artifactId>mybatis-spring-boot-starter</artifactId><version>1.3.2</version></dependency><dependency><groupId>mysql</groupId><artifactId>mysql-connector-java</artifactId><version>5.1.10</version></dependency><dependency><groupId>org.springframework.boot</groupId><artifactId>spring-boot-starter-test</artifactId><scope>test</scope></dependency><!--druid链接池--><dependency><groupId>com.alibaba</groupId><artifactId>druid-spring-boot-starter</artifactId><version>1.1.0</version></dependency><!-- <dependency><groupId>org.springframework.boot</groupId><artifactId>spring-boot-starter-data-jpa</artifactId></dependency>--><!-- 辅助字符串处理类--><!-- https://mvnrepository.com/artifact/org.apache.commons/commons-lang3 --><dependency><groupId>org.apache.commons</groupId><artifactId>commons-lang3</artifactId><version>3.4</version></dependency><dependency><groupId>org.springframework.boot</groupId><artifactId>spring-boot-starter-thymeleaf</artifactId><version>1.0.2.RELEASE</version></dependency><!--html页面解析,配置主要用于放宽对html页面审查--><dependency><groupId>net.sourceforge.nekohtml</groupId><artifactId>nekohtml</artifactId><version>1.9.22</version></dependency><!-- 热部署--><dependency><groupId>org.springframework.boot</groupId><artifactId>spring-boot-devtools</artifactId><optional>true</optional></dependency><!--test--><!-- https://mvnrepository.com/artifact/junit/junit --><dependency><groupId>com.github.pagehelper</groupId><artifactId>pagehelper</artifactId><version>4.0.0</version></dependency><!-- https://mvnrepository.com/artifact/org.projectlombok/lombok --><dependency><groupId>org.projectlombok</groupId><artifactId>lombok</artifactId><version>1.16.18</version><scope>provided</scope></dependency><!--整合日志--><dependency><groupId>org.springframework.boot</groupId><artifactId>spring-boot-starter-logging</artifactId></dependency></dependencies><build><plugins><plugin><groupId>org.springframework.boot</groupId><artifactId>spring-boot-maven-plugin</artifactId></plugin><plugin><groupId>org.mybatis.generator</groupId><artifactId>mybatis-generator-maven-plugin</artifactId><version>1.3.2</version><configuration><configurationFile>${basedir}/src/main/resources/generator/generatorConfig.xml</configurationFile><overwrite>true</overwrite><verbose>true</verbose></configuration></plugin></plugins></build>
这些内容需要放在project标签内,与modelVersion,groupId等标签内容并列
3.配置文件
在main/resources文件目录下,有名为application的文件,在这个文件中配置了关于sql连接以及Mybatis的一些简单设置。
server:port: 8080
spring:datasource:name: testtype: com.alibaba.druid.pool.DruidDataSourcedruid:driver-class-name: com.mysql.jdbc.Driverurl: jdbc:mysql://127.0.0.1:3306/dataRetrospection    //数据库连接urlusername: root                       //连接用户名,密码password: root
thymeleaf:mode: LEGACYHTML5prefix: classpath:templates/suffix: .htmlhttp:multipart:max-file-size: 10Mbmax-request-size: 100Mbmvc:throw-exception-if-no-handler-found: truemybatis:mapper-locations: classpath:maper/*Mapper.xml    //Mybatis的映射文件所在路径,本质上就是sql语句type-aliases-package: stdu.rg.model              //实体类,相当于数据库的表
logging:level:com.example.mapper: debug
4.配置使用Mybatis
配置文件内容
<?xml version="1.0" encoding="UTF-8"?>
<!DOCTYPE generatorConfigurationPUBLIC "-//mybatis.org//DTD MyBatis Generator Configuration 1.0//EN""http://mybatis.org/dtd/mybatis-generator-config_1_0.dtd">
<generatorConfiguration><!-- 数据库驱动:选择你的本地硬盘上面的数据库驱动包--><classPathEntry location="H:\文件\例子\generatorSqlmapCustom\lib\mysql-connector-java-5.1.28-bin.jar"/><context id="DB2Tables" targetRuntime="MyBatis3"><commentGenerator><property name="suppressDate" value="true"/><property name="configLocation" value="maper/mybatis.xml"></property><!-- 是否去除自动生成的注释 true:是 : false:否 --><property name="suppressAllComments" value="true"/></commentGenerator><!--数据库链接URL,用户名、密码 --><jdbcConnection driverClass="com.mysql.jdbc.Driver"connectionURL="jdbc:mysql://127.0.0.1:3306/dataRetrospection" userId="root"password="root"></jdbcConnection><javaTypeResolver><property name="forceBigDecimals" value="false"/></javaTypeResolver><!-- 生成模型的包名和位置--><javaModelGenerator targetPackage="stdu.rg.model" targetProject="src/main/java"><property name="enableSubPackages" value="true"/><property name="trimStrings" value="true"/></javaModelGenerator><!-- 生成映射文件的包名和位置--><sqlMapGenerator targetPackage="maper" targetProject="src/main/resources"><property name="enableSubPackages" value="true"/></sqlMapGenerator><!-- 生成DAO的包名和位置--><javaClientGenerator type="XMLMAPPER" targetPackage="stdu.rg.mapper" targetProject="src/main/java"><property name="enableSubPackages" value="true"/></javaClientGenerator><!-- 要生成的表 tableName是数据库中的表名或视图名 domainObjectName是实体类名-->         <table tableName="equipment" domainObjectName="Equipment" enableCountByExample="false"enableUpdateByExample="false" enableDeleteByExample="false" enableSelectByExample="false"selectByExampleQueryId="false"></table></context>
</generatorConfiguration>
根据提前设置好的,将生成的不同文件放在不同的包下,并执行配置逆向工程方法
public void generator() throws Exception{List<String> warnings = new ArrayList<String>();boolean overwrite = true;//指定 逆向工程配置文件File configFile = new File("D:\\JavaWorkspace\\Ashijian\\DataRetrospection-1\\src\\main\\resources\\generator\\generatorConfig.xml"); //配置文件所在路径ConfigurationParser cp = new ConfigurationParser(warnings);Configuration config = cp.parseConfiguration(configFile);DefaultShellCallback callback = new DefaultShellCallback(overwrite);MyBatisGenerator myBatisGenerator = new MyBatisGenerator(config,callback, warnings);myBatisGenerator.generate(null);}
调用这个方法即可生成相应的类,文件目录如下
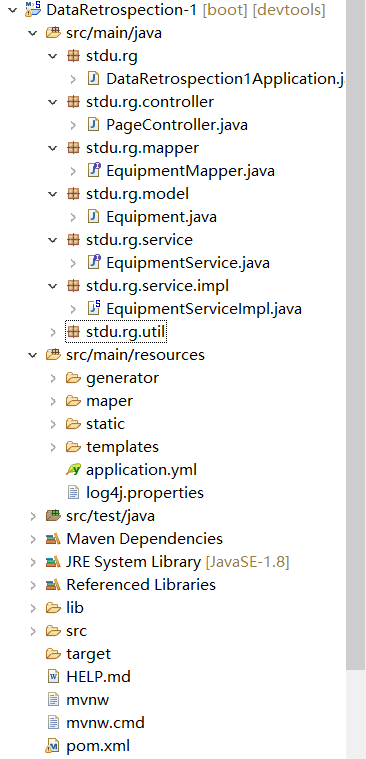
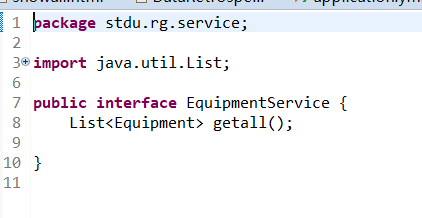
5.接口类,及注入
编写Service接口,用来对Model进行操作,
对接口进行实现 (注:类前边的Service的注解很重要),所调用的getall方法在xml文件中有对应id的sql语句
import java.util.List;import org.springframework.beans.factory.annotation.Autowired;
import org.springframework.stereotype.Service;import stdu.rg.mapper.EquipmentMapper;
import stdu.rg.model.Equipment;
import stdu.rg.service.EquipmentService;@Service("EquipmentService")
public class EquipmentServiceImpl implements EquipmentService{@Autowiredprivate EquipmentMapper equipmentMapper;@Overridepublic List<Equipment> getall() {// TODO Auto-generated method stubreturn equipmentMapper.getall();}}
这样基本的配置及数据库相关表格类已经生成完毕,下一步就是操作,将数据进行简单的展示,及页面跳转。
6.在resource下目录如下,static文件下是项目的css,js等文件,templates为html页面,maper是Mybatis的类似于sql语句文件。该文件夹的名字需要与application的配置相同。

6.这里使用的是ConllController类,控制层。
首先是页面跳转问题,<a href="#" th:href="@{/page/select}">查询</a>
由a标签设置路径,可查找page开头的,下面的方法为page之后的路径,return字符串即为目标页面的名字。
@Controller
@RequestMapping(value = {"/page"})
public class PageController {@Autowiredprivate EquipmentService equipmentService;@RequestMapping(value = {"index"})public String index() {return "index";}
}
同样的可以在方法内写其他方法,完成页面传值及处理。这里我使用的返回值类型为ModelAndView,addObject可以存放任何Object类,setviewname为目标页面名。
@RequestMapping(value = {"select"})public ModelAndView select() {List<Equipment> equipments=equipmentService.getall();for(int i=0;i<equipments.size();i++) {System.out.println(equipments.get(i).getId());}ModelAndView ma=new ModelAndView();ma.addObject("equipments",equipments);ma.setViewName("select"); return ma;} 7.页面接收及跳转问题完成,下一步就是展示,使用简单的table表格进行展示。
<table border="1"><tr  th:each="equipment : ${equipments}">  <td th:text="${equipment.id}">Onions</td>  <td th:text="${equipment.time}">Onions</td>  <td th:text="${equipment.lng}">Onions</td>  <td th:text="${equipment.lat}">Onions</td>  <td th:text="${equipment.type}">Onions</td> <td th:text="${equipment.varieties}">Onions</td> <td th:text="${equipment.price}">Onions</td>
<!--         <td> <a th:href="@{'/page/delete?username='+${user.username}}">删除</a></td>   --></tr></table>
这是循环遍历list并取出其中内容展示简单代码。
8.这些过程全部完成之后就可以启动创建项目时的启动类,访问页面localhost:8080/page/index
遇到的问题:
1.逆向工程配置使用的jar包为
2.这些jar包与pom配置的包有冲突,所以执行完逆向工程需要将这jar包移出去,如果不移除,启动类是无法正常运行的。具体原因是因为包版本问题。缺少一些方法。
3.有些文件夹命名一定要与标准相同,否则容易出错。
4.包名与配置文件的要相对应。
以上是这次配置全部过程。本质上对其运行原理还是有些不理解,只是对照一个项目搭建的,下一步还是需要进一步了解其内容。