橙云网站建设/跨境电商seo是什么意思
前言
今天是学习react的第三天啦,我的第一个小目标是将平时使用的todo清单软件通过react在web端一比一的实现所有功能!
建议拉取项目代码搭配食用效果更佳 react-todo gitee仓库
前面写的文章都会放在前言中:
📦代码仓库链接 react-todo gitee仓库
💻在线预览效果 react-todo 开发进度
# 👀从零开始学React第一天~React基础框架的构建(Create React App+Tailwind css+Material ui)
# 👀从零开始学React第二天~React配置Eslint+路由导航的实现(react-router-dom)
开发任务
今天的任务是:
将昨天开发左侧菜单栏抽离成单独的组件,如下图
实现Day Todo功能模块中的一个顶部栏日期的功能,如下图


开发
在今天的开发开始前我根据官方文档又新增了一个 eslint plugin eslint-plugin-react-hooks
我们先执行命令安装一下
yarn add eslint-plugin-react-hooks --save-dev
然后在 .eslintrc.js 中声明一下插件,目前完整的配置如下
module.exports = {root: true,env: {browser: true,es2021: true,},extends: ["eslint:recommended", "plugin:react/recommended"],parserOptions: {ecmaFeatures: {jsx: true,},ecmaVersion: 2018,sourceType: "module",},plugins: ["react", "react-hooks"],rules: {semi: [2, "never"],"react-hooks/rules-of-hooks": "error", // 检查 Hook 的规则"react-hooks/exhaustive-deps": "warn", // 检查 effect 的依赖},
}
eslint-plugin-react-hooks 具体的规则如下:
只在 React 函数中调用 Hook
不要在普通的 JavaScript 函数中调用 Hook。 你可以:
- ✅ 在 React 的函数组件中调用 Hook
- ✅ 在自定义 Hook 中调用其他 Hook
抽离LeftNav组件
我们在Layout目录下新建一个 LeftNav 组件,并将左侧栏的相关代码抽离出来.
// /layout/LeftNav.jsx
import React from "react"
import PropTypes from "prop-types"
import { Link } from "react-router-dom"
import { List, ListItem, ListItemButton, ListItemIcon } from "@mui/material"
import WbSunnyOutlinedIcon from "@mui/icons-material/WbSunnyOutlined"
import CalendarTodayOutlinedIcon from "@mui/icons-material/CalendarTodayOutlined"
import CalendarViewMonthOutlinedIcon from "@mui/icons-material/CalendarViewMonthOutlined"
import InboxOutlinedIcon from "@mui/icons-material/InboxOutlined"
import SearchOutlinedIcon from "@mui/icons-material/SearchOutlined"
import ListAltOutlinedIcon from "@mui/icons-material/ListAltOutlined"LeftNav.propTypes = {active: PropTypes.string,changeActive: PropTypes.func,
}export default function LeftNav(props) {const { active, changeActive } = propsconst data = [{ icon: <WbSunnyOutlinedIcon />, label: "Day Todo", path: "dayTodo" },{icon: <CalendarTodayOutlinedIcon />,label: "最近待办",path: "recentlyTodo",},{icon: <CalendarViewMonthOutlinedIcon />,label: "日期概览",path: "dateOverview",},{ icon: <InboxOutlinedIcon />, label: "待办箱", path: "todyBox" },{ icon: <SearchOutlinedIcon />, label: "搜索", path: "search" },{ icon: <ListAltOutlinedIcon />, label: "数据复盘", path: "dataReview" },]return (<List>{data.map((item) => {return (<Link to={item.path} key={item.path}><ListItemdisablePaddingclassName={item.path === active ? "bg-gray-200" : ""}onClick={() => changeActive(item.path)}><ListItemButton><ListItemIcon>{item.icon}</ListItemIcon><span className="text-sm">{item.label}</span></ListItemButton></ListItem></Link>)})}</List>)
}
而原本的页面就变得更加清爽了,我将hook定义的 active和setAcitve 这两个变量改为了在页面中定义,然后以组件参数的形式传入 LeftNav。
由于使用了eslint还得声明一下组件的prop类型,根据官方文档的操作使用了 PropTypes 类型验证器。
下面是抽离组件后页面的代码:
// layout/index.jsx
import React, { useState } from "react"
import routes from "../routes"
import { Route, Routes } from "react-router-dom"
import { Button, Card } from "@mui/material"
import LeftNav from "./LeftNav"export default function Layout() {const [active, setActive] = useState("dayTodo")return (<div className="w-screen h-screen flex items-center justify-center"><Card variant="outlined" className="w-2/3 h-3/4 shadow-lg bg-white flex"><div className="w-1/5 bg-gray-50"><div className=" flex items-center justify-center p-5"><Button variant="contained">这是一个按钮</Button></div><LeftNavactive={active}changeActive={(active) => setActive(active)}/></div><div className=" w-4/5"><Routes>{routes.map((item) => {return (<Routeindex={item.path === active}key={item.path}exactpath={item.path}element={item.component()}></Route>)})}</Routes></div></Card></div>)
}
实现顶部栏日期
我们先分析一下需求:
- 默认是显示本周的七个日期,并且今天的日期会亮起
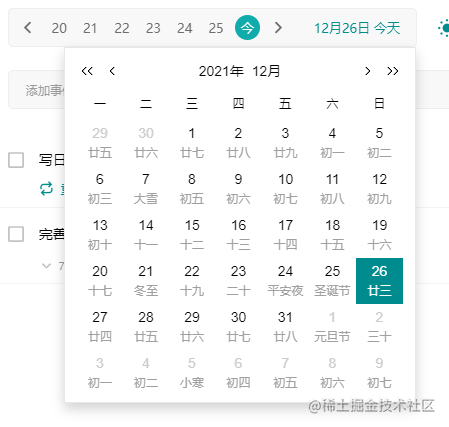
- 右侧是具体的时间,如果我们选择其他日期,激活亮起的日期和右侧的具体时间也会随之改变。如果点击右侧具体时间会弹出一个完整日历
- 点击太阳图标可以回到今天的日期
- 点击左右分别代表切换到上周或者下周的日期
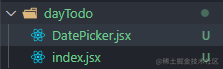
首先我们在DayTodo目录下新建一个 DatePicker 组件,用于将我们这个顶部的日期选择栏单独编写成一个组件,然后在页面中引用。
引入Day.js
经过上面的需求分析,我们需要获取的数据是 今天的日期 和 每周的七个日期 ,这种频繁涉及到时间处理的操作我会选择使用 Day.js 这个js库。
Day.js是一个极简的JavaScript库,可以为现代浏览器解析、验证、操作和显示日期和时间。
Day.js官方文档链接
首先我们安装一下这个库
yarn add dayjs
然后我们在DatePicker 组件引入,代码如下:
// dayTodo/DatePick.jsx
import React from 'react';
import dayjs from 'dayjs';
import isoWeek from 'dayjs/plugin/isoWeek'
dayjs.extend(isoWeek)
export default function DatePicker(){const today = dayjs().date()const thisWeek = Array.from({length:7}).map((item,index)=>{return dayjs().isoWeekday(index + 1).date()})console.log(today,thisWeek)return (<div></div>)
}
在上面的代码中我引入了dayjs,然后定义了两个变量
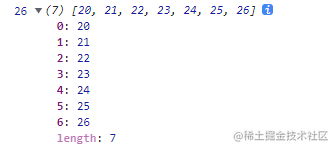
today:今天的日期,例如26号
thisWeek:本周的七个日期组成的数组
我使用了 Array.from({length:7}) 这样一个方法快速创建了长度为七的数组,再使用map遍历,通过dayjs的isoWeek() 方法传入遍历的索引再通过 date() 方法获取日期就实现了功能
获取或设置ISO day of the week (opens new window),其中1为星期一,7为星期日。
我们将两个变量打印出来,看看是不是我们所需要的数据,控制台输出结果如下:
完善页面
然后我们接着完善页面和数据,最终完成的组件代码如下:
// dayTodo/DatePick.jsx
import React, { useState } from "react"
import { IconButton, Button } from "@mui/material"
import ArrowBackIosNewOutlinedIcon from "@mui/icons-material/ArrowBackIosNewOutlined"
import ArrowForwardIosOutlinedIcon from "@mui/icons-material/ArrowForwardIosOutlined"import dayjs from "dayjs"
import isoWeek from "dayjs/plugin/isoWeek"
import isToday from "dayjs/plugin/isToday"
import localeData from "dayjs/plugin/localeData"
import "dayjs/locale/zh-cn"
dayjs.locale("zh-cn")
dayjs.extend(isoWeek)
dayjs.extend(isToday)
dayjs.extend(localeData)export default function DatePicker() {// 当前选中的日期const [activeDate, setDate] = useState(dayjs())// 判断是否为选择的日期const isActive = (item) => item.date() === activeDate.date()// 本周七天的日期对象数组const thisWeek = Array.from({ length: 7 }).map((item, index) => {return dayjs().isoWeekday(index + 1)})return (<div className=" p-5"><div className="inline-flex rounded-md bg-gray-100 p-1 items-center ">{/* 上翻按钮 */}<IconButton size="small"><ArrowBackIosNewOutlinedIcon fontSize="12px" /></IconButton>{/* 七天日期 */}{thisWeek.map((item) => {return (<divclassName={`flex items-center justify-center cursor-pointer w-7 h-7 rounded-full mx-1 ${item.date() === activeDate.date()? "bg-primary": item.isToday()? "bg-gray-200": "hover:bg-gray-200"}`}key={item}size="small"onClick={() => {setDate(item)}}><span className="text-sm">{item.isToday() ? "今" : item.date()}</span></div>)})}{/* 下翻按钮 */}<IconButton size="small"><ArrowForwardIosOutlinedIcon fontSize="12px" /></IconButton>{/* 当前选中日期对应星期几 */}<Button variant="text">{`${activeDate.month() + 1}月${activeDate.date()}日 ${activeDate.isToday()? "今天": activeDate.localeData().weekdays(dayjs(activeDate))}`}</Button></div></div>)
}
实现的效果如下图:

最终实现这个代码还是花了不少时间的,主要都是在翻看Dayjs的文档,下面解析一下一些比较复杂的点:
样式方面主要的难点在于 判断当前选中的时间 和 判断选择的是否为今天,我分别使用的dayjs提供的方法 isToday 和自己定义的一个方法
显示当前选中的时间是中文的星期几使用的是dayjs的一个本地化的功能,先加载中文包,然后基于当前选中的时间来获取。
目前还剩下 上下周切换 和一个 回到今天的小太阳按钮 就完成了这个时间选择栏啦。
目前这个组件也是耦合了很多代码,事实上跟日期相关的数据在后面肯定是很多组件需要使用到的,并且dayjs引入的插件和语言也是应该抽离的。我想等到我引入一个全局状态管理库的时候再统一抽离出去。到时再研究一下redux如何使用和封装,基本上页面和临时的数据就可以顺利走通啦~
总结
今天写的组件使用到的样式比较多,事实上我原本想引入一个 css-in-js 的库来学习一下新思想的,但是看了文档后最终没有选择引入,因为还不是非常有必要。
在样式比较多的地方可以显著感觉到vue与react的不同。在写vue的时候总是担心 tailwindcss 提供的样式太长了,是否需要单独抽离到style中去写。
但是在react中直接没有顾虑,基本全部样式都耦合在jsx中了,目前还没有涉及到修改组件原生样式的功能,我还不知道如果react要写 style 的话怎么样才是比较优雅的方法,后面慢慢摸索一下~
但睡了个午觉醒来还是打开了掘金(大概我还是喜欢那种能帮助到别人的感觉吧),衷心希望我的开发思路或者踩坑过程可以帮到大家!