著名网站织梦/搜索广告排名
简介
本文是《Qml组件化编程》系列文章的第一篇,涛哥将教大家,如何在Qml中实现各种功能的按钮,
同时也会教大家一些组件化编程的思想,如何将做好的功能封装成一个个组件,以便在工程中复用。
写作背景
作者“武威的涛哥”,从2015年开始参加工作,便入手了Qml,参与了很多大大小小
的Qml项目,至今已有四年多实战经验。
2019年,涛哥决定把自己掌握的很多知识都总结整理出来,以《Qml组件化编程》系列
文章的形式分享给广大Qml爱好者和开发者。
文章主要发布在涛哥的博客 和 知乎专栏-涛哥的Qt进阶之路。
涛哥会坚持高质量和深入浅出的原则,将文章写好,让支持涛哥的读者能够受益匪浅。
系列文章中涉及的源代码,绝大部分涛哥都会在github上开源。
如果觉得涛哥写的还不错,还请为涛哥打个赏,您的赞赏是涛哥持续创作的源泉。
有时也难免会犯一些错误,希望看到的读者能够热心指出。有任何相关的问题,也欢迎与涛
哥交流,向涛哥提出建议和意见。
感谢大家!
文章定位
涛哥写的是进阶教程,教大家如何从新手成长为高手,要理解文章中的内容,需要
有一点儿Qml基础。关于基础教程,网络上有很多,涛哥推荐以下几个质量比较高的:
- QmlBook
- QmlBook中文翻译
- 豆子的系列文章《Qt学习之路》 76章开始 《Qt学习之路》
豆子的文章前75章关于Widget部分也很不错。
- 还有一本安晓辉的书《QtQuick核心编程》
我眼中的QQuick
QQuick使用Qml来描述界面,Qml是可以与html5媲美的存在,其开发效率、舒适度、
描述能力和定制化能力已经远远超过了QWidget,配合各种属性动画、粒子系统和Effects
特效可以轻易做出各种酷炫、现代化的UI,不规则的图形可以通过Painter的方式实现,
对于渲染有性能要求的地方可以通过集成OpenGL、Vulkan等图形API的方式来处理。
Qml的特性是自由和灵活,这也是它的缺点,上手Qml需要一小段时间的适应,之后就会
大量的造轮子,造的多了就轻车熟路了,常见的各种二维界面或效果基本上都能造出来。
(当然Qml中也有些bug,需要一定的经验和技巧才能解决。话说回来,哪个框架没点Bug呢?)
再久一点,可以考虑考虑Qml中的设计模式(或者叫惯用手法),如何抽象出通用Qml库、
如何最大程度地复用Qml代码、如何让Qml代码更容易维护等。
Qt版本的选择
Qt发布的版本有很多,一般稳妥的做法是使用LTS(长期支持版)版本的最后一个修正版本。
当前已知的LTS最新修正版本是5.9.8和5.12.3 , 涛哥会优先使用这两个版本,后续有版本
要求的地方,涛哥都会进行额外的说明。
默认按钮
开始进入正题了
Qml中已经有了现成的按钮,在QtQuick.Controls模块中, 目前有两个版本:
- QtQuick.Controls 1.x
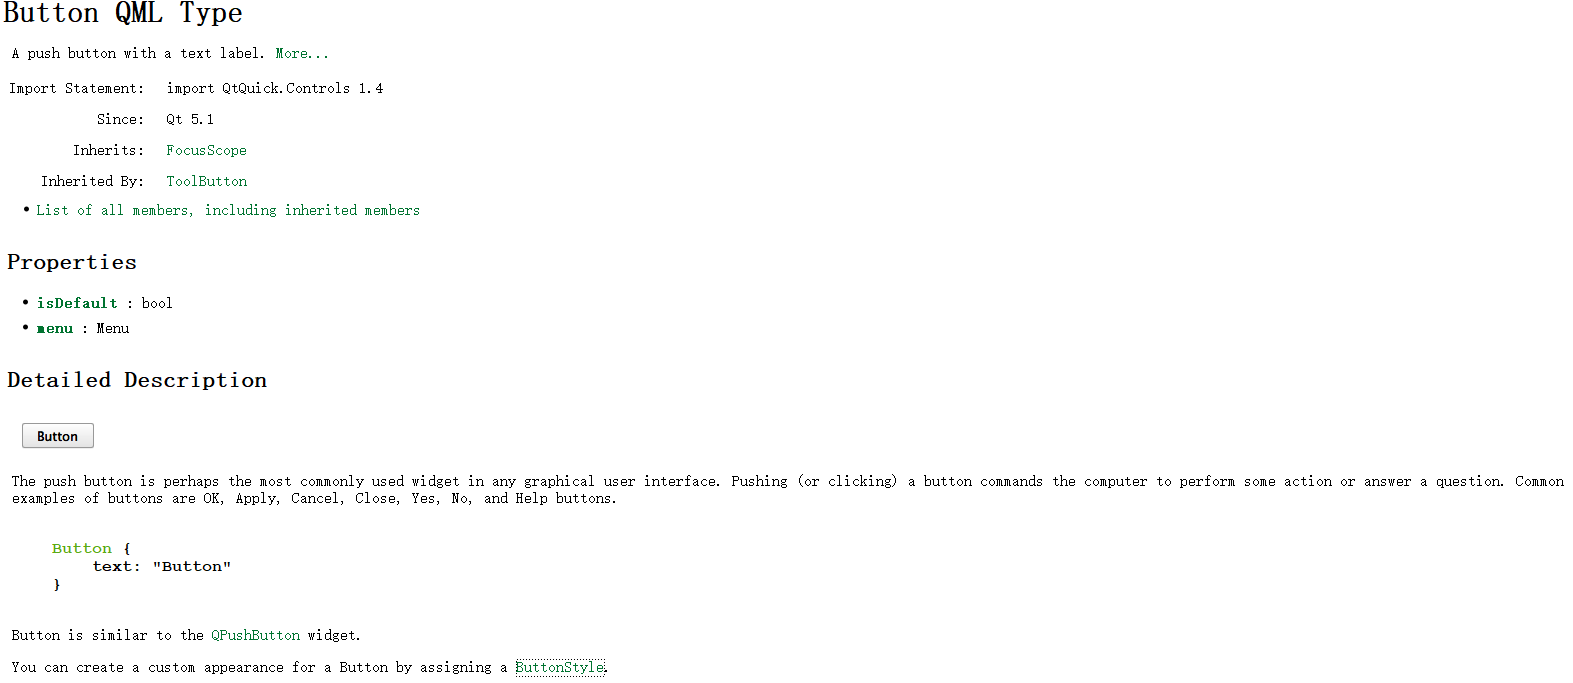
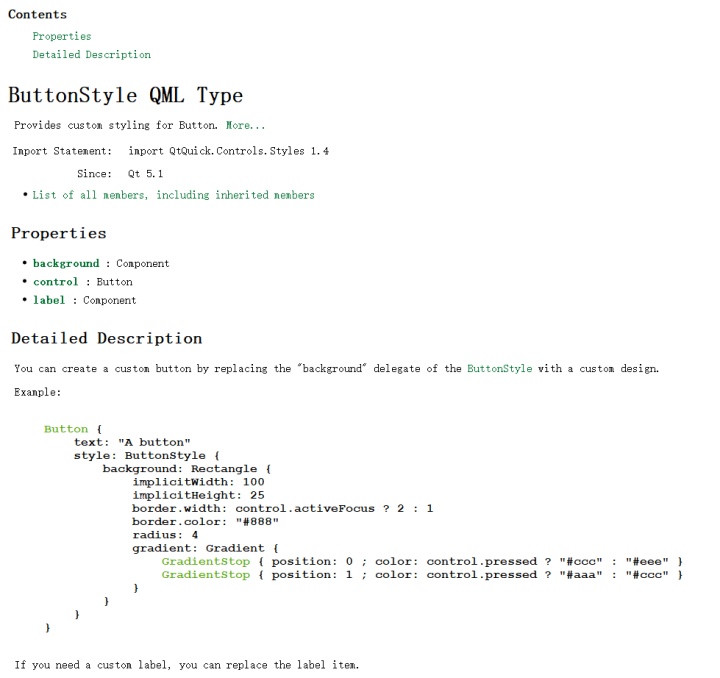
1.x的版本是通过style的方式进行定制
- QtQuick.Controls 2.x
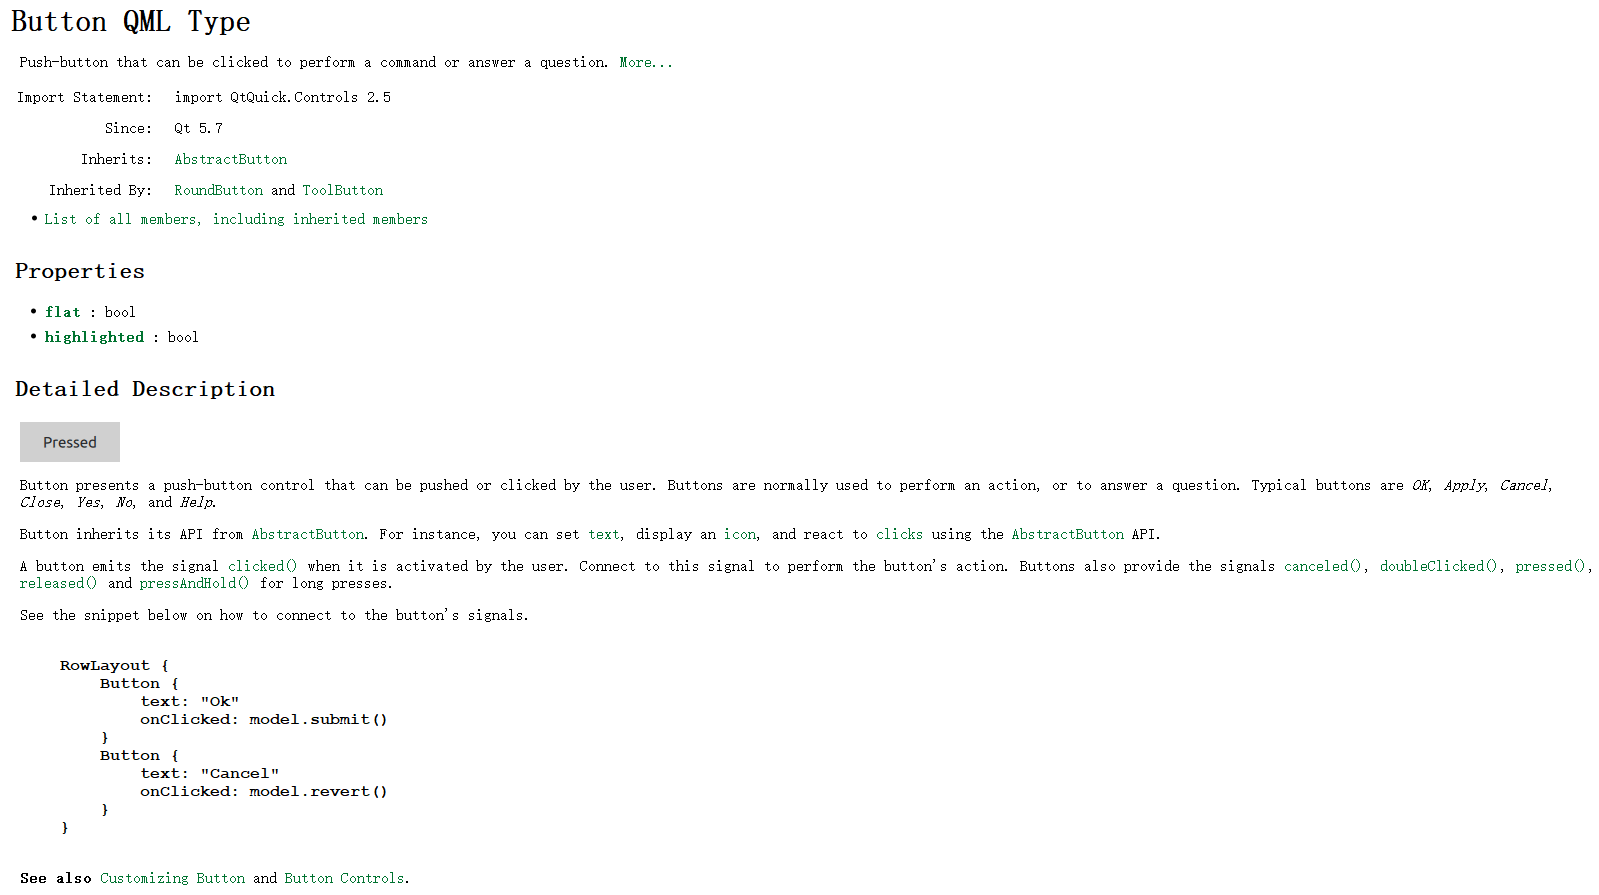
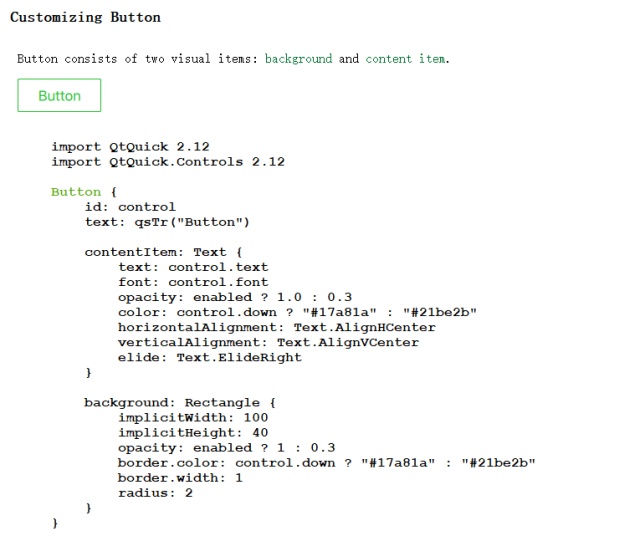
2.x的版本则是通过修改Control属性的方式进行定制
2.x版本的默认风格,还可以通过修改配置文件qtquickcontrols2.conf中的style来修改
可参考Qt在线文档- style配置
Qml版本混用
这里顺便说一个经常有人问到的问题: 2.x版本中能否混用1.x版本的控件?
答案是可以。只需要使用别名机制即可。(如果你看过Qml的源代码,就能轻易发现这个用法)
// MixControls.qml
import QtQuick 2.0
import QtQuick.Controls 2.0                    //导入Controls 2.0模块
import QtQuick.Controls 1.4 as QC14            //导入Controls 1.4模块,取别名QC14
import QtQuick.Controls.Styles 1.4 as QCS14    //导入Controls.Styles 1.4模块,取别名QCS14Rectange {Button {        //默认使用2.0的Button}QC14.Button {   //通过别名使用1.4的Buttonstyle: QCS14.ButtonStyle {  //通过别名使用1.4的style}}
}
按钮的本质
默认的按钮,很多时候并不能达到想要的效果,比如圆角、贴图片、渐变色的按钮等等,还需要做很多的定制化工作
其实按钮的本质,就是一个可以点击的区域(MouseArea),附带颜色(Rectangle)、图片(Image)或文字(Text)。
涛哥教大家造第一个轮子,一个带文字的按钮。
// Taobutton.qml
import QtQuick 2.0
import QtQuick.Controls 2.0
Item  {width: 800height: 600property color btnColor: "#009688"Rectangle {width: 140height: 40anchors.centerIn: parentcolor: btnArea.pressed ? Qt.darker(btnColor, 1.2) : (btnArea.containsMouse ? Qt.lighter(btnColor, 1.2) : btnColor)Text {id: btnTextanchors.centerIn: parenttext: qsTr("我是一个按钮")}MouseArea {id: btnAreaanchors.fill: parenthoverEnabled: true  //打开悬浮onClicked: {console.log(qsTr("按钮被按了"))}}}
}
使用qmlscene预览一下效果
(gif录制工具不能鼠标悬浮,所以悬浮效果看不到,实际上是有悬浮效果的,可自行尝试)
说明一下,qml中有个全局的对象Qt,它有一组调颜色的函数,Qt.lighter和Qt.darker,分别可以按系数来变浅和加深
一个颜色值,这样只要有了一个颜色值,就能自动计算出深一点或者浅一点的颜色,可以减少很多配颜色的工作哦
再看一下这个表达式,当鼠标按下去的时候,使用深一点的颜色,鼠标悬浮的时候使用浅一点的颜色,其它情况就用设定的颜色
color: btnArea.pressed ? Qt.darker(btnColor, 1.2) : (btnArea.containsMouse ? Qt.lighter(btnColor, 1.2) : btnColor)这里的1.2是试出来的值,也可以使用其它值。
按钮的演变
如果要带个边框呢?只要给Rectange设置边框的宽度和颜色就行了
property color btnBorderColor: "orange"Rectangle {...border.width: btnArea.containsMouse ? 2 : 0 //鼠标悬浮时有宽度,才能看到边框border.color: btnBorderColor...}如果要圆角呢? 只要给Rectangle 设置radius就行了
Rectangle{...radius: 5...}如果要圆形呢?只要给Rectangle设置宽度和高度相等(正方形),radius是宽度的一半
Rectangle{...width: 120height: widthradius: width / 2...}如果要背景色做成渐变的呢?
Rectangle{id: gradientBtn...property color btnColor: containsMouse ? Qt.darker("#009688") : "#009688"color: btnColorgradient: Gradient {GradientStop { position: 0 ; color: Qt.darker(gradientBtn.btnColor, 1.2) }GradientStop { position: 0.5 ; color: Qt.darker(gradientBtn.btnColor, 1.4) }GradientStop { position: 1 ; color: Qt.darker(gradientBtn.btnColor, 1.6) }}...}顺带提一下,5.12的Rectangle,有了新的渐变色 渐变色网站,大约有180种
可以直接在Qml中使用。
gradient: Gradient.NightFade //通过枚举使用gradient: "SugarLollipop" //通过字符串名字使用
(gif录制工具不能鼠标悬浮,所以悬浮效果看不到,实际上是有悬浮效果的,可自行尝试)
组件化按钮
为了能够复用我们的按钮,需要将它做成一个组件。
这里以文本按钮为例:
// TTextBtn.qmlimport QtQuick 2.9
import QtQuick.Controls 2.0
Rectangle {id: rootproperty alias textItem: t      //导出Text实例,方便外部直接修改property alias text: t.text     //导出文本property alias textColor: t.color   //导出文本颜色property alias containsMouse: area.containsMouse    //导出鼠标悬浮property alias containsPress: area.containsPress    //导出鼠标按下signal clicked();               //自定义点击信号color: "transparent"Text {id: t//默认坐标居中anchors.centerIn: parent//默认文字对齐方式为水平和垂直居中verticalAlignment: Text.AlignVCenterhorizontalAlignment: Text.AlignHCenter//默认宽度为parent的宽度,这样字太长超出范围时自动显示省略号width: parent.width}MouseArea {id: areaanchors.fill: parent;hoverEnabled: parent.enabled;onClicked: root.clicked();  //点击时触发自定义点击信号cursorShape: Qt.PointingHandCursor  //悬浮或点击时的鼠标样式}
}
Qml组件,先以最简单的方式理解,就是放在一个单独的Qml文件中,声明一些属性导出,由使用者去实例化并设置属性
比如这样:
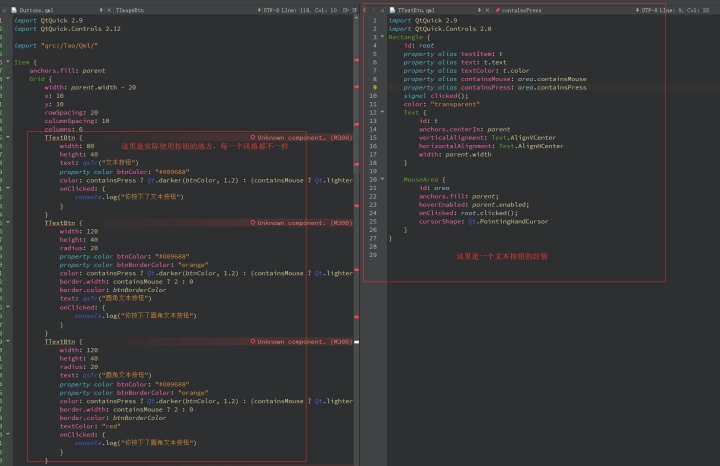
组件化的好处,包括容易复用(如上图,多个实例都不一样)、可以统一修改(后面会有动态换皮肤的方案,依赖于组件化)、
便于维护和扩展等。后续涛哥还会讲如何做多层抽象的组件、单例组件、如何引用插件中的组件等。
组件化图片按钮
带图片的按钮,只需要把Rectangle换成Image即可。
为了应对各种按钮状态,涛哥做了以下的属性扩展
// TImageBtn.qmlimport QtQuick 2.9
import QtQuick.Controls 2.0
Item {id: rootproperty url normalUrl      //常规状态下的图片路径property url hoveredUrl     //悬浮property url pressedUrl     //按下property url disabledUrl    //禁用property alias imageItem: img           //直接别名导出Image实例,外面可以修改其任意属性property alias imageUrl: img.source     //别名导出图片路径property alias imageWidth: img.widthproperty alias imageHeight: img.heightproperty alias imageAnchors: img.anchorsproperty alias containsMouse: area.containsMouseproperty alias containsPress: area.containsPress//点击信号signal clicked();Image {id: imganchors.fill: parent//默认按鼠标状态选取不同的图片source: root.enabled ? (containsPress ? pressedUrl : (containsMouse ? hoveredUrl : normalUrl)) : disabledUrl}MouseArea {id: areaanchors.fill: parent;hoverEnabled: parent.enabled;onClicked: root.clicked();cursorShape: Qt.PointingHandCursorpreventStealing: true}
}
组件化图文按钮
有了前面的文字按钮和图片按钮,我们可以做一个图片和文字都有的按钮。
图片和文字同时显示,那么就有了布局问题。图片在左?还是在右?在上?还是在下?
涛哥这里用了点技巧,封装了一个同时支持四种布局的图文按钮
// TImgTextBtn.qmlimport QtQuick 2.9
import QtQuick.Controls 2.0
Rectangle {id: rootproperty url normalUrlproperty url hoveredUrlproperty url pressedUrlproperty url disabledUrlproperty alias imageItem: imgproperty alias imageUrl: img.sourceproperty alias imageWidth: img.widthproperty alias imageHeight: img.heightproperty alias textItem: tproperty alias text: t.textproperty alias textColor: t.colorproperty alias containsMouse: area.containsMouseproperty alias containsPress: area.containsPresssignal clicked();//5.10以前的版本,Qml中没有枚举,用int属性代替枚举property int layoutType: layoutImageLeft    //布局类型,默认图片在左,外部可修改readonly property int layoutImageLeft: 0    //图片在左 只读属性,代替枚举readonly property int layoutImageRight: 1   //图片在右 只读属性,代替枚举readonly property int layoutImageUp: 2      //图片在上 只读属性,代替枚举readonly property int layoutImageDown: 3    //图片在下 只读属性,代替枚举color: "transparent"Image {id: imgsource: root.enabled ? (containsPress ? pressedUrl : (containsMouse ? hoveredUrl : normalUrl)) : disabledUrl}Text {id: t//默认文字对齐方式为水平和垂直居中verticalAlignment: Text.AlignVCenterhorizontalAlignment: Text.AlignHCenter}//按布局类型 处理布局Component.onCompleted: {switch (layoutType) {case layoutImageLeft:img.anchors.verticalCenter = root.verticalCentert.anchors.verticalCenter = root.verticalCenterimg.anchors.left = root.leftt.anchors.left = img.rightt.anchors.leftMargin = 6break;case layoutImageRight:img.anchors.verticalCenter = root.verticalCentert.anchors.verticalCenter = root.verticalCentert.anchors.left = root.leftimg.anchors.left = t.rightimg.anchors.leftMargin = 6breakcase layoutImageUp:img.anchors.horizontalCenter = root.horizontalCentert.anchors.horizontalCenter = root.horizontalCenterimg.anchors.top = root.topt.anchors.top = img.bottomt.anchors.topMargin = 6breakcase layoutImageDown:img.anchors.horizontalCenter = root.horizontalCentert.anchors.horizontalCenter = root.horizontalCentert.anchors.top = root.topimg.anchors.top = t.bottomimg.anchors.topMargin = 6break;}}MouseArea {id: areaanchors.fill: parent;hoverEnabled: parent.enabled;onClicked: root.clicked();cursorShape: Qt.PointingHandCursor}
}
最后,我们来看看效果吧
如果觉得涛哥写的还不错,还请为涛哥打个赏,您的赞赏是涛哥持续创作的源泉。
转载声明
文章出自涛哥的博客 – 点击这里查看涛哥的博客 本作品采用 知识共享署名-非商业性使用-相同方式共享 4.0 国际许可协议进行许可, 转载请注明出处, 谢谢合作 © 涛哥