2019独角兽企业重金招聘Python工程师标准>>> 
本文讲的主要内容是如何将CoreText绘图和自定义的View结合在一起,进行无缝的排版,并且可以控制自定义View元素的对其方式(顶部对其、底部对其、居中对其)
其它文章:
CoreText 入门(一)-文本绘制
CoreText入门(二)-绘制图片
CoreText进阶(三)-事件处理
CoreText进阶(四)-文字行数限制和显示更多
CoreText进阶(五)- 文字排版样式和效果
CoreText进阶(六)-内容大小计算和自动布局
CoreText进阶(七)-添加自定义View和对其
效果

 实现代码如下:
- (void)viewDidLoad {[super viewDidLoad];self.edgesForExtendedLayout = UIRectEdgeNone;self.view.backgroundColor = [UIColor colorWithRed:0.9 green:0.9 blue:0.9 alpha:1];CGRect frame = CGRectMake(0, 100, self.view.bounds.size.width, 400);YTDrawView *textDrawView = [[YTDrawView alloc] initWithFrame:frame];textDrawView.backgroundColor = [UIColor whiteColor];// 添加普通的文本[textDrawView addString:@"Hello World " attributes:self.defaultTextAttributes clickActionHandler:^(id obj) {}];// 添加链接[textDrawView addLink:@"http://www.baidu.com" clickActionHandler:^(id obj) {UIAlertController* alert = [UIAlertController alertControllerWithTitle:@"链接点击" message:[NSString stringWithFormat:@"点击对象%@", obj] preferredStyle:(UIAlertControllerStyleAlert)];[alert addAction:[UIAlertAction actionWithTitle:@"取消" style:(UIAlertActionStyleCancel) handler:nil]];[self presentViewController:alert animated:YES completion:nil];}];// 添加图片[textDrawView addImage:[UIImage imageNamed:@"tata_img_hottopicdefault"] size:CGSizeMake(30, 30) clickActionHandler:^(id obj) {UIAlertController* alert = [UIAlertController alertControllerWithTitle:@"图片点击" message:[NSString stringWithFormat:@"点击对象%@", obj] preferredStyle:(UIAlertControllerStyleAlert)];[alert addAction:[UIAlertAction actionWithTitle:@"取消" style:(UIAlertActionStyleCancel) handler:nil]];[self presentViewController:alert animated:YES completion:nil];}];// 添加链接[textDrawView addLink:@"http://www.baidu.com" clickActionHandler:^(id obj) {}];// 添加普通的文本[textDrawView addString:@"这是一个最好的时代,也是一个最坏的时代;" attributes:self.defaultTextAttributes clickActionHandler:^(id obj) {}];// 添加链接[textDrawView addLink:@" 这是明智的时代,这是愚昧的时代;这是信任的纪元,这是怀疑的纪元;这是光明的季节,这是黑暗的季节;这是希望的春日,这是失望的冬日; " clickActionHandler:^(id obj) {}];// 添加自定义的View,默认是底部对其UIView* customView = [[UIView alloc] initWithFrame:CGRectMake(0, 0, 160, 50)];customView.backgroundColor = [UIColor colorWithRed:1 green:0.7 blue:1 alpha:0.51];[customView bk_whenTapped:^{NSLog(@"customView Tapped");}];UILabel *labelInCustomView = [UILabel new];labelInCustomView.textAlignment = NSTextAlignmentCenter;labelInCustomView.font = [UIFont systemFontOfSize:12];labelInCustomView.text = @"可点击的自定义的View";[customView addSubview:labelInCustomView];[labelInCustomView mas_makeConstraints:^(MASConstraintMaker *make) {make.edges.equalTo(customView);}];[textDrawView addView:customView size:customView.frame.size clickActionHandler:nil];// 添加普通的文本[textDrawView addString:@" Hello " attributes:self.defaultTextAttributes clickActionHandler:nil];// 添加居中对其的自定义的ViewUIView *unClickableCustomView = [[UIView alloc] initWithFrame:CGRectMake(0, 0, 160, 50)];unClickableCustomView.backgroundColor = [UIColor colorWithRed:1 green:0.7 blue:1 alpha:0.51];UILabel *labelInUnClickableCustomView = [UILabel new];labelInUnClickableCustomView.textAlignment = NSTextAlignmentCenter;labelInUnClickableCustomView.font = [UIFont systemFontOfSize:12];labelInUnClickableCustomView.text = @"居中对其自定义的View";[unClickableCustomView addSubview:labelInUnClickableCustomView];[labelInUnClickableCustomView mas_makeConstraints:^(MASConstraintMaker *make) {make.edges.equalTo(unClickableCustomView);}];[textDrawView addView:unClickableCustomView size:unClickableCustomView.frame.size align:(YTAttachmentAlignTypeCenter) clickActionHandler:nil];// 添加普通的文本[textDrawView addString:@" 我们面前应有尽有,我们面前一无所有; " attributes:self.defaultTextAttributes clickActionHandler:nil];// 添加自定义的按钮,默认是底部对其UIButton *button = [UIButton buttonWithType:UIButtonTypeSystem];button.frame = CGRectMake(0, 0, 80, 30);[button setTitle:@"我是按钮" forState:UIControlStateNormal];button.backgroundColor = [UIColor colorWithRed:0.9 green:0.9 blue:0.9 alpha:1];[button bk_addEventHandler:^(id sender) {NSLog(@"button Clicked");} forControlEvents:UIControlEventTouchUpInside];[textDrawView addView:button size:button.frame.size clickActionHandler:nil];[textDrawView addString:@" " attributes:self.defaultTextAttributes clickActionHandler:nil];// 添加顶部对其按钮button = [UIButton buttonWithType:UIButtonTypeSystem];button.frame = CGRectMake(0, 0, 90, 30);[button setTitle:@"顶部对其按钮" forState:UIControlStateNormal];button.titleLabel.font = [UIFont systemFontOfSize:14];button.backgroundColor = [UIColor colorWithRed:0.9 green:0.9 blue:0.9 alpha:1];[button bk_addEventHandler:^(id sender) {NSLog(@"button Clicked");} forControlEvents:UIControlEventTouchUpInside];[textDrawView addView:button size:button.frame.size align:(YTAttachmentAlignTypeTop) clickActionHandler:nil];// 添加普通的文本[textDrawView addString:@" 我们都将直上天堂,我们都将直下地狱。 " attributes:self.defaultTextAttributes clickActionHandler:nil];[self.view addSubview:textDrawView];self.textDrawView = textDrawView;
}
添加View
添加View其实和添加图片的处理方式很类似,只不过添加图片我们是使用CG绘图的方式把图片绘制在View上,而添加View是使用UIkit的方法addSubview把View添加到View的层级上,这里有个稍微有个需要注意的地方就是坐标的问题,UI坐标系和CG坐标系的颠倒的,需要做个额外的处理
首先定义一个添加View的方法,在该方法中主要是进行数据模型的保存以及生产特殊的占位属性字符串,然后添加属性字符串的RunDelegate
- (void)addView:(UIView *)view size:(CGSize)size align:(YTAttachmentAlignType)align clickActionHandler:(ClickActionHandler)clickActionHandler {YTAttachmentItem *imageItem = [YTAttachmentItem new];[self updateAttachment:imageItem withFont:self.font];imageItem.align = align;imageItem.attachment = view;imageItem.type = YTAttachmentTypeView;imageItem.size = size;imageItem.clickActionHandler = clickActionHandler;[self.attachments addObject:imageItem];NSAttributedString *imageAttributeString = [self attachmentAttributeStringWithAttachmentItem:imageItem size:size];[self.attributeString appendAttributedString:imageAttributeString];
}
设置占位属性字符串的方法和添加图片时候使用到的是一样的代码
- (NSAttributedString *)attachmentAttributeStringWithAttachmentItem:(YTAttachmentItem *)attachmentItem size:(CGSize)size {// 创建CTRunDelegateCallbacksCTRunDelegateCallbacks callback;memset(&callback, 0, sizeof(CTRunDelegateCallbacks));callback.getAscent = getAscent;callback.getDescent = getDescent;callback.getWidth = getWidth;// 创建CTRunDelegateRef
//    NSDictionary *metaData = @{YTRunMetaData: attachmentItem};CTRunDelegateRef runDelegate = CTRunDelegateCreate(&callback, (__bridge void * _Nullable)(attachmentItem));// 设置占位使用的图片属性字符串// 参考:https://en.wikipedia.org/wiki/Specials_(Unicode_block)  U+FFFC  OBJECT REPLACEMENT CHARACTER, placeholder in the text for another unspecified object, for example in a compound document.unichar objectReplacementChar = 0xFFFC;NSMutableAttributedString *imagePlaceHolderAttributeString = [[NSMutableAttributedString alloc] initWithString:[NSString stringWithCharacters:&objectReplacementChar length:1] attributes:[self defaultTextAttributes]];// 设置RunDelegate代理CFAttributedStringSetAttribute((CFMutableAttributedStringRef)imagePlaceHolderAttributeString, CFRangeMake(0, 1), kCTRunDelegateAttributeName, runDelegate);// 设置附加数据,设置点击效果NSDictionary *extraData = @{YTExtraDataAttributeTypeKey: attachmentItem.type == YTAttachmentTypeImage ? @(YTDataTypeImage) : @(YTDataTypeView),YTExtraDataAttributeDataKey: attachmentItem,};CFAttributedStringSetAttribute((CFMutableAttributedStringRef)imagePlaceHolderAttributeString, CFRangeMake(0, 1), (CFStringRef)YTExtraDataAttributeName, (__bridge CFTypeRef)(extraData));CFRelease(runDelegate);return imagePlaceHolderAttributeString;
}
接下来就是需要计算添加的View所在父View中的位置,进行相应的保存,这里需要注意的是坐标系的问题,需要做一个额外的转换
- (void)calculateContentPositionWithBounds:(CGRect)bounds {int imageIndex = 0;// CTFrameGetLines获取但CTFrame内容的行数NSArray *lines = (NSArray *)CTFrameGetLines(self.ctFrame);// CTFrameGetLineOrigins获取每一行的起始点,保存在lineOrigins数组中CGPoint lineOrigins[lines.count];CTFrameGetLineOrigins(self.ctFrame, CFRangeMake(0, 0), lineOrigins);for (int i = 0; i < lines.count; i++) {CTLineRef line = (__bridge CTLineRef)lines[i];NSArray *runs = (NSArray *)CTLineGetGlyphRuns(line);for (int j = 0; j < runs.count; j++) {CTRunRef run = (__bridge CTRunRef)(runs[j]);NSDictionary *attributes = (NSDictionary *)CTRunGetAttributes(run);if (!attributes) {continue;}// ..... 部分代码省略// 找到代理则开始计算图片位置信息CGFloat ascent;CGFloat desent;// 可以直接从metaData获取到图片的宽度和高度信息CGFloat width = CTRunGetTypographicBounds(run, CFRangeMake(0, 0), &ascent, &desent, NULL);CGFloat height = ascent + desent;// CTLineGetOffsetForStringIndex获取CTRun的起始位置CGFloat xOffset = lineOrigins[i].x + CTLineGetOffsetForStringIndex(line, CTRunGetStringRange(run).location, NULL);CGFloat yOffset = lineOrigins[i].y;// 更新ImageItem对象的位置if (imageIndex < self.attachments.count) {YTAttachmentItem *imageItem = self.attachments[imageIndex];// 使用CG绘图的位置不用矫正,使用UI绘图的坐标Y轴会上下颠倒,所以需要做调整if (imageItem.type == YTAttachmentTypeView) {yOffset = bounds.size.height - lineOrigins[i].y - ascent;} else if (imageItem.type == YTAttachmentTypeImage) {yOffset = yOffset - desent;}imageItem.frame = CGRectMake(xOffset, yOffset, width, height);imageIndex ++;}}}
}
对其实现
处理对其方式之前要了解字形度量的一些概念,然后在此基础上进行分析不同的对其方式下需要如何正确的设置排版的参数,才能渲染绘制出理想中内容
字形度量的一些概念
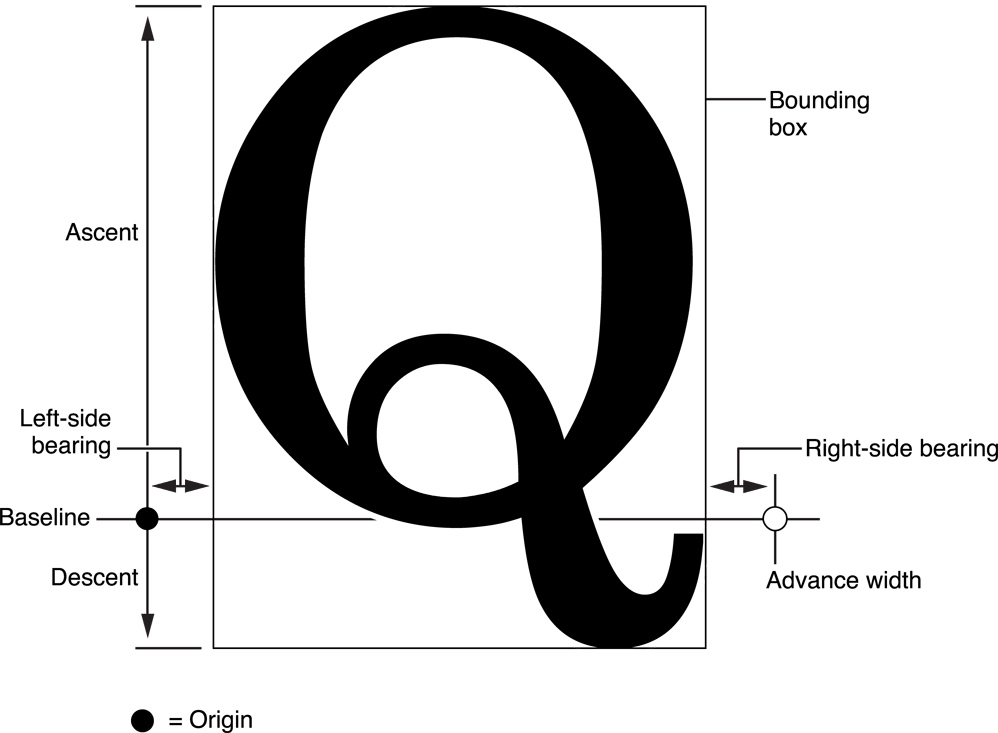
下面的这张图片来自苹果官方的参考文档:Typographical Concepts

字形度量中的几个概念的说明参考 使用CoreText绘制文本 的是内容如下
bounding box(边界框),这是一个假想的框子,它尽可能紧密的装入字形。
baseline(基线),一条假想的线,一行上的字形都以此线作为上下位置的参考,在这条线的左侧存在一个点叫做基线的原点。
ascent(上行高度),从原点到字体中最高(这里的高深都是以基线为参照线的)的字形的顶部的距离,ascent是一个正值。
descent(下行高度),从原点到字体中最深的字形底部的距离,descent是一个负值(比如一个字体原点到最深的字形的底部的距离为2,那么descent就为-2)。
三种对其方式的分析
以下对其方式的分析都是以下面的这些数据为标准的
Font.fontAscent = 33.75.
Font.fontDescent = 27.04.
LineHeight = Font.fontAscent + Font.fontDescent = 60.8.
顶部对其.

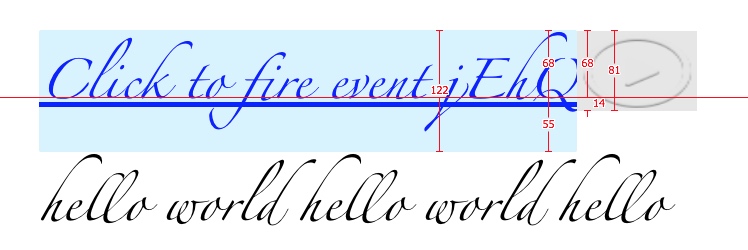
顶部对其,需要设置ascent值为文字内容的ascent,descent值为attachmen的高度减去ascent,如下图所示(图片上的标注是2x,并且数值因为是手动使用工具标注,会有一些细微的偏差),内容的高度为40,所以有:
ascent= Font.fontAscent = 33.75.descent= 40 -ascent= 6.25.
ascent = 33.75.
descent = 6.25.
height = ascent + descent = 40.
baseline = 33.75.
底部对其

底部对其,需要设置descent值为文字内容的descent,ascent值为attachmen的高度减去ascent,如下图所示(图片上的标注是2x,并且数值因为是手动使用工具标注,会有一些细微的偏差),内容的高度为40,所以有:
descent= Font.fontDescent = 27.04.ascent= 40 -descent= 12.95.
ascent = 12.95.
descent = 27.04.
height = ascent + descent = 40.

居中对其.

居中对其,descent值和ascent值需要经过一些简单的计算,先计算ascent值,ascent值为文字内容的ascent减去顶部的那一段差值,(如下图标准中的值为21处的高度),然后descent值为attachmen的高度减去ascent,如下图所示(图片上的标注是2x,并且数值因为是手动使用工具标注,会有一些细微的偏差),内容的高度为40,所以有:
ascent= Font.fontAscent - (LineHeight - 40)/2 = 23.35.descent= 40 -ascent= 16.64.
ascent = 23.35.
descent = 16.64.
height = ascent + descent = 40.

代码实现
首先需要在Attachment模型中添加如下几个属性,这些属性在计算attachment内容的descent、ascent是必须要用到的
@property (nonatomic, assign) YTAttachmentAlignType align;///<对其方式
@property (nonatomic, assign) CGFloat ascent;///<文本内容的ascent,用于计算attachment内容的ascent
@property (nonatomic, assign) CGFloat descent;///<文本内容的descent,用于计算attachment内容的descent
@property (nonatomic, assign) CGSize size;///<attachment内容的大小
然后根据以上分析,我们可以很容易的写出如下的几个RunDelegate回调方法的代码:
// MARK: - CTRunDelegateCallbacks 回调方法
static CGFloat getAscent(void *ref) {YTAttachmentItem *attachmentItem = (__bridge YTAttachmentItem *)ref;if (attachmentItem.align == YTAttachmentAlignTypeTop) {return attachmentItem.ascent;} else if (attachmentItem.align == YTAttachmentAlignTypeBottom) {return attachmentItem.size.height - attachmentItem.descent;} else if (attachmentItem.align == YTAttachmentAlignTypeCenter) {return attachmentItem.ascent - ((attachmentItem.descent + attachmentItem.ascent) - attachmentItem.size.height) / 2;}return attachmentItem.size.height;
}static CGFloat getDescent(void *ref) {YTAttachmentItem *attachmentItem = (__bridge YTAttachmentItem *)ref;if (attachmentItem.align == YTAttachmentAlignTypeTop) {return attachmentItem.size.height - attachmentItem.ascent;} else if (attachmentItem.align == YTAttachmentAlignTypeBottom) {return attachmentItem.descent;} else if (attachmentItem.align == YTAttachmentAlignTypeCenter) {return attachmentItem.size.height - attachmentItem.ascent + ((attachmentItem.descent + attachmentItem.ascent) - attachmentItem.size.height) / 2;}return 0;
}static CGFloat getWidth(void *ref) {YTAttachmentItem *attachmentItem = (__bridge YTAttachmentItem *)ref;return attachmentItem.size.width;
}
另外,在更新全局字体的时候需要同步的更新YTAttachmentItem中的descent、ascent属性
- (void)setFont:(UIFont *)font {_font = font;[self.attributeString yt_setFont:_font];[self updateAttachments];
}- (void)updateAttachments {for (YTAttachmentItem *attachment in self.attachments) {[self updateAttachment:attachment withFont:self.font];}
}
总结
以上就是使用Core Text添加自定义的View以及设置对其方式的一点小总结,如有不妥之处,还请不吝赐教。
参考
Typographical Concepts
使用CoreText绘制文本
