怎么制作网站链接手机/网站怎么优化
本文主要讲述Android 加载动态链接库的过程,为了分析工作中遇到的一个问题 x86的系统是如何运行arm的动态链接库的。
参考博客:
https://pqpo.me/2017/05/31/system-loadlibrary/ 深入理解 System.loadLibrary
https://www.jianshu.com/p/bf8b4a90f825 Android Native库的加载及动态链接
https://blog..net/groundhappy/article/details/80493358 android的native_bridge
基于android7.0代码,涉及文件:
libcore\ojluni\src\main\java\java\lang\System.java
libcore\ojluni\src\main\java\java\lang\Runtime.java
libcore\dalvik\src\main\java\dalvik\system\PathClassLoader.java
libcore\dalvik\src\main\java\dalvik\system\DexClassLoader.java
libcore\ojluni\src\main\native\Runtime.c
art\runtime\openjdkjvm\OpenjdkJvm.cc
art\runtime\java_vm_ext.cc
system\core\libnativeloader\native_loader.cpp
bionic\linker\dlfcn.cpp
bionic\linker\linker.cpp
android是基于linux系统的,在开始前像看下Linux系统下是如何加载动态链接库有助于理解Android的动态库加载流程。
Linux环境下加载动态库主要包括如下函数,位于头文件dlfcn.h中:同样android的函数也位于dlfcn.h头文件中。
void *dlopen(const char *filename, int flag); //打开动态链接库
char *dlerror(void); //获取错误信息
void *dlsym(void *handle, const char *symbol); //获取方法指针
int dlclose(void *handle); //关闭动态链接库
用一个简单的C++代码,作为动态链接库包含计算相关的函数:(懒 使用的参考文章中demo)
extern "C"
int add(int a, int b) {
return a + b;
}
extern "C"
int mul(int a, int b) {
return a*b;
}
extern “C” 表示告诉编译器以C的方式编译,不要修改函数名,否则C++会修改函数名。
然后通过下述命令编译成动态链接库:
g++ -fPIC -shared caculate.cpp -o libcaculate.so
这样会在同级目录下生成一个动态库文件:libcaculate.so
然后编写加载动态库并使用的代码:
[main_call.cpp]
#include
#include
using namespace std;
static const char * const LIB_PATH = "./libcaculate.so";
typedef int (*CACULATE_FUNC)(int, int);
int main() {
void* symAdd = nullptr;
void* symMul = nullptr;
char* errorMsg = nullptr;
dlerror();
//1.打开动态库,拿到一个动态库句柄
void* handle = dlopen(LIB_PATH, RTLD_NOW);
if(handle == nullptr) {
cout << "load error!" << endl;
return -1;
}
// 查看是否有错误
if ((errorMsg = dlerror()) != nullptr) {
cout << "errorMsg:" << errorMsg << endl;
return -1;
}
cout << "load success!" << endl;
//2.通过句柄和方法名获取方法指针地址
symAdd = dlsym(handle, "add");
if(symAdd == nullptr) {
cout << "dlsym failed!" << endl;
if ((errorMsg = dlerror()) != nullptr) {
cout << "error message:" << errorMsg << endl;
return -1;
}
}
//3.将方法地址强制类型转换成方法指针
CACULATE_FUNC addFunc = reinterpret_cast(symAdd);
//4.调用动态库中的方法
cout << "1 + 2 = " << addFunc(1, 2) << endl;
//5.通过句柄关闭动态库
dlclose(handle);
return 0;
}
主要就用到了上面的4个函数过程如下
1、打开动态库,拿到一个动态库句柄
2、通过句柄和方法名获取方法指针地址
3、将方法地址强制类型转换成方法指针
4、调用动态库中的方法
5、通过句柄关闭动态库。
中间会使用dlerror检测是否有错误。
有必要解释一下的是方法指针地址到方法指针的转换,为了方便这里定义了一个方法指针的别名:
typedef int (*CACULATE_FUNC)(int, int);
指明该方法接受两个int类型参数返回一个int值。
拿到地址之后强制类型转换成方法指针用于调用:
CACULATE_FUNC addFunc = reinterpret_cast(symAdd);
最后只要编译运行即可:
g++ -std=c++11 -ldl main_call.cpp -o main
.main
因为代码中使用了c++11标准新加的特性,所以编译的时候带上-std=c++11,另外使用了头文件dlfcn.h需要带上-ldl,编译生成的main文件即是二进制可执行文件,需要将动态库放在同级目录下执行。
上面就是Linux环境下创建动态库,加载并使用动态库的全部过程。
由于Android基于Linux系统,所有Android系统底层也是通过这种方式加载并使用动态库的。
Android 链接器Linker之前的工作
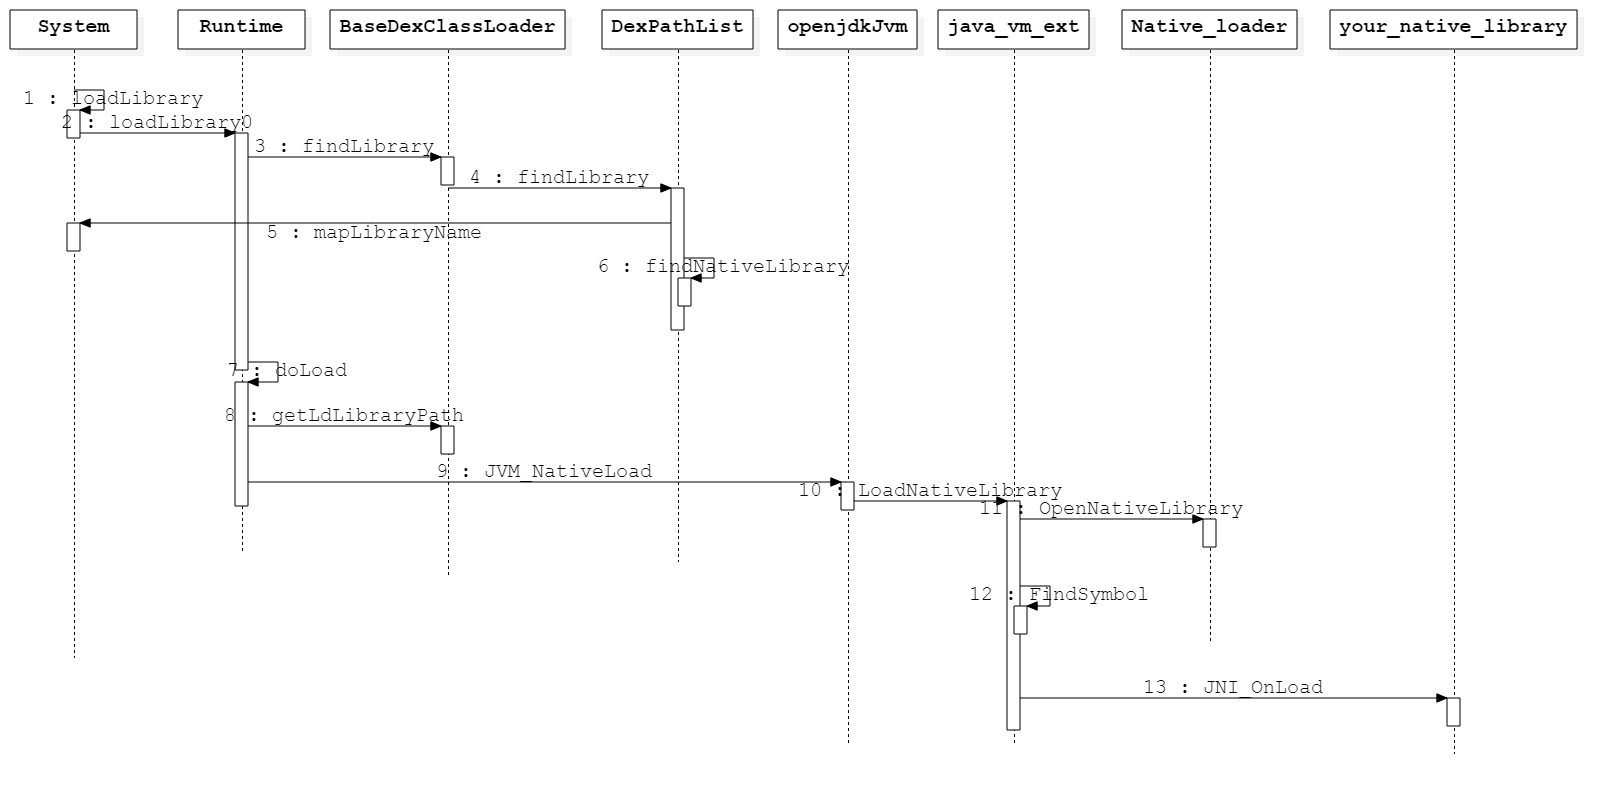
流程图来自参考的另一篇博客
下面从System.loadLibrary() 开始分析
public static void loadLibrary(String libname) {
//VMStack.getCallingClassLoader() 返回应用类加载器这里是:PathClassLoader
Runtime.getRuntime().loadLibrary0(VMStack.getCallingClassLoader(), libname);
}
下面看* loadLibrary0()*
synchronized void loadLibrary0(ClassLoader loader, String libname) {
if (libname.indexOf((int)File.separatorChar) != -1) {
throw new UnsatisfiedLinkError(
"Directory separator should not appear in library name: " + libname);
}
String libraryName = libname;
if (loader != null) {
//findLibrary()返回的是库的全路径名,loader是PathClassLoader 最终会
//调用父类的findLibrary()方法。
String filename = loader.findLibrary(libraryName);
//这里可以通过Logger 来打印log 因为这时候 util.log是无法执行到这里
Logger logger = Logger.getLogger("lly");
logger.info("filename == "+filename);
logger.info("mapLibraryName == "+System.mapLibraryName(libraryName));
if (filename == null) {
// It's not necessarily true that the ClassLoader used
// System.mapLibraryName, but the default setup does, and it's
// misleading to say we didn't find "libMyLibrary.so" when we
// actually searched for "liblibMyLibrary.so.so".
throw new UnsatisfiedLinkError(loader + " couldn't find \"" +
System.mapLibraryName(libraryName) + "\"");
}
//装载动态库
String error = doLoad(filename, loader);
if (error != null) {
throw new UnsatisfiedLinkError(error);
}
return;
}
......
}
参数loader为Android的应用类加载器,它是PathClassLoader 类型的对象,继承自BaseDexClassLoader对象
public String findLibrary(String name) {
return pathList.findLibrary(name);
}
最终会调用DexPathList 的findLibrary()方法
public String findLibrary(String libraryName) {
//生成平台相关的库名称这里会返回libxxx.so
String fileName = System.mapLibraryName(libraryName);
for (Element element : nativeLibraryPathElements) {
//查找动态库返回的全路径名
String path = element.findNativeLibrary(fileName);
if (path != null) {
return path;
}
}
return null;
}
回到loadLibrary0(),有了动态库的全路径名就可以装载库了,下面看doLoad()。
private String doLoad(String name, ClassLoader loader) {
String librarySearchPath = null;
if (loader != null && loader instanceof BaseDexClassLoader) {
BaseDexClassLoader dexClassLoader = (BaseDexClassLoader) loader;
librarySearchPath = dexClassLoader.getLdLibraryPath();
}
// nativeLoad should be synchronized so there's only one LD_LIBRARY_PATH in use regardless
// of how many ClassLoaders are in the system, but dalvik doesn't support synchronized
// internal natives.
synchronized (this) {
return nativeLoad(name, loader, librarySearchPath);
}
}
nativeLoad最终调用Runtime.c中的Runtime_nativeLoad(),接着调用OpenjdkJvm.cc 中的 JVM_NativeLoad() ,最终会调用到 Java_vm_ext.cc 中的LoadNativeLibrary() so加载的过程主要在这个函数中完成,参照上面的Linux加载so的流程,我们分析下这个方法:
bool JavaVMExt::LoadNativeLibrary(JNIEnv* env,
const std::string& path,
jobject class_loader,
jstring library_path,
std::string* error_msg){
//1、打开动态链接库
void* handle = android::OpenNativeLibrary(env,
runtime_->GetTargetSdkVersion(),
path_str,
class_loader,
library_path);
//这里是x86为兼容arm库文件采用的方案 使用houdini技术,在运行时动态转化指令集,从而实现对arm库的支持。
bool needs_native_bridge = false;
if (handle == nullptr) {
if (android::NativeBridgeIsSupported(path_str)) {
handle = android::NativeBridgeLoadLibrary(path_str, RTLD_NOW);
needs_native_bridge = true;
}
}
if (handle == nullptr) {
//检查错误信息
*error_msg = dlerror();
VLOG(jni) << "dlopen(\"" << path << "\", RTLD_NOW) failed: " << *error_msg;
return false;
}
if (env->ExceptionCheck() == JNI_TRUE) {
LOG(ERROR) << "Unexpected exception:";
env->ExceptionDescribe();
env->ExceptionClear();
}
// Create a new entry.
// TODO: move the locking (and more of this logic) into Libraries.
bool created_library = false;
{
// Create SharedLibrary ahead of taking the libraries lock to maintain lock ordering.
std::unique_ptr new_library(
new SharedLibrary(env, self, path, handle, class_loader, class_loader_allocator));
MutexLock mu(self, *Locks::jni_libraries_lock_);
library = libraries_->Get(path);
if (library == nullptr) { // We won race to get libraries_lock.
library = new_library.release();
libraries_->Put(path, library);
created_library = true;
}
}
if (!created_library) {
LOG(INFO) << "WOW: we lost a race to add shared library: "
<< "\"" << path << "\" ClassLoader=" << class_loader;
return library->CheckOnLoadResult();
}
VLOG(jni) << "[Added shared library \"" << path << "\" for ClassLoader " << class_loader << "]";
bool was_successful = false;
void* sym;
if (needs_native_bridge) {
library->SetNeedsNativeBridge();
}
//2、获取方法地址
sym = library->FindSymbol("JNI_OnLoad", nullptr);
if (sym == nullptr) {
VLOG(jni) << "[No JNI_OnLoad found in \"" << path << "\"]";
was_successful = true;
} else {
// Call JNI_OnLoad. We have to override the current class
// loader, which will always be "null" since the stuff at the
// top of the stack is around Runtime.loadLibrary(). (See
// the comments in the JNI FindClass function.)
ScopedLocalRef old_class_loader(env, env->NewLocalRef(self->GetClassLoaderOverride()));
self->SetClassLoaderOverride(class_loader);
VLOG(jni) << "[Calling JNI_OnLoad in \"" << path << "\"]";
typedef int (*JNI_OnLoadFn)(JavaVM*, void*);
//3、强制类型转换成函数指针
JNI_OnLoadFn jni_on_load = reinterpret_cast(sym);
//4、调用函数
int version = (*jni_on_load)(this, nullptr);
......
library->SetResult(was_successful);
return was_successful;
}
arm的so可以运行在x86的系统上原因就是因为这个分支:
if (handle == nullptr) {
if (android::NativeBridgeIsSupported(path_str)) {
handle = android::NativeBridgeLoadLibrary(path_str, RTLD_NOW);
needs_native_bridge = true;
}
}
当调用OpenNativeLibrary()打开so时会去读取so文件的信息,x86的头文件和arm的头文件信息是不一样的,所有在用x86的的手机上运行arm的so文件时handle为空,这时候会根据so文件的绝对路径来判断是否支持houdini,如果支持的话会用NativeBridgeLoadLibrary()
重新打开so文件,进行下一步操作。测试已知支持arm so文件的路径有:
/data/app/包名/lib/arm/libxxx.so
/system/priv-app/应用名称/lib/arm/libxxx.so
到这里其实我的问题已经解决了,关于为什么会去这些路径下找,由于Native Bridge不开源,是以so的方式提供的,没有办法跟进去,望知道的分享一下。
下面看下Android 链接器Linker的装载过程
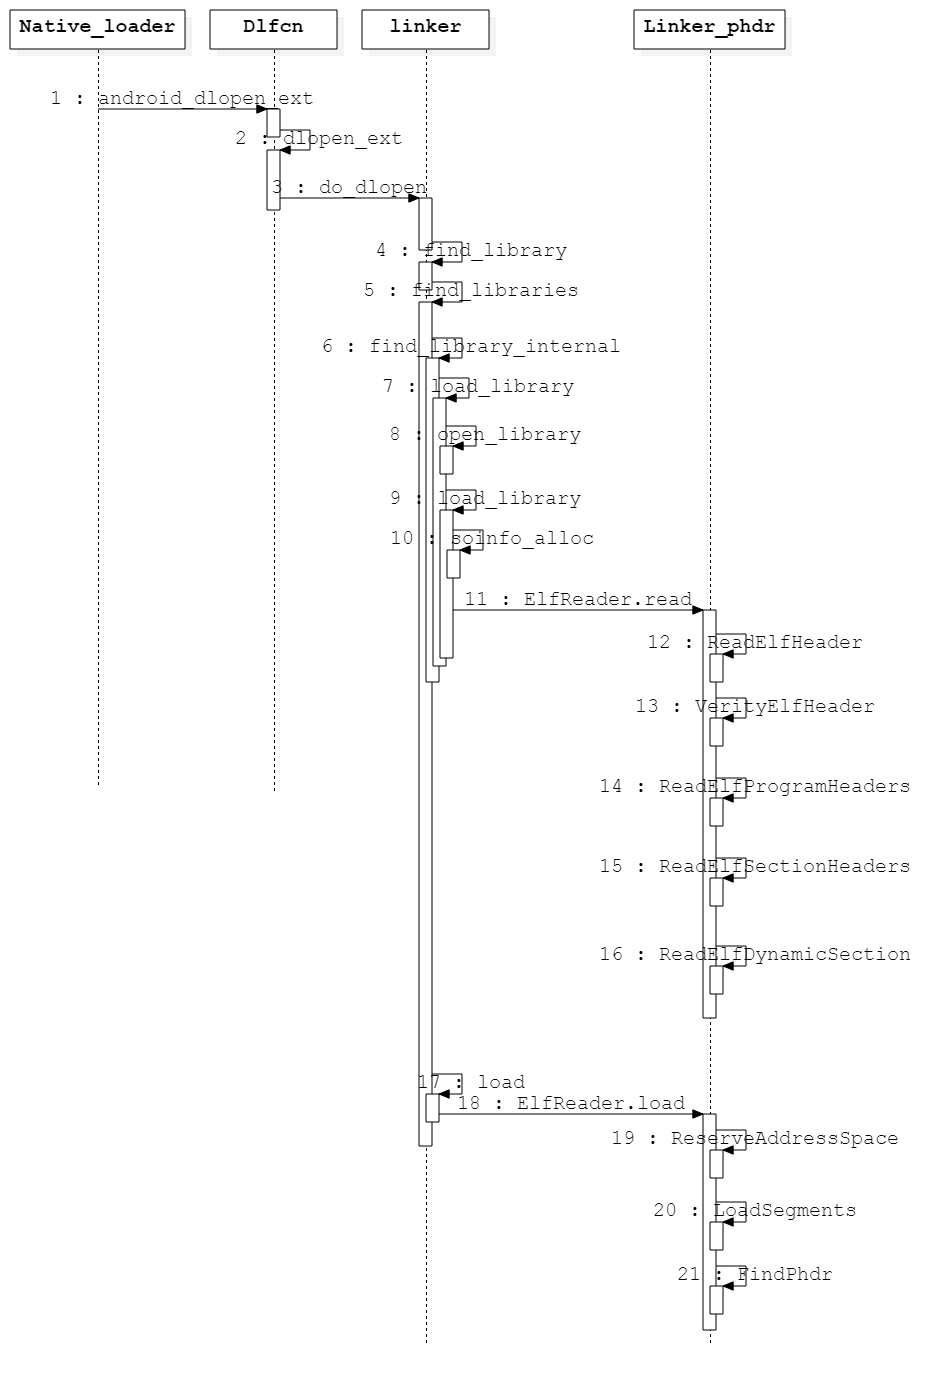
其中会在load_library 读取ELF文件头以及一些段信息
static bool load_library(android_namespace_t* ns,
LoadTask* task,
LoadTaskList* load_tasks,
int rtld_flags,
const std::string& realpath){
......
if (!task->read(realpath.c_str(), file_stat.st_size)) {
soinfo_free(si);
task->set_soinfo(nullptr);
return false;
}
.......
return true;
}
看下Read方法
bool ElfReader::Read(const char* name, int fd, off64_t file_offset, off64_t file_size) {
CHECK(!did_read_);
CHECK(!did_load_);
name_ = name;
fd_ = fd;
file_offset_ = file_offset;
file_size_ = file_size;
if (ReadElfHeader() &&
VerifyElfHeader() &&
ReadProgramHeaders() &&
ReadSectionHeaders() &&
ReadDynamicSection()) {
did_read_ = true;
}
__libc_format_log(ANDROID_LOG_DEBUG, "lly", "did_read_ == %d",did_read_);
return did_read_;
}
ReadElfHeader() : 读取ELF文件头信息
VerifyElfHeader() : 校验ELF(文件类型等)
ReadProgramHeaders() : 根据ELF文件头信息获取程序头表
ReadSectionHeaders() : 根据ELF文件头信息获取段头表
ReadDynamicSection() : 获取Dynamic Section的信息
常见的 has unexpected e_machine: 40 就是在 VerifyElfHeader()方法中提示的。
最后看下Native库的动态链接过程:
