市建设局网站/株洲今日头条新闻
本章主要内容是利用mqtt、多线程、队列实现模型一次加载,批量图片识别分类功能
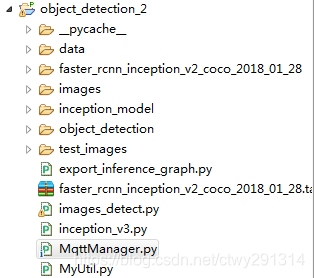
目录结构如下:
mqtt连接及多线程队列管理
MqttManager.py
# -*- coding:utf8 -*-
import paho.mqtt.client as mqtt
from multiprocessing import Process, Queue
import images_detectMQTTHOST = "192.168.3.202"
MQTTPORT = 1883
mqttClient = mqtt.Client()
q = Queue() # 连接MQTT服务器
def on_mqtt_connect():mqttClient.connect(MQTTHOST, MQTTPORT, 60)mqttClient.loop_start()# 消息处理函数
def on_message_come(mqttClient, userdata, msg):q.put(msg.payload.decode("utf-8"))  # 放入队列print("产生消息", msg.payload.decode("utf-8"))def consumer(q, pid):print("开启消费序列进程", pid)# 多进程中发布消息需要重新初始化mqttClientImagesDetect = images_detect.ImagesDetect()ImagesDetect.detect(q)# subscribe 消息订阅
def on_subscribe():mqttClient.subscribe("test", 1)  # 主题为"test"mqttClient.on_message = on_message_come  # 消息到来处理函数# publish 消息发布
def on_publish(topic, msg, qos):mqttClient.publish(topic, msg, qos);def main():on_mqtt_connect()on_subscribe()for i in range(1, 3):c1 = Process(target=consumer, args=(q, i))c1.start()while True:passif __name__ == '__main__':main()
图片识别
images_detect.py
# coding: utf-8
import numpy as np
import os
import sys
import tarfile
import tensorflow as tf
from object_detection.utils import label_map_util
from object_detection.utils import visualization_utils as vis_util
import cv2
import decimal
import MyUtilcontext = decimal.getcontext()
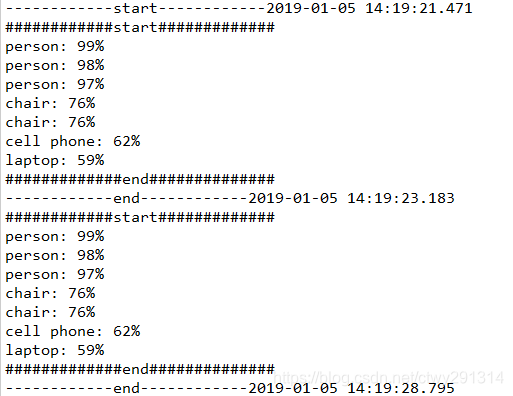
context.rounding = decimal.ROUND_05UPclass ImagesDetect():def __init__(self):sys.path.append("..")MODEL_NAME = 'faster_rcnn_inception_v2_coco_2018_01_28'MODEL_FILE = MODEL_NAME + '.tar.gz'# Path to frozen detection graph. This is the actual model that is used for the object detection.PATH_TO_CKPT = MODEL_NAME + '/frozen_inference_graph.pb'# List of the strings that is used to add correct label for each box.PATH_TO_LABELS = os.path.join('data', 'mscoco_label_map.pbtxt')NUM_CLASSES = 90tar_file = tarfile.open(MODEL_FILE)for file in tar_file.getmembers():file_name = os.path.basename(file.name)if 'frozen_inference_graph.pb' in file_name:tar_file.extract(file, os.getcwd())# ## Load a (frozen) Tensorflow model into memory.self.detection_graph = tf.Graph()with self.detection_graph.as_default():od_graph_def = tf.GraphDef()with tf.gfile.GFile(PATH_TO_CKPT, 'rb') as fid:serialized_graph = fid.read()od_graph_def.ParseFromString(serialized_graph)tf.import_graph_def(od_graph_def, name='')# ## Loading label map# Label maps map indices to category names, so that when our convolution network predicts `5`, we know that this corresponds to `airplane`. Here we use internal utility functions, but anything that returns a dictionary mapping integers to appropriate string labels would be finelabel_map = label_map_util.load_labelmap(PATH_TO_LABELS)categories = label_map_util.convert_label_map_to_categories(label_map, max_num_classes=NUM_CLASSES, use_display_name=True)self.category_index = label_map_util.create_category_index(categories)self.image_tensor = self.detection_graph.get_tensor_by_name('image_tensor:0')# 每个框代表一个物体被侦测到self.boxes = self.detection_graph.get_tensor_by_name('detection_boxes:0')# 每个分值代表侦测到物体的可信度. self.scores = self.detection_graph.get_tensor_by_name('detection_scores:0')self.classes = self.detection_graph.get_tensor_by_name('detection_classes:0')self.num_detections = self.detection_graph.get_tensor_by_name('num_detections:0')def detect(self, q): with self.detection_graph.as_default():config = tf.ConfigProto() # config.gpu_options.allow_growth = Trueconfig.gpu_options.per_process_gpu_memory_fraction = 0.2 with tf.Session(graph=self.detection_graph, config=config) as sess:while True: img_src = q.get()print('------------start------------' + MyUtil.get_time_stamp())image_np = cv2.imread(img_src)# 扩展维度,应为模型期待: [1, None, None, 3]image_np_expanded = np.expand_dims(image_np, axis=0)# 执行侦测任务. (boxes, scores, classes, num_detections) = sess.run([self.boxes, self.scores, self.classes, self.num_detections],feed_dict={self.image_tensor: image_np_expanded})# 检测结果的可视化vis_util.visualize_boxes_and_labels_on_image_array(image_np,np.squeeze(boxes),np.squeeze(classes).astype(np.int32),np.squeeze(scores),self.category_index,use_normalized_coordinates=True,line_thickness=8)print('------------end------------' + MyUtil.get_time_stamp())# cv2.imshow('object detection', cv2.resize(image_np, (800, 600))) if cv2.waitKey(25) & 0xFF == ord('q'):cv2.destroyAllWindows()breakMyUtil.py
import timedef get_time_stamp():ct = time.time()local_time = time.localtime(ct)data_head = time.strftime("%Y-%m-%d %H:%M:%S", local_time)data_secs = (ct - int(ct)) * 1000time_stamp = "%s.%03d" % (data_head, data_secs)return time_stamp效果: