作为一个企业级的Web应用,MVC框架是必不可少的。Spring MVC目前使用也比较广泛,本文就来介绍一下如何在OSGI应用中实现Spring、Mybatis、Spring MVC框架的整合,其中Spring MVC的整合比较困难,原因是Spring整合到OSGI中后,每个Bundle都拥有一个孤立的ApplicationContext,也就是说不同Bundle中实例化的Bean之间的依赖注入就存在一定的问题,前面文章中提到过,这个问题可以通过Bean的注册和引用机制解决。
而实例化Spring MVC框架中的org.springframework.web.servlet.DispatcherServlet类时也需要指定Bean的配置文件,Spring MVC框架启动后会实例化配置文件中的Bean(例如Controller实例),Spring MVC框架启动后实例化的Bean与Bundle中实例化的Bean属于不同的类加载器,所以Bundle中实例化的Bean无法注入到Spring MVC框架启动时实例化的Bean,比较直接的例子就是Mybatis操作数据库的SqlSession实例无法注入到Spring MVC的Controller中,网上比较多的解决方案是使用Virgo,笔者经过一番钻研,解决了Spring MVC框架与OSGI应用的整合,如果发现有什么问题,可以一起探讨下^_^。
接下来就介绍OSGI应用中Spring、Mybatis、Spring MVC框架的整合,我们依然使用前面文章中已经搭建好的工作空间。
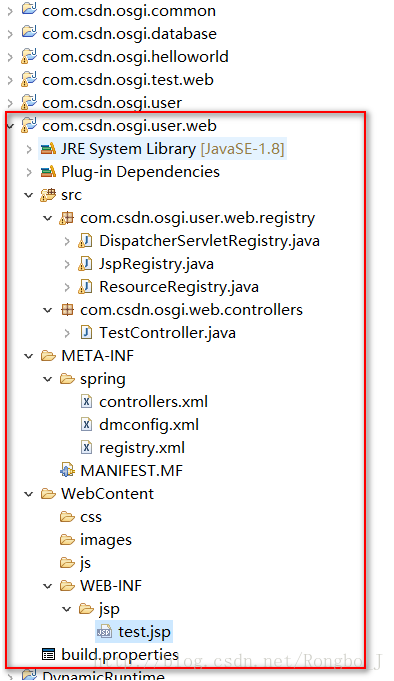
首先新建一个Bundle,名称为com.csdn.osgi.user.web,整个工作空间结构如下图所示:
由于OSGI应用中资源与Servlet都需要注册后才能被客户端访问,我们可以编写几个类专门用于注册Web资源。

首先是图片、CSS、JS等静态资源的注册,在com.csdn.osgi.user.web这个Bundle中新建一个类,名称为com.csdn.osgi.user.web.registry.ResourceRegistry,代码如下:
package com.csdn.osgi.user.web.registry;import java.util.Iterator;
import java.util.Map;
import java.util.Set;import org.eclipse.gemini.blueprint.context.BundleContextAware;
import org.osgi.framework.BundleContext;
import org.osgi.framework.ServiceReference;
import org.osgi.service.http.HttpContext;
import org.osgi.service.http.HttpService;
import org.osgi.service.http.NamespaceException;
import org.springframework.beans.BeansException;
import org.springframework.context.ApplicationContext;
import org.springframework.context.ApplicationContextAware;public class ResourceRegistry implements ApplicationContextAware,BundleContextAware {Map resMapping;BundleContext bundleContext;ApplicationContext applicationContext;@Overridepublic void setBundleContext(BundleContext bundleContext) {this.bundleContext = bundleContext;}@Overridepublic void setApplicationContext(ApplicationContext applicationContext)throws BeansException {this.applicationContext = applicationContext;}public void setResMapping(Map resMapping) {this.resMapping = resMapping;}public void init() {ServiceReference serviceReference = bundleContext.getServiceReference(HttpService.class.getName());HttpService httpService = (HttpService) bundleContext.getService(serviceReference);HttpContext commonContext = httpService.createDefaultHttpContext();try {Set keySet = resMapping.keySet();Iterator<String> it = keySet.iterator();while(it.hasNext()){String key = it.next();String value = (String) resMapping.get(key);httpService.registerResources(key, value, commonContext);}} catch (NamespaceException e) {e.printStackTrace();}}
}
我们可以通过Spring来实例化这个类,Bean的配置如下:
<bean name="resourceRegistry" class="com.csdn.osgi.user.web.registry.ResourceRegistry" init-method="init"><property name="resMapping"><map> <entry key="/js" value="/WebContent/js"/> <entry key="/css" value="/WebContent/css"/><entry key="/images" value="/WebContent/images"/></map> </property></bean>这样就可以完成静态资源的注册,这种方式比较灵活,如果有新的资源类型,只需要在map标签中增加一个新的entry标签即可。
接下来是JSP的注册,我们在com.csdn.osgi.user.web这个Bundle中新建一个类,名称为 com.csdn.osgi.user.web.registry.JspRegistry,代码如下:
package com.csdn.osgi.user.web.registry;import java.util.Dictionary;
import java.util.Hashtable;import javax.servlet.ServletException;import org.eclipse.equinox.jsp.jasper.JspServlet;
import org.eclipse.gemini.blueprint.context.BundleContextAware;
import org.osgi.framework.BundleContext;
import org.osgi.framework.ServiceReference;
import org.osgi.service.http.HttpContext;
import org.osgi.service.http.HttpService;
import org.osgi.service.http.NamespaceException;
import org.springframework.beans.BeansException;
import org.springframework.context.ApplicationContext;
import org.springframework.context.ApplicationContextAware;public class JspRegistry implements ApplicationContextAware,BundleContextAware {BundleContext bundleContext;ApplicationContext appContext;@Overridepublic void setBundleContext(BundleContext bundleContext) {this.bundleContext = bundleContext;}@Overridepublic void setApplicationContext(ApplicationContext appContext)throws BeansException {this.appContext = appContext;}public void init() {ServiceReference serviceReference = bundleContext.getServiceReference(HttpService.class.getName());HttpService httpService = (HttpService) bundleContext.getService(serviceReference);HttpContext commonContext = httpService.createDefaultHttpContext();Dictionary initparams = new Hashtable<String, String>();JspServlet jspServlet = new JspServlet(bundleContext.getBundle(), "/WebContent/WEB-INF/jsp", "/jsp");try {httpService.registerServlet("/jsp", jspServlet, initparams, commonContext);} catch (ServletException e) {e.printStackTrace();} catch (NamespaceException e) {e.printStackTrace();}}
}
同样,也是在Spring中实例化JspRegistry,Bean的配置如下:
<bean name="jspRegistry" class="com.csdn.osgi.user.web.registry.JspRegistry" init-method="init">
</bean>
最后就是Servlet资源的注册了,使用Spring MVC框架,我们需要实例化一个DispatcherServlet对象,需要注意的是,DispatcherServlet对象不能通过new关键字创建,应该由Spring框架实例化,在com.csdn.osgi.user.web这个Bundle中新建一个类,名称为com.csdn.osgi.user.web.registry.DispatcherServletRegistry,代码如下:
package com.csdn.osgi.user.web.registry;import java.util.Dictionary;
import java.util.Hashtable;import javax.servlet.ServletException;import org.eclipse.gemini.blueprint.context.BundleContextAware;
import org.osgi.framework.BundleContext;
import org.osgi.framework.ServiceReference;
import org.osgi.service.http.HttpContext;
import org.osgi.service.http.HttpService;
import org.osgi.service.http.NamespaceException;
import org.springframework.beans.BeansException;
import org.springframework.context.ApplicationContext;
import org.springframework.context.ApplicationContextAware;
import org.springframework.web.servlet.DispatcherServlet;public class DispatcherServletRegistry implements ApplicationContextAware, BundleContextAware {String urlPattern;String servletName;BundleContext bundleContext;ApplicationContext applicationContext;DispatcherServlet dispatcherServlet;@Overridepublic void setBundleContext(BundleContext bundleContext) {this.bundleContext = bundleContext;}@Overridepublic void setApplicationContext(ApplicationContext applicationContext)throws BeansException {this.applicationContext = applicationContext;}public void setServletName(String servletName) {this.servletName = servletName;}public void setUrlPattern(String urlPattern) {this.urlPattern = urlPattern;}public void setDispatcherServlet(DispatcherServlet dispatcherServlet) {this.dispatcherServlet = dispatcherServlet;}public void init() {ServiceReference serviceReference = bundleContext.getServiceReference(HttpService.class.getName());HttpService httpService = (HttpService) bundleContext.getService(serviceReference);HttpContext commonContext = httpService.createDefaultHttpContext();Dictionary<String, String> initparams = new Hashtable<String, String>();initparams.put("load-on-startup", "1");initparams.put("servlet-name", servletName);try {httpService.registerServlet(urlPattern, dispatcherServlet, initparams, commonContext);}catch (ServletException e) {e.printStackTrace();} catch (NamespaceException e){e.printStackTrace();}}
}
DispatcherServletRegistry 类的实例化也是通过Spring来完成,Bean的配置如下:
<bean name="dispatcherServlet" class="org.springframework.web.servlet.DispatcherServlet"><property name="contextConfigLocation"><value>/META-INF/spring/*.xml</value></property></bean> <bean name="servletRegistry" class="com.csdn.osgi.user.web.registry.DispatcherServletRegistry" init-method="init"><property name="urlPattern" value="/*.do"></property><property name="servletName" value="dispatcherServlet"></property><property name="dispatcherServlet" ref="dispatcherServlet"></property></bean>接下来在com.csdn.osgi.user.web这个Bundle中,新建META-INF/spring/registry.xml文件,用于配置注册Web资源的Bean,内容如下:
<?xml version="1.0" encoding="UTF-8"?>
<beans xmlns="http://www.springframework.org/schema/beans"xmlns:xsi="http://www.w3.org/2001/XMLSchema-instance"xmlns:osgix="http://www.springframework.org/schema/osgi-compendium"xmlns:ctx="http://www.springframework.org/schema/context"xmlns:osgi="http://www.eclipse.org/gemini/blueprint/schema/blueprint"xsi:schemaLocation="http://www.springframework.org/schema/beans http://www.springframework.org/schema/beans/spring-beans.xsdhttp://www.springframework.org/schema/context http://www.springframework.org/schema/context/spring-context.xsdhttp://www.springframework.org/schema/osgi-compendium http://www.springframework.org/schema/osgi-compendium/spring-osgi-compendium.xsdhttp://www.eclipse.org/gemini/blueprint/schema/blueprint http://www.eclipse.org/gemini/blueprint/schema/blueprint/gemini-blueprint.xsd"><bean name="dispatcherServlet" class="org.springframework.web.servlet.DispatcherServlet"><property name="contextConfigLocation"><value>/META-INF/spring/*.xml</value></property></bean>    <bean name="servletRegistry" class="com.csdn.osgi.user.web.registry.DispatcherServletRegistry" init-method="init"><property name="urlPattern" value="/*.do"></property><property name="servletName" value="dispatcherServlet"></property><property name="dispatcherServlet" ref="dispatcherServlet"></property></bean><bean name="resourceRegistry" class="com.csdn.osgi.user.web.registry.ResourceRegistry" init-method="init"><property name="resMapping"><map>  <entry key="/js" value="/WebContent/js"/>  <entry key="/css" value="/WebContent/css"/><entry key="/images" value="/WebContent/images"/></map> </property></bean><bean name="jspRegistry" class="com.csdn.osgi.user.web.registry.JspRegistry" init-method="init"></bean></beans>
然后新建一个META-INF/spring/dmconfig.xml文件,用于引用其他Bundle中注册的Bean,内容如下:
<?xml version="1.0" encoding="UTF-8"?>
<beans xmlns="http://www.springframework.org/schema/beans"xmlns:xsi="http://www.w3.org/2001/XMLSchema-instance"xmlns:osgix="http://www.springframework.org/schema/osgi-compendium"xmlns:ctx="http://www.springframework.org/schema/context"xmlns:osgi="http://www.eclipse.org/gemini/blueprint/schema/blueprint"xsi:schemaLocation="http://www.springframework.org/schema/beans http://www.springframework.org/schema/beans/spring-beans.xsdhttp://www.springframework.org/schema/context http://www.springframework.org/schema/context/spring-context.xsdhttp://www.springframework.org/schema/osgi-compendium http://www.springframework.org/schema/osgi-compendium/spring-osgi-compendium.xsdhttp://www.eclipse.org/gemini/blueprint/schema/blueprint http://www.eclipse.org/gemini/blueprint/schema/blueprint/gemini-blueprint.xsd"><osgi:reference  id="sqlMapService" interface="org.apache.ibatis.session.SqlSession" /></beans>
然后还需要新建一个META-INF/spring/controllers.xml文件,实例化Spring MVC中的Controller及ViewResolver等,配置如下:
<?xml version="1.0" encoding="UTF-8"?>
<beans xmlns="http://www.springframework.org/schema/beans"xmlns:xsi="http://www.w3.org/2001/XMLSchema-instance"xmlns:osgix="http://www.springframework.org/schema/osgi-compendium"xmlns:ctx="http://www.springframework.org/schema/context"xmlns:osgi="http://www.eclipse.org/gemini/blueprint/schema/blueprint"xsi:schemaLocation="http://www.springframework.org/schema/beans http://www.springframework.org/schema/beans/spring-beans.xsdhttp://www.springframework.org/schema/context http://www.springframework.org/schema/context/spring-context.xsdhttp://www.springframework.org/schema/osgi-compendium http://www.springframework.org/schema/osgi-compendium/spring-osgi-compendium.xsdhttp://www.eclipse.org/gemini/blueprint/schema/blueprint http://www.eclipse.org/gemini/blueprint/schema/blueprint/gemini-blueprint.xsd"><bean id="viewResolver" class="org.springframework.web.servlet.view.InternalResourceViewResolver"><property name="prefix" value="jsp/"/><property name="suffix" value=".jsp"/></bean><bean name="/test.do" class="com.csdn.osgi.web.controllers.TestController"></bean></beans>
上面配置中,我们实例化了一个TestController对象,用于测试Spring MVC框架是否整合成功,TestController代码如下:
package com.csdn.osgi.web.controllers;import javax.servlet.http.HttpServletRequest;
import javax.servlet.http.HttpServletResponse;import org.springframework.web.servlet.ModelAndView;
import org.springframework.web.servlet.mvc.Controller;public class TestController implements Controller{@Overridepublic ModelAndView handleRequest(HttpServletRequest req,HttpServletResponse resp) throws Exception {System.out.println("Test Controller");ModelAndView mv = new ModelAndView();mv.setViewName("test");return mv;}}
接下来还需要增加一个WebContent/WEB-INF/jsp/test.jsp页面,代码如下:
<%@ page language="java" contentType="text/html; charset=utf-8"pageEncoding="utf-8"%>
<!DOCTYPE html>
<html>
<head>
<title>Spring MVC测试页面</title>
</head>
<body>
<h1>这是Spring MVC测试页面!</h1>
</body>
</html>
到此为止Spring MVC框架已经整合完毕,同时我们实例化了一个用于测试的TestController对象,整个工程结构如下图所示:
最后,启动OSGI容器,打开浏览器,访问http://localhost:8080/test.do,如下图所示:
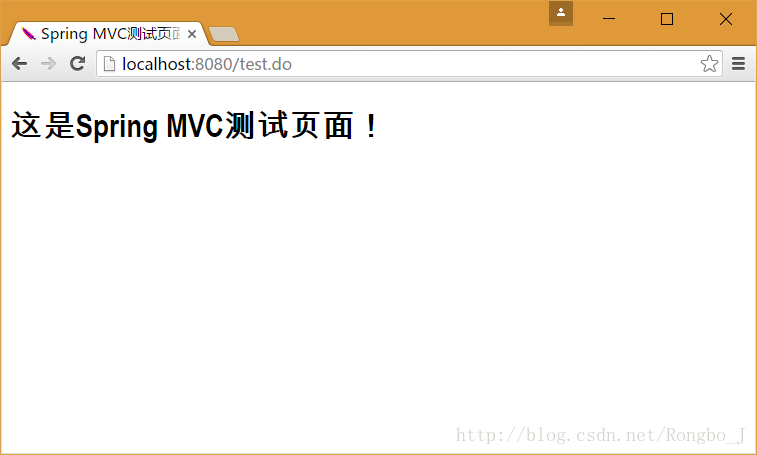
可以发现Spring MVC已经成功整合到OSGI应用中,下篇文章,笔者带领大家基于Spring、Mybatis、Spring MVC实现一个简单的登录功能。
注意:不需要启动前面文章演示使用的com.csdn.osgi.test.web这个Bundle,否则JSP注册时指定的URL会有冲突。
本文源码地址:http://download.csdn.net/detail/rongbo_j/9753640
转载请注明原文地址:http://blog.csdn.net/Rongbo_J/article/details/55000418