在使用这个 SDK 提供的功能前,必须先添加类库的引用到你的工程里。参考: Download and add the libraries to the
project.
定义你的 XAML 的 UI
Ui 非常的简单,只有两个 Image 控件和两个按钮。一个 Image 用来显示原图,另一个显示经过滤镜处理过
的图片。类似的,一个按钮用来选择图片,另一个保存经过滤镜处理的图片到图片库中。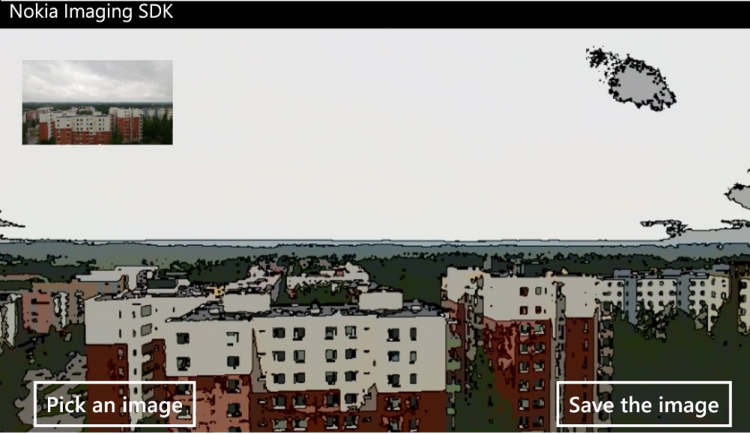
下面是实现的步骤:
1、在 VS 中打开 MainPage.xaml
2、定义 xaml 页面为 landscape orientation
SupportedOrientations="Landscape" Orientation="Landscape"
shell:SystemTray.IsVisible="False"
3、替换页面中默认的名字为LayoutRoot 的 grid 代码:
<!--LayoutRoot is the root grid where all page content is placed-->
<Canvas x:Name="LayoutRoot" Background="Transparent"><TextBlock Text="Nokia Imaging SDK" Style="{StaticResource PhoneTextNormalStyle}" /><Image x:Name="CartoonImage" Height="480" Width="800" Stretch="UniformToFill" /><Image x:Name="OriginalImage" Height="100" Width="157" Stretch="UniformToFill"
                 Canvas.Left="24" Canvas.Top="70" Canvas.ZIndex="0"/><Button Content="Pick an image" Click="PickAnImageButton_Click" Canvas.Left="24" Canvas.Top="398" /><Button Content="Save the image" Click="SaveImage_Click" x:Name="SaveButton" Canvas.Left="569" Canvas.Top="398" /></Canvas>
上面的 Image 控件一个用来显示原图,另一个显示 CartoonImage。
从图片库中选择图片:
private void PickAnImageButton_Click(object sender, RoutedEventArgs e)
{PhotoChooserTask chooser = new PhotoChooserTask();chooser.Completed += PickImageCallback;chooser.Show();
}private async void PickImageCallback(object sender, PhotoResult e){if (e.TaskResult != TaskResult.OK){ return;}
}
当在回调函数中提供给我们 System.IO.Stream 对象时,我们获取到了图片的内容,这时我们就开始
使用 Nokia Imaging SDK 了。
1、添加下面的命名空间
using Nokia.Graphics.Imaging;
using Nokia.InteropServices.WindowsRuntime;
using System.IO;
using System.Windows.Media.Imaging;
using System.Runtime.InteropServices.WindowsRuntime;
2、下面的命名空间是从图片库中选择图片和保存图片到图片库
using Microsoft.Phone.Tasks;
using Windows.Storage.Streams;
using Microsoft.Xna.Framework.Media;
3、在 MainPage.xaml.cs 类中,定义下面的变量:
public partial class MainPage : PhoneApplicationPage{// FilterEffect instance is used to apply different// filters to an image.// Here we will apply Cartoon filter to an image.private FilterEffect _cartoonEffect           =    null;// The following  WriteableBitmap contains // The filtered and thumbnail image.private WriteableBitmap _cartoonImageBitmap      =    null;private WriteableBitmap _thumbnailImageBitmap      =    null;......
}
4、接下来初始化上面定义的变量。在构造函数中初始化:
public Mainpage()
{InitializeComponent();// Initialize WriteableBitmaps to render the// filtered and original image._cartoonImageBitmap = new WriteableBitmap((int)CartoonImage.Width, (int)CartoonImage.Height);_thumbnailImageBitmap = new WriteableBitmap((int)OriginalImage.Width, (int)OriginalImage.Height);
}
5、当图片选择完成后,我们给图片添加滤镜。这里我们添加 Cartoon 滤镜,然后通过 xaml 中的图片控件(CartoonImage)显示
结果:
private async void PickImageCallback(object sender, PhotoResult e) { if (e.TaskResult != TaskResult.OK || e.ChosenPhoto == null){return;}try{// Show thumbnail of original image.
        _thumbnailImageBitmap.SetSource(e.ChosenPhoto);OriginalImage.Source = _thumbnailImageBitmap;// Rewind stream to start.                     e.ChosenPhoto.Position = 0;// A cartoon effect is initialized with selected image stream as source.var imageStream = new StreamImageSource(e.ChosenPhoto);_cartoonEffect = new FilterEffect(imageStream);// Add the cartoon filter as the only filter for the effect.var cartoonFilter = new CartoonFilter();_cartoonEffect.Filters = new[] { cartoonFilter };// Render the image to a WriteableBitmap.var renderer = new WriteableBitmapRenderer(_cartoonEffect, _cartoonImageBitmap);_cartoonImageBitmap = await renderer.RenderAsync();// Set the rendered image as source for the cartoon image control.CartoonImage.Source = _cartoonImageBitmap;}catch (Exception exception){MessageBox.Show(exception.Message);return;}SaveButton.IsEnabled = true;
}
开始我们把没经过滤镜处理的图片流显示到 _thumbnailImageBitmap 上。
接下来一行把 stream 的 position 设置到开始。这一步很重要。因为经过上一步后,流的位置会在末尾。
接着使用这个图片流(e.ChosenPhoto)初始化 _cartoonEffect。Cartoon 滤镜就被添加到 _cartoonEffect 的滤镜
列表上了。
使用 WriteableBitmapRender 把添加滤镜效果的图片,输出到 _cartoonImageBitmap 对象上。输出到 _cartoonImageBitmap
的操作是异步的;RenderAsync 方法用 _cartoonEffect 中的图片替换掉原图片数据。
然后我们可以使 SaveButton 可用了,保存经过滤镜处理的图片。
添加 capabilities
因为图片数据是从 Pictures 文件夹中读取的,所以需要添加相应的能力。
1、打开清单文件(WMAppManifest.xml)
2、添加 ID_CAP_MEDIALIB_PHOTO :
<Capabilities><Capability Name="ID_CAP_NETWORKING" /><Capability Name="ID_CAP_MEDIALIB_AUDIO" /><Capability Name="ID_CAP_MEDIALIB_PLAYBACK" /><Capability Name="ID_CAP_SENSORS" /><Capability Name="ID_CAP_WEBBROWSERCOMPONENT" /><Capability Name="ID_CAP_MEDIALIB_PHOTO" />
</Capabilities>
输出并且编码为全像素 JPEG
因为我们有一个 FilterEffect 对象实例,所以输出全像素 JPEG 是很容易的。原始图片的每一个像素
都会经过这个 library 的处理,然后保存为 JPEG。然后 Media library 保存这个由 SDK 输出的
JPEG 文件。
下面的代码演示怎样保持全尺寸的 JPEG:
private async void SaveImage_Click(object sender, RoutedEventArgs e)
{SaveButton.IsEnabled = false;if (_cartoonEffect == null) {return;}var jpegRenderer = new JpegRenderer(_cartoonEffect);// Jpeg renderer gives the raw buffer for the filtered image.IBuffer jpegOutput = await jpegRenderer.RenderAsync();// Save the image as a jpeg to the saved pictures album.MediaLibrary library = new MediaLibrary();string fileName = string.Format("CartoonImage_{0:G}", DateTime.Now);var picture = library.SavePicture(fileName, jpegOutput.AsStream());MessageBox.Show("Image saved!");SaveButton.IsEnabled = true;
}
Nokia WiKi 原文链接:http://developer.nokia.com/Resources/Library/Lumia/#!nokia-imaging-sdk/quick-start.html