企业品牌网站建设成都搜索优化排名公司
文章目录
- 1.Flutter 项目结构规范
- 2 Flutter 命名规范
- 3.Flutter 代码格式化
- 4.Flutter 注释
- 5.Flutter 代码使用规范
- 5.1 导包相关
- 5.2 字符串相关
- 5.3 集合相关
- 5.4 函数方法相关
- 5.6 异步任务编程相关
- 6.总结
想学习好一门编程语言,想标准高效地学习一门编程语言,首先你需要了解它的开发规范。标准的开发规范可以让我们事半功倍,也可以让别人更好地理解和使用你的代码、算法。学习 Flutter 同样建议大家先了解掌握其开发规范,大致包括:项目结构规范、命名规范、缩进格式规范、注释规范、代码规范、其他规范。良好的开发规范不但能提升自己的编程水平及能力,有利于提升自己的开发效率,也能够让其他人更好地理解你的代码,方便项目协同和维护。Flutter 的部分编程规范和约束与其他编程语言还是有一些区别,所以本节将着重给大家讲解下 Flutter 开发规范,以便后续的 Flutter 学习。
1.Flutter 项目结构规范
那么接下来,我们就开始 Flutter 项目结构规范的了解与学习。
前面我们讲过 Flutter 的项目结构。

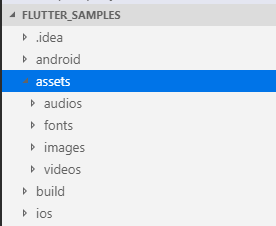
默认新建项目后,官方标准的项目结构如上图所示。
android 目录存放 Android 项目结构代码;ios 目录存放 iOS 项目结构代码;lib 目录存放 Flutter 核心的逻辑代码;test 目录存放测试用例代码;配置信息写在 pubspec.yaml 文件里。所以,我们一般开发就按照这个目录结构就可以了,这几个目录不能更改。当我们需要新建项目内的资源文件目录的时候,例如我们项目里需要引入一些打包进去的图标、图片文件,音频视频文件,字体文件等等,我们参照官方例子,一般把项目资源文件放在项目根目录自己新建的 assets 目录里,如果有需要,可以在 assets 目录里再进行分类:如 images、audios、videos、fonts 等等,大致结构如下图所示:


如果没有其他太多的资源,把资源文件都放在 assets 目录下即可。这个 assets 目录默认是没有的,我们可以在项目根目录新建一个 assets 目录用于存放应用使用的资源文件。
还有一种就是在项目根目录里创建多个类别资源文件夹:如 fonts(存放字体文件资源)、assets 目录(存放图片图标资源)等,大致如下图所示:

这两种资源目录创建方式都可以,可以根据需求实际情况进行使用。
这里要注意的是:定义的资源文件,我们需要在 pubspec.yaml 进行路径配置,才可以在 Flutter 代码里使用。

具体的配置信息上节博客有详细讲解,这里就不重复讲了。
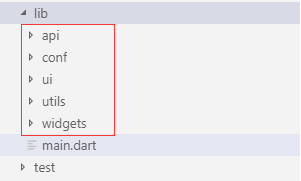
接下来我们再看下 lib 代码里的大致结构:
默认创建在 lib 目录下只有一个 main.dart 文件,这是整个应用的入口文件,这个 main.dart 名称不可以修改、位置也不可以修改(只能在 lib 根目录下)。lib 里的其他类可以按照供能进行划分目录,自己建立相应的分类目录即可。

具体目录如何划分,根据自己的实际项目需求和习惯进行划分即可。
如果想引入第三方库可以在 Dart PUB 搜索:https://pub.dartlang.org/。然后在 pubspec.yaml 进行配置即可使用。

2 Flutter 命名规范
大部分编程语言或多或少都有自己的命名特点,不过大同小异。这里给大家介绍下 Flutter 的相关命名规范。
良好的编码规范习惯、一致的命名规则有助于我们进行开发。Flutter 的命名规范其实也就是 Dart 语言的规范,后面都以 Flutter 规范来表述。
先看下 Flutter 的三种命名方式:
- UpperCamelCase:单词首字母大写的驼峰命名方式,例如 StudentName;
- lowerCamelCase:第一个单词的首字母小写的驼峰命名方式,如 studentName;
- lowercase_with_underscores:单词全部是小写字母,中间用 _ 连接,如 student_name。
接下来看下这三种命名方式一般都在哪种情况下使用。
首先是 UpperCamelCase 命名方式。
UpperCamelCase 命名方式一般用在类名、注解、枚举、typedef 和参数的类型上,例如:
//类名命名
class ItemMenu { ... }class HttpApi { ... }//注解
@Foo()
class A { ... }//枚举
enum Color {LightRed, LightBlue
}//typedef
typedef Predicate<T> = bool Function(T value);//方法参数类型
@override
Widget build(BuildContext context) {...}
然后是 lowerCamelCase 命名方式。
lowerCamelCase 命名方式一般用在类成员、变量、方法名、参数命名等命名上,如:
//变量命名
var item;HttpRequest httpRequest;//方法和参数名称命名
void align(bool clearItems) {// ...
}
//常量名称定义
const pi = 3.14;
const defaultTimeout = 1000;
final urlScheme = RegExp('^([a-z]+):');class Dice {static final numberGenerator = Random();
}
最后是 lowercase_with_underscores 命名方式。
lowercase_with_underscores 命名方式一般用在命名库(libraries)、包(packages)、目录(directories)和源文件(source files)上,类似这样的格式:libray_names,file_names。因此 Flutter 里的库名、包名、目录和源代码文件的命名都建议需要采用小写单词加 _ 下划线分隔方式命名,如:
library json_parser.string_scanner;import 'file_system.dart';
import 'item_menu.dart';//目录文件夹命名可以类似:http_utils这种形式
//源代码文件命名可以类似:screen_utils.dart这种形式
同时,在 Flutter 导入类库时候的 as 关键字后面的命名也要遵循 lowercase_with_underscores 命名方式,如:
import 'dart:math' as math;
import 'package:angular_components/angular_components'as angular_components;
import 'package:js/js.dart' as js;
Flutter 命名还有一点需要注意的就是不要使用前缀字母,如 mHttp、kHttp 这种形式。
//推荐
defaultTimeout
//不建议使用
kDefaultTimeout
为了保持代码的整洁及有层次分类,我们可以在某些地方使用空行来分隔。
我们来看下导包时候的建议顺序。
//建议 dart:包的导入要写在package:包的前面
import 'dart:async';
import 'dart:html';import 'package:bar/bar.dart';
import 'package:foo/foo.dart';//建议package:包的导入要写在我们相对引用本项目类的前面
import 'package:bar/bar.dart';
import 'package:foo/foo.dart';import 'util.dart';//建议将自己的包内的类的引入放置在其他第三方库引入的包后面
import 'package:bar/bar.dart';
import 'package:foo/foo.dart';import 'package:my_package/util.dart';//建议export的引入要写在import引入的后面
import 'src/error.dart';
import 'src/foo_bar.dart';export 'src/error.dart';//同级别的引用排列顺序最好按照字母的顺序进行排列
import 'package:bar/bar.dart';
import 'package:foo/foo.dart';import 'foo.dart';
import 'foo/foo.dart';
还有一点,如果你的某个方法和常量、变量、类不想被外部其他类调用时用的话,在相应的名称前加 _ 下划线前缀即可,例如:
//这样这个类就不能被其他类访问调用到了
class _MyMainPageState extends State<MyMainApp> {@overridevoid initState() {super.initState();}
3.Flutter 代码格式化
很多语言都有自己的格式要求,这样有利于排版和阅读使用。其实很多 IDE 也自带了一些格式化工具和插件,如 Visual Studio Code 可以使用 Alt+Shift+F 进行格式化代码。那么接下来就讲解下 Flutter 代码格式化的相关建议规范。
官方建议可以使用 dartfmt 进行格式化代码。
这个 dartfmt 可以帮我们自动按照规范格式化代码,非常方便。
如果遇到格式化工具都无法格式化的代码,建议重新简化组织代码,如缩短局部变量名称或更改层级等等。
官方建议,每行代码不超过 80 个字符。太长的单行显示不利于阅读。
建议流程控制相关语句都要加花括号 {…},防止出现其他错误,也更有利于排版和阅读。如:
if (isWeekDay) {print('Bike to work!');
} else {print('Go dancing or read a book!');
}
但是如果一个控制语句只有 if,没有 else 的话,可以不使用 {}:
if (arg == null) return defaultValue;
但是,如果 if 里的判断语句和 return 的返回的语句内容都很长,可能会产生换行,这种建议要加花括号 {…}:
if (overflowChars != other.overflowChars) {return overflowChars < other.overflowChars;
}
其他格式化控制需要注意的就是,Flutter 采用的是 React 方式进行开发,所有类都是 Widget。如果遇到一些层级嵌套太深的情况下,你也可以将某个层级定义为另一个方法进行调用引入。
class _MyMainPageState extends State<MyMainApp> {@overridevoid initState() {super.initState();}@overrideWidget build(BuildContext context) {return MaterialApp(home: Scaffold(appBar: AppBar(title: Text('标题'),),//通过方法引入body: getBody(),),);}Widget getBody() {return Center(child: Text("我是内容"));}
}...
4.Flutter 注释
Flutter 注释分为几种。首先看下 // 形式单行注释,这种注释不会出现、生成在文档里,只是代码里的注释:
// 这个注释不会出现生成到文档里
if (_chunks.isEmpty) return false;greet(name) {// 单行注释,这个注释不会出现生成到文档里print('Hi, $name!');
}
接下来是块注释(多行注释),这个可以用来注释代码,或者用于需要多行注释说明的情况下。
/*
class _MyMainPageState extends State<MyMainApp> {@overridevoid initState() {super.initState();}@overrideWidget build(BuildContext context) {return MaterialApp(//页面home: Scaffold(appBar: AppBar(title: Text('标题'),),body: getBody(),),);}Widget getBody() {return Center(child: Text("我是内容"));}
}
*/greet(name) {/* 用多行注释(块注释),来写单行注释是不建议的*/print('Hi, $name!');
}
最后看下文档注释,这个注释使用 /// 来表示,并且注释会出现生成到文档里。一般我们可以使用文档注释来注释类成员和类型、方法、参数、类、变量常量等:
/// 这个是获取字符长度
int get length => ...
此时就不建议使用单行注释了,而是使用文档注释,来说明这个成员变量和类型是干什么的。
当然还有一种多行注释也是支持的,只不过 Flutter 不建议使用。
/*** 多行注释,不建议这种方式,但是也是支持的*/
编写注释时候,建议注释要精炼简短;适当的时候可以用空行来分隔注释内容;不要把注释内容和周围的上下文代码混合在一起,不容易阅读。
我们也可以在文档注释里加入一些 dart 代码例子:
/// A widget to display before the [title].////// If this is null and [automaticallyImplyLeading] is set to true, the/// [AppBar] will imply an appropriate widget. For example, if the [AppBar] is/// in a [Scaffold] that also has a [Drawer], the [Scaffold] will fill this/// widget with an [IconButton] that opens the drawer (using [Icons.menu]). If/// there's no [Drawer] and the parent [Navigator] can go back, the [AppBar]/// will use a [BackButton] that calls [Navigator.maybePop].////// {@tool sample}////// The following code shows how the drawer button could be manually specified/// instead of relying on [automaticallyImplyLeading]:////// ```dart/// AppBar(/// leading: Builder(/// builder: (BuildContext context) {/// return IconButton(/// icon: const Icon(Icons.menu),/// onPressed: () { Scaffold.of(context).openDrawer(); },/// tooltip: MaterialLocalizations.of(context).openAppDrawerTooltip,/// );/// },/// ),/// )/// ```/// {@end-tool}////// The [Builder] is used in this example to ensure that the `context` refers/// to that part of the subtree. That way this code snippet can be used even/// inside the very code that is creating the [Scaffold] (in which case,/// without the [Builder], the `context` wouldn't be able to see the/// [Scaffold], since it would refer to an ancestor of that widget).////// See also:////// * [Scaffold.appBar], in which an [AppBar] is usually placed./// * [Scaffold.drawer], in which the [Drawer] is usually placed.final Widget leading;
可以在文档注释中,适当的引入 [] 方括号来强调某个变量、参数、类或者其他的东西,并且我们的文档注释要写在注解前:
/// A button that can be flipped on and off.
@Component(selector: 'toggle')
class ToggleComponent {}
Flutter 也支持在文档注释里加入 MarkDown 文本:/// 这个是正常的文字
///
///
/// * MarkDown符号
/// * MarkDown符号
/// * MarkDown符号
///
/// 1. MarkDown列表
/// 2. MarkDown列表
/// 1. MarkDown列表
///
///     * MarkDown列表
///     * MarkDown列表
///     * MarkDown列表
///
/// MarkDown语法都支持:
///
/// ```
/// this.code
///     .will
///     .retain(its, formatting);
/// ```
///
/// The code language (for syntax highlighting) defaults to Dart. You can
/// specify it by putting the name of the language after the opening backticks:
///
/// ```html
/// <h1>HTML is magical!</h1>
/// ```
///
/// Links can be:
///
/// * http://www.just-a-bare-url.com
/// * [with the URL inline](http://google.com)
/// * [or separated out][ref link]
///
/// [ref link]: http://google.com
///
/// # A Header
///
/// ## A subheader
///
/// ### A subsubheader
///
/// #### If you need this many levels of headers, you're doing it wrong
但是我们应该避免过度使用 MarkDown,这样可能会导致文档注释非常混乱,不利于阅读使用。
代码缩减问题可以使用 ```来解决:
/// You can use [CodeBlockExample] like this:
///
/// ```
/// var example = CodeBlockExample();
/// print(example.isItGreat); // "Yes."
/// ```//这种有缩进空格的不建议/// You can use [CodeBlockExample] like this:
///
///     var example = CodeBlockExample();
///     print(example.isItGreat); // "Yes."
关于 Flutter 注释规范就讲解么多。
5.Flutter 代码使用规范
Flutter 代码使用规范内容比较多,这里就说几个典型的例子。
5.1 导包相关
假如我们包结构如下:
my_package
└─ lib├─ src│  └─ utils.dart└─ api.dart
在 api.dart 中想引入 scr 下的 utils.dart 类,建议这样引入:
//相对路径引入即可
import 'src/utils.dart';//而不是这样引入
import 'package:my_package/src/utils.dart';
//不需要加入package,因为如果后续package名字变了,修改起来非常麻烦
5.2 字符串相关
字符串连接不需要用 + 号连接,直接挨着写即可:
raiseAlarm('ERROR: Parts of the spaceship are on fire. Other ''parts are overrun by martians. Unclear which are which.');...
'Hello, $name! You are ${year - birth} years old.';//使用+号连接是错误的,不支持的
raiseAlarm('ERROR: Parts of the spaceship are on fire. Other ' +'parts are overrun by martians. Unclear which are which.');...
'Hello, ' + name + '! You are ' + (year - birth).toString() + ' y...';
5.3 集合相关
Flutter 的集合类型有这几种:lists、maps、queues、sets。
//建议用这种方式创建空集合
var points = [];
var addresses = {};//这种方式创建空集合是不建议的
var points = List();
var addresses = Map();//当然也可以提供类型参数
var points = <Point>[];
var addresses = <String, Address>{};//下面这种写法不建议
var points = List<Point>();
var addresses = Map<String, Address>();//使用isEmpty和isNotEmpty来判断集合是否为空
if (lunchBox.isEmpty) return 'so hungry...';
if (words.isNotEmpty) return words.join(' ');//不要使用.length方法来判断是否是空
if (lunchBox.length == 0) return 'so hungry...';
if (!words.isEmpty) return words.join(' ');//对于集合转换,我们可以使用它的链式高级方法来转换
var aquaticNames = animals.where((animal) => animal.isAquatic).map((animal) => animal.name);//集合的循环遍历建议使用for
for (var person in people) {...
}//这种forEach写法不推荐
people.forEach((person) {...
});//List.from一般用于类型转换,这两种方式都可以实现,但是推荐第一种写法
var copy1 = iterable.toList();
var copy2 = List.from(iterable);//建议这种写法
// Creates a List<int>:
var iterable = [1, 2, 3];// Prints "List<int>":
print(iterable.toList().runtimeType);//不建议使用List.from这种写法
// Creates a List<int>:
var iterable = [1, 2, 3];// Prints "List<dynamic>":
print(List.from(iterable).runtimeType);//但是如果改变集合类型,这是可以使用List.from方法
var numbers = [1, 2.3, 4]; // List<num>.
numbers.removeAt(1); // Now it only contains integers.
var ints = List<int>.from(numbers);var stuff = <dynamic>[1, 2];
var ints = List<int>.from(stuff);//关于集合过滤
//不建议
var objects = [1, "a", 2, "b", 3];
var ints = objects.where((e) => e is int);
//不建议
var objects = [1, "a", 2, "b", 3];
var ints = objects.where((e) => e is int).cast<int>();
//建议写法
var objects = [1, "a", 2, "b", 3];
var ints = objects.whereType<int>();
5.4 函数方法相关
//建议写法
void main() {localFunction() {...}
}
//不建议写法
void main() {var localFunction = () {...};
}//建议写法
names.forEach(print);
//不建议写法
names.forEach((name) {print(name);
});//用等号将默认值和参数分隔
//建议写法
void insert(Object item, {int at = 0}) { ... }
//不建议写法
void insert(Object item, {int at: 0}) { ... }//可以使用??两个问号来判断是否是null
void error([String message]) {stderr.write(message ?? '\n');
}//不要将变量初始化为null
//建议写法
int _nextId;class LazyId {int _id;int get id {if (_nextId == null) _nextId = 0;if (_id == null) _id = _nextId++;return _id;}
}
//不建议写法
int _nextId = null;class LazyId {int _id = null;int get id {if (_nextId == null) _nextId = 0;if (_id == null) _id = _nextId++;return _id;}
}//不用写类成员变量的getter和setter方法,默认是隐藏自带的
//建议写法
class Box {var contents;
}//不建议,没必要的,不用写类成员变量的getter和setter方法
class Box {var _contents;get contents => _contents;set contents(value) {_contents = value;}
}//可以使用final来创建只读常量,也支持=>简写
class Box {final contents = [];
}double get area => (right - left) * (bottom - top);
//=>也就是省略了{...}和return//不建议重复多次使用this关键字
//建议写法
class Box {var value;void clear() {update(null);}void update(value) {this.value = value;}
}
//不建议写法
class Box {var value;void clear() {this.update(null);}void update(value) {this.value = value;}
}//尽量在声明中初始化常量
//建议
class Folder {final String name;final List<Document> contents = [];Folder(this.name);Folder.temp() : name = 'temporary';
}
//不建议
class Folder {final String name;final List<Document> contents;Folder(this.name) : contents = [];Folder.temp() : name = 'temporary'; // Oops! Forgot contents.
}
//缩减构造方法初始化写法
//建议
class Point {num x, y;Point(this.x, this.y);
}
//不建议
class Point {num x, y;Point(num x, num y) {this.x = x;this.y = y;}
}//构造方法里无需重复声明参数类型
//建议
class Point {int x, y;Point(this.x, this.y);
}
//不建议
class Point {int x, y;Point(int this.x, int this.y);
}//对于空方法体的构造方法直接写;结尾
//建议
class Point {int x, y;Point(this.x, this.y);
}
//不建议
class Point {int x, y;Point(this.x, this.y) {}
}//new关键字可以不写,dart2已经支持不写new关键字了
//建议
Widget build(BuildContext context) {return Row(children: [RaisedButton(child: Text('Increment'),),Text('Click!'),],);
}
//不建议
Widget build(BuildContext context) {return new Row(children: [new RaisedButton(child: new Text('Increment'),),new Text('Click!'),],);
}//无需重复定义const关键字
//建议
const primaryColors = [Color("red", [255, 0, 0]),Color("green", [0, 255, 0]),Color("blue", [0, 0, 255]),
];
//不建议
const primaryColors = const [const Color("red", const [255, 0, 0]),const Color("green", const [0, 255, 0]),const Color("blue", const [0, 0, 255]),
];
5.5 异常处理相关
//可以使用rethrow重新处理后抛出异常,以提供给其他后续逻辑处理
//建议
try {somethingRisky();
} catch (e) {if (!canHandle(e)) rethrow;handle(e);
}
//不建议
try {somethingRisky();
} catch (e) {if (!canHandle(e)) throw e;handle(e);
}
5.6 异步任务编程相关
//我们可以使用Future和async、await来进行处理异步编程,async和await最后成对出现
//建议写法
Future<int> countActivePlayers(String teamName) async {try {var team = await downloadTeam(teamName);if (team == null) return 0;var players = await team.roster;return players.where((player) => player.isActive).length;} catch (e) {log.error(e);return 0;}
}
//不建议写法
Future<int> countActivePlayers(String teamName) {return downloadTeam(teamName).then((team) {if (team == null) return Future.value(0);return team.roster.then((players) {return players.where((player) => player.isActive).length;});}).catchError((e) {log.error(e);return 0;});
}//如果有些方法功能没有用到异步任务,不要加async关键字
//建议写法
Future afterTwoThings(Future first, Future second) {return Future.wait([first, second]);
}
//不建议写法
Future afterTwoThings(Future first, Future second) async {return Future.wait([first, second]);
}//关于数据转换我们可以用Future里高级用法来简化操作
//建议写法
Future<bool> fileContainsBear(String path) {return File(path).readAsString().then((contents) {return contents.contains('bear');});
}
//建议写法
Future<bool> fileContainsBear(String path) async {var contents = await File(path).readAsString();return contents.contains('bear');
}
//不建议写法
Future<bool> fileContainsBear(String path) {var completer = Completer<bool>();File(path).readAsString().then((contents) {completer.complete(contents.contains('bear'));});return completer.future;
}//可以适当的使用T泛型
//建议写法
Future<T> logValue<T>(FutureOr<T> value) async {if (value is Future<T>) {var result = await value;print(result);return result;} else {print(value);return value as T;}
}
//不建议写法
Future<T> logValue<T>(FutureOr<T> value) async {if (value is T) {print(value);return value;} else {var result = await value;print(result);return result;}
}
关于 Flutter 代码规范就讲解么多。
6.总结
本节博客主要是给大家讲解 Flutter 的相关开发规范,为后续 Flutter 的开发学习奠定基础,以便更好地进行深入研究和开发等。良好的开发规范不但有利于提升自己的开发效率,也能够让其他人更好的理解你的代码,主要注意点和建议如下:
- 建议仔细阅读和理解这些规范内容,最后对比其他语言进行学习理解。
- 学习完后,可以先尝试进行一个实践练习。