安徽湖滨建设集团有限公司网站关于校园推广的软文
在本文中,我将分享如何在 Node.js 中如何使用 Elasticsearch 来开发的经验。 顺便说一句,以防万一你从未听说过 Elasticsearch:
Elasticsearch 是一个高度可扩展的开源全文本搜索和分析引擎。 它使你可以快速,近乎实时地存储,搜索和分析大量数据。 它通常用作支持具有复杂搜索功能和要求的应用程序的基础引擎/技术。
如果你想了解更多关于 Elasticsearch 的介绍,你可以参阅我之前的文章 “Elasticsearch 简介”。
前提条件
- 你需要在你的电脑上安装 nodjs 8.9.4 或以上的版本
- 你需要安装 docker 18.03.0-ce 或以上的版本
创建 nodejs 项目
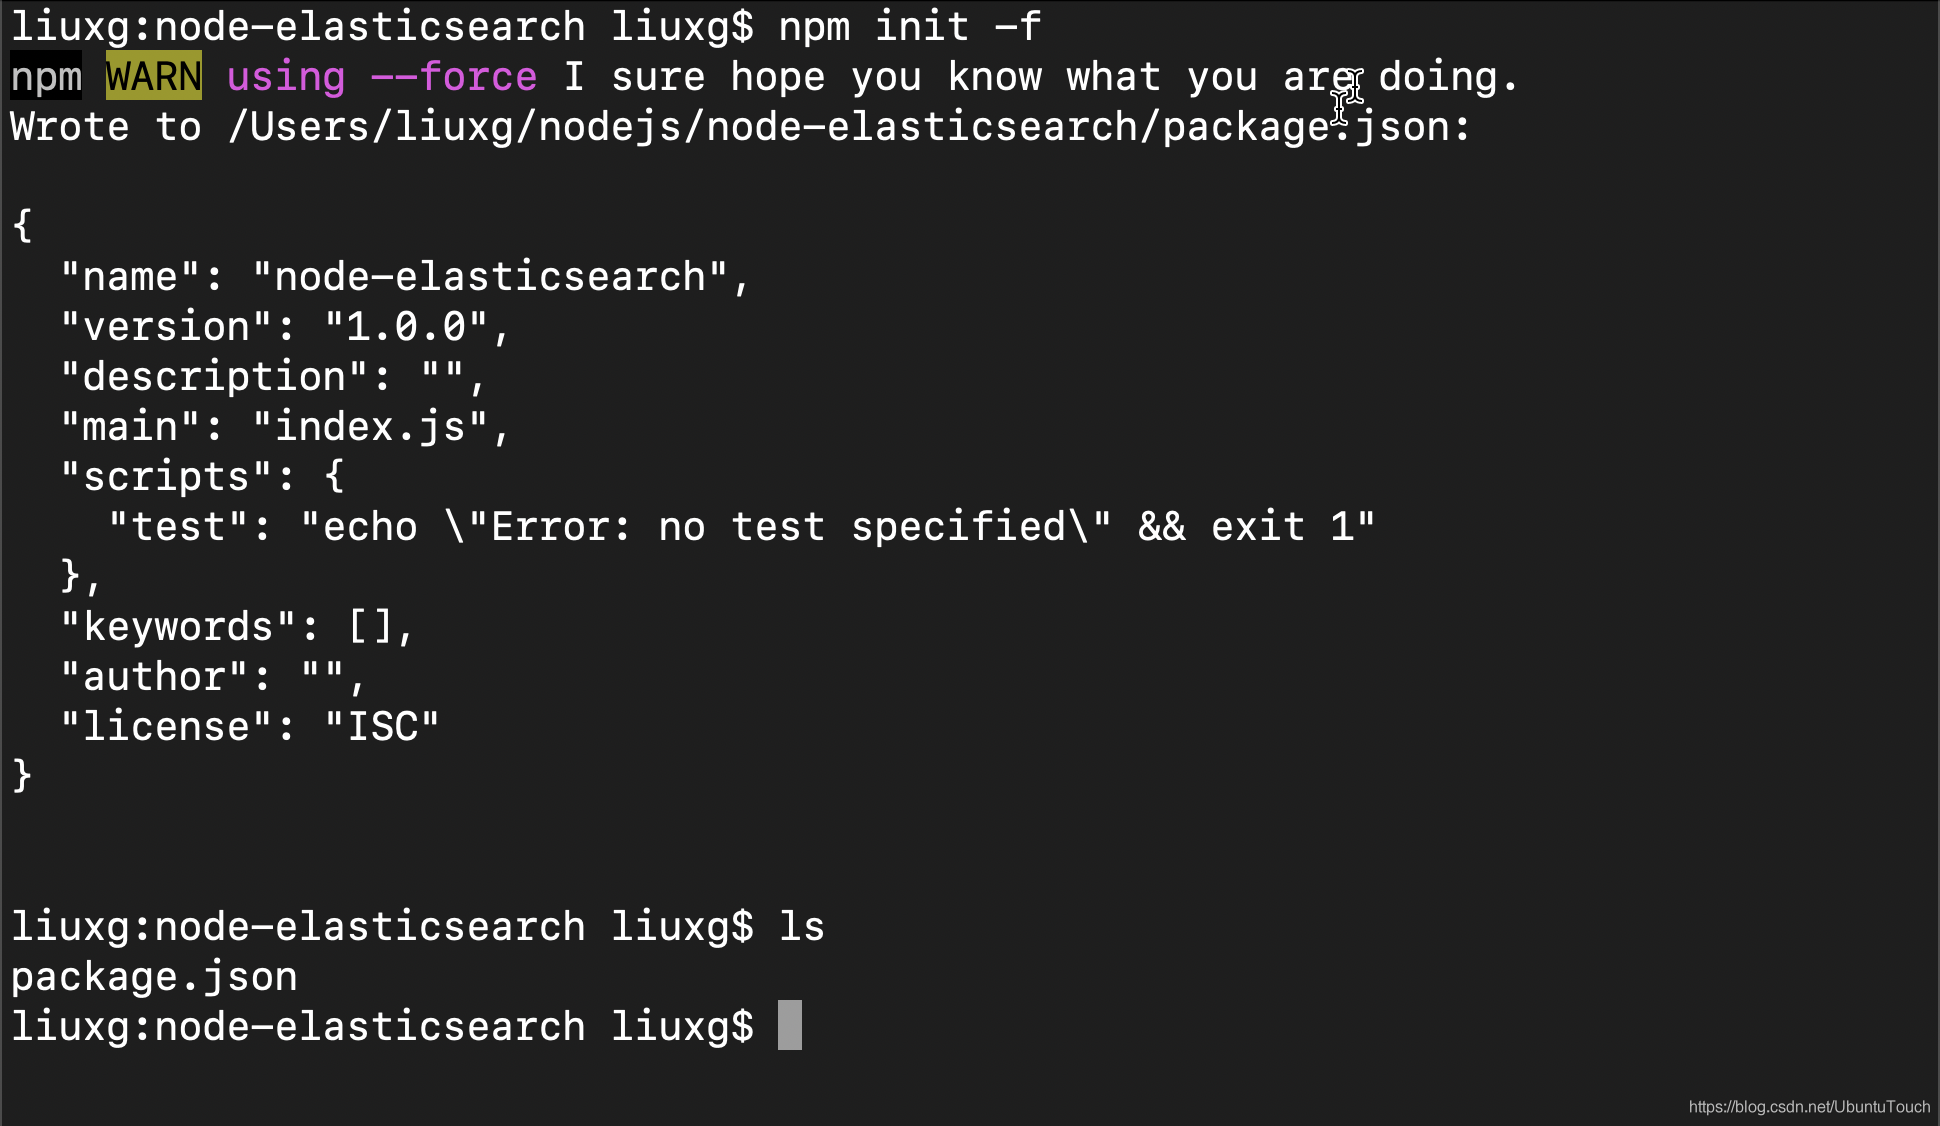
首先我们来创建一个叫做 node-elasticsearch 的目录,并进入该目录:
make node-elasticsearch
cd node-elasticsearch
复制代码
执行 npm init 生成 package.json 文件。 我为强制创建模式添加了 -f 标志:
我们把生成的 package.json 的 scripts 部分修改为启动 index.js:
package.json
{"name": "node-elasticsearch","version": "1.0.0","description": "","main": "index.js","scripts": {"start": "node index.js"},"keywords": [],"author": "","license": "ISC","dependencies": {"elasticsearch": "^16.7.2"}
}
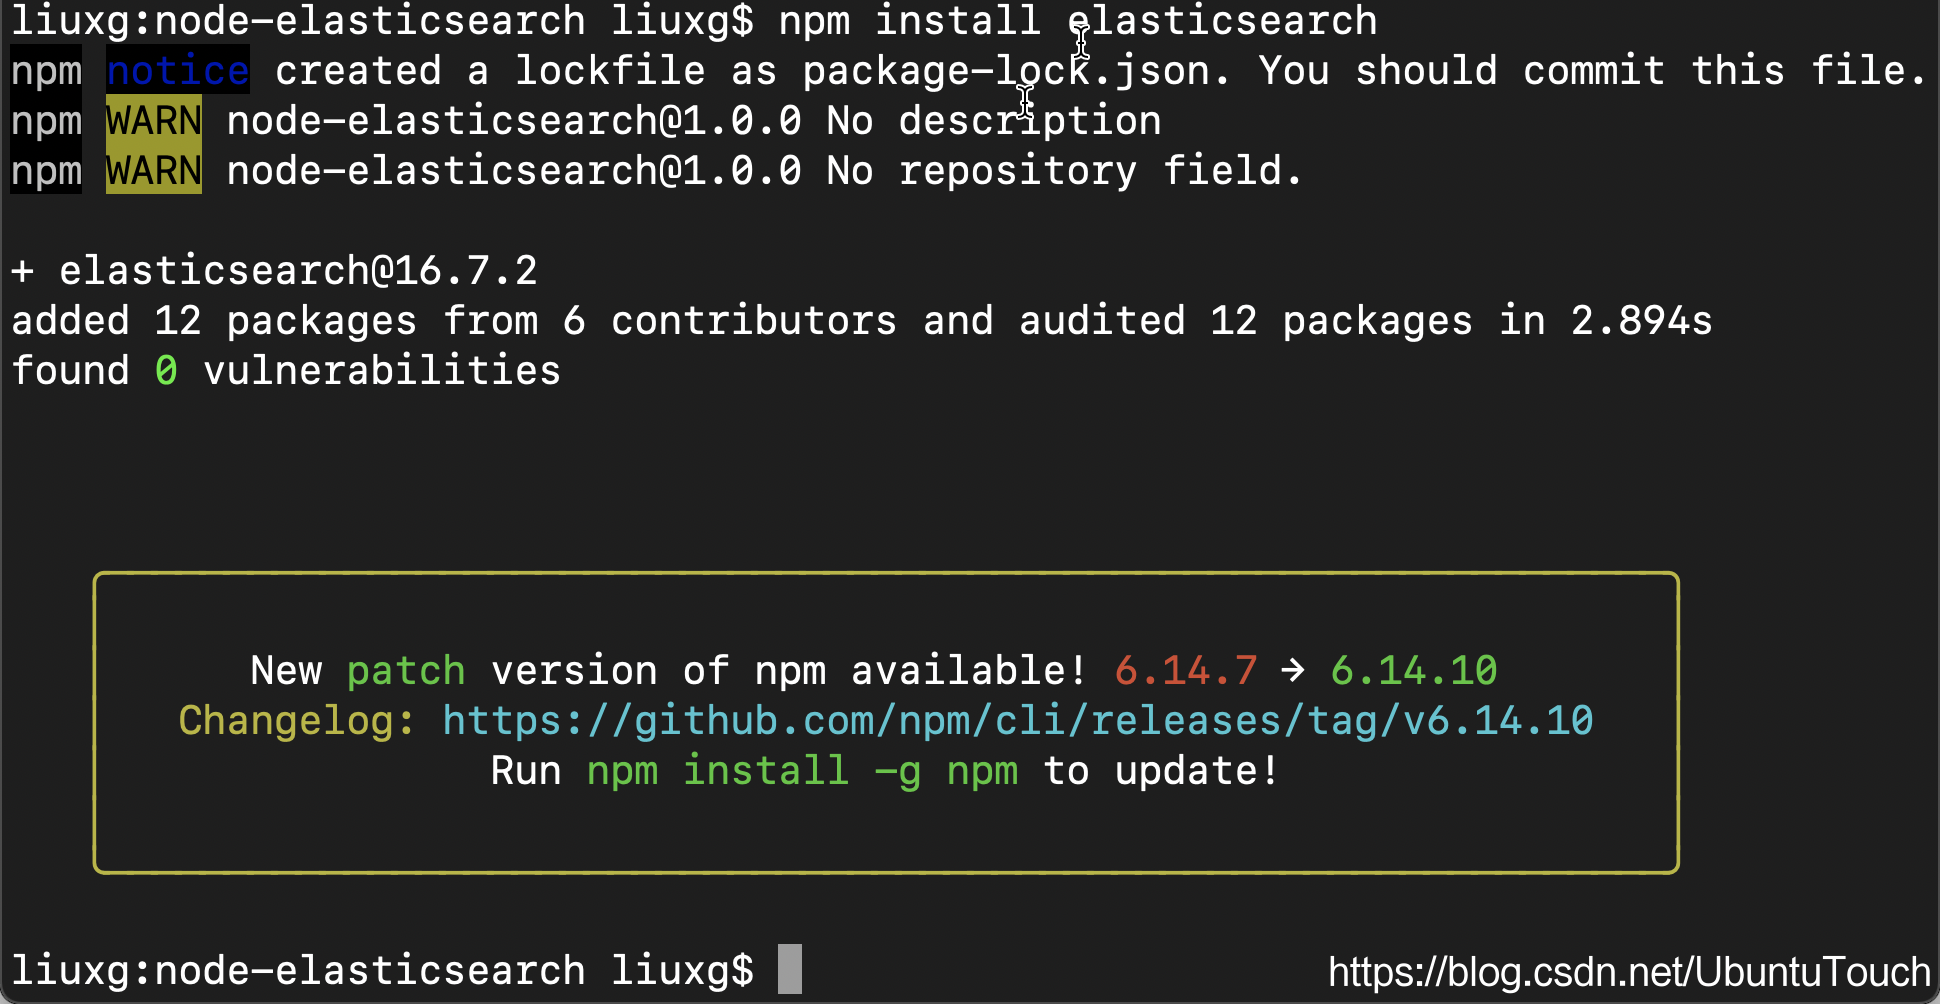
复制代码然后从 npm 安装 Elasticsearch 软件包。 很高兴看到我们有 Node.js 的官方软件包。
npm install elasticsearch
复制代码
我们的 node.js 设置已准备就绪。
这样我们就安装好了 elasticsearch 包。接下来,我们将安装 Elasticsearch。
安装 Elasticsearch 及 Kibana
如果你之前从来没有安装过 Elasticsearch 或 Kibana。你可以阅读我之前的文章 “Elastic:菜鸟上手指南” 来进行安装。在本练习中,我们将使用 docker 来安装 Elasticsearch 及 Kibana。我们首先来创建一个叫做 docker-compose.yml 的文件:
docker-compose.yml
---
version: "3"
services:elasticsearch:image: docker.elastic.co/elasticsearch/elasticsearch:7.10.0container_name: es01environment:- node.name=es01- cluster.name=docker-cluster- bootstrap.memory_lock=true- "ES_JAVA_OPTS=-Xms512m -Xmx512m"- discovery.type=single-nodeulimits:memlock:soft: -1hard: -1volumes:- esdata:/usr/share/elasticsearch/dataports:- 9200:9200kibana:image: docker.elastic.co/kibana/kibana:7.10.0ports:- 5601:5601depends_on:- elasticsearchvolumes:esdata:driver: local
复制代码
在上面,我们使用了 Elastic Stack 7.10.0 发行版作为实验的版本。在你实际的使用中,你可以根据自己的版本需求而进行修改。
我们必须先启动 docker,然后在命令行中执行:
docker-compose up
复制代码
上面命令必须执行于 docker-compose.yml 文件所在的目录中。
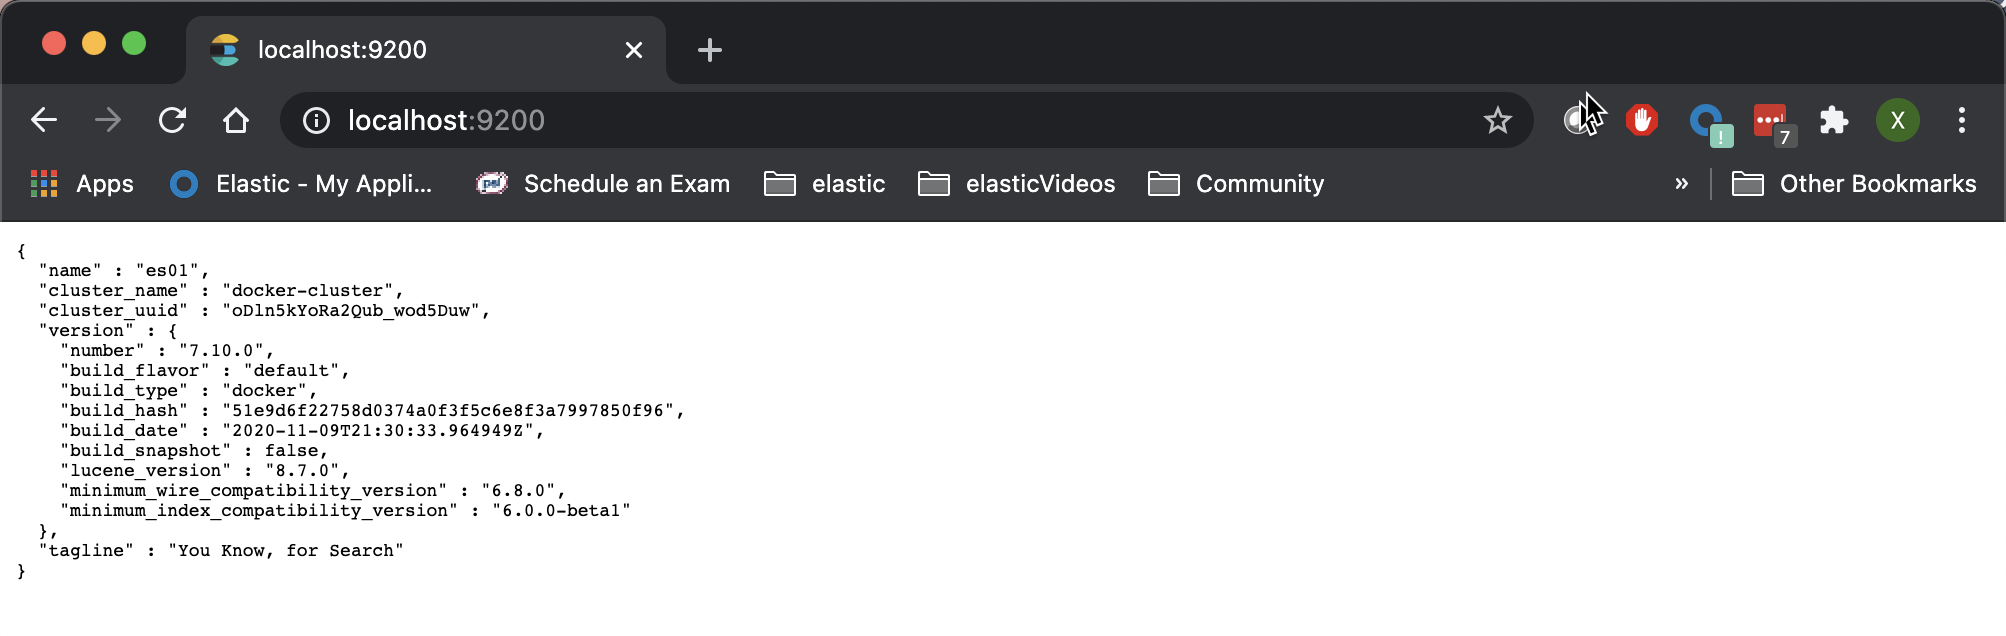
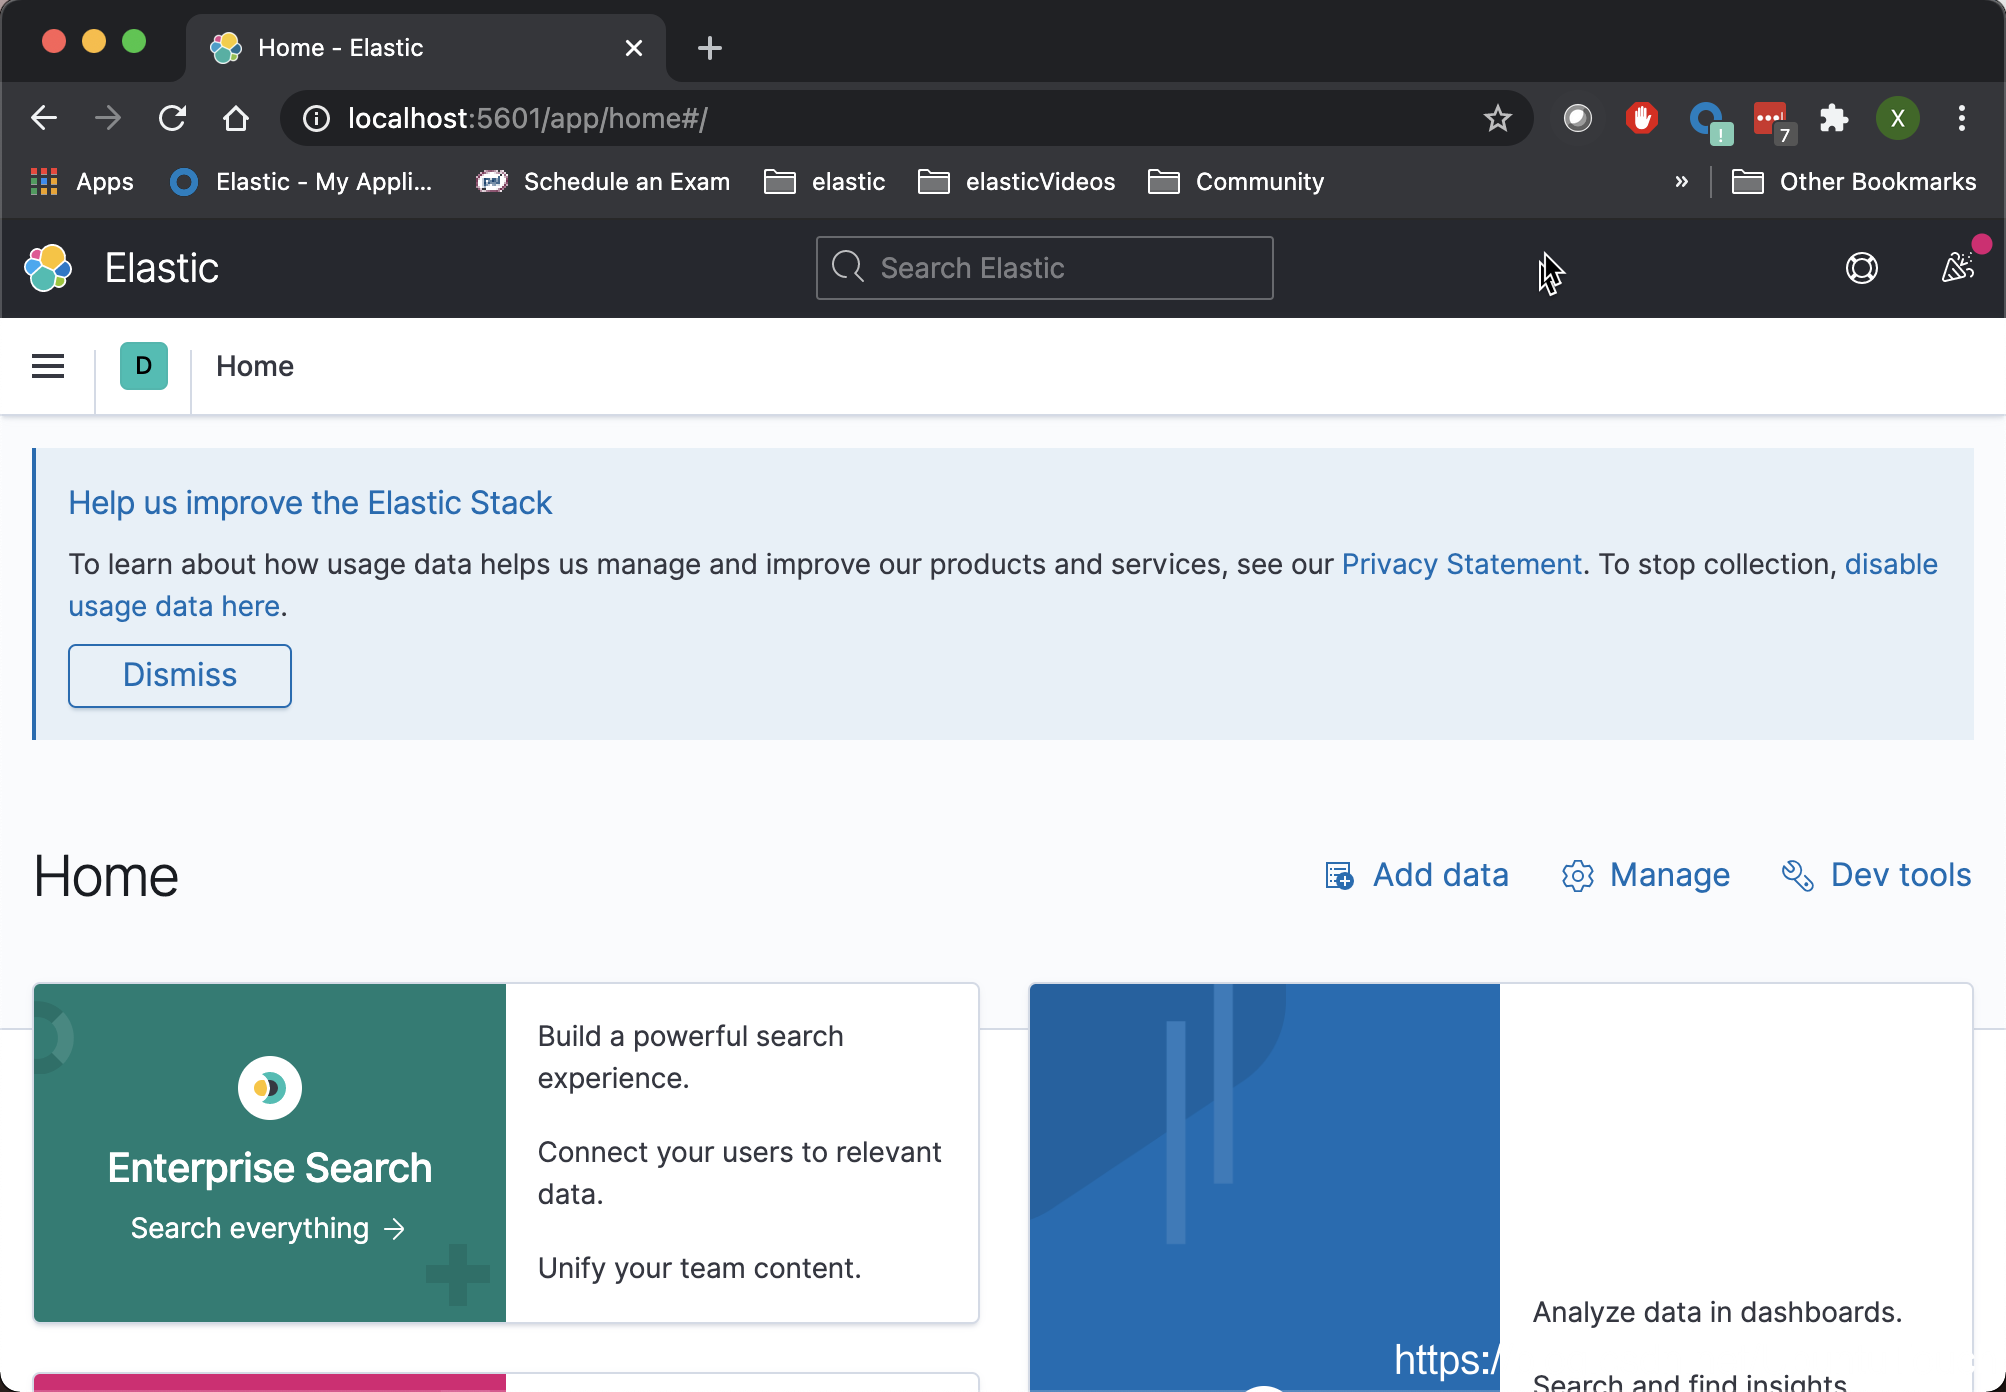
它将启动 http://localhost:9200 中的 Elasticsearch 和 http://localhost:5601 中的 Kibana。 你可以通过在浏览器中打开链接来进行验证。
连接到 Elasticsearch
我们接下来创建一个叫做 index.js 的文件,并输入一下的内容:
index.js
const es = require('elasticsearch');
const client = es.Client({ host: 'http://localhost:9200' });client.ping().then(res => console.log('connection success', res)).catch(err => console.error('wrong connection', err));
复制代码
代码真的很简单。 我们导入我们的 Elasticsearch 模块并创建一个针对 Elasticsearch 主机的客户端对象。 最后,我们使用 ping 方法验证我们的 Elasticsearch 连接是否成功。 如果成功,它将返回 true。
$ npm start> node-elasticsearch@1.0.0 start /Users/liuxg/nodejs/node-elasticsearch
> node index.jsconnection success true
复制代码
创建索引
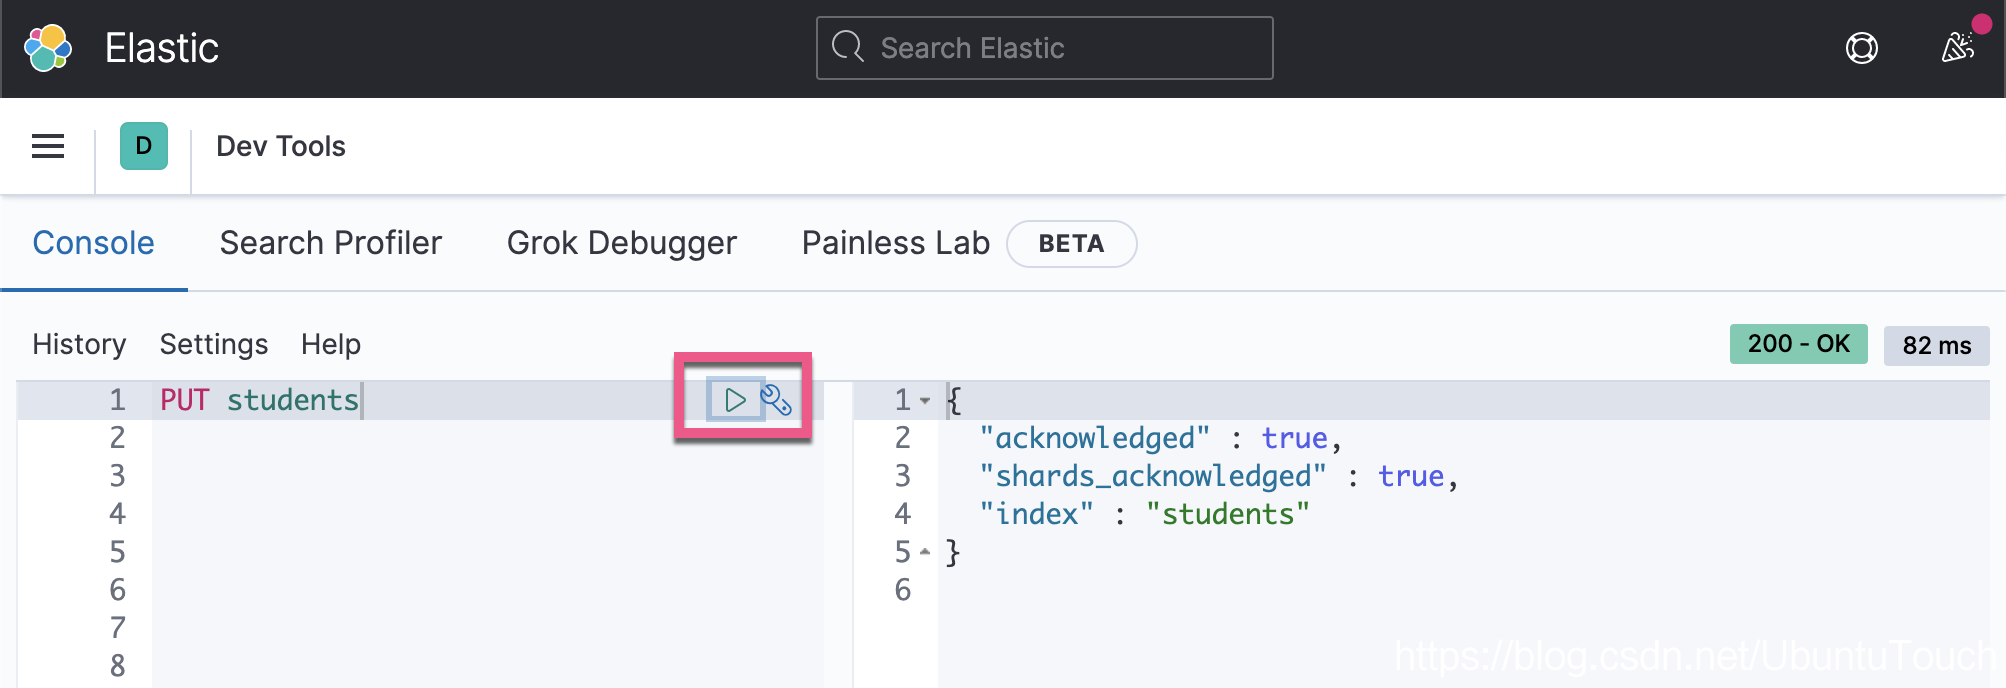
Elasticsearch 中的索引是文档的集合。 术语文档广泛用于表示 Elasticsearch 中的数据。 我们将创建一个名为 student 的索引来存储学生列表。 一个重要的规则,索引名称必须小写。在 http://localhost:5601 中打开 Kibana,然后单击开发工具菜单。 然后,在 “Console” 选项中,使用下面的命令,然后单击绿色的播放按钮创建索引。
插入文档
现在,从我们的项目中,让我们尝试插入一些学生文档。
index.js
const es = require('elasticsearch');
const client = es.Client({ host: 'http://localhost:9200' });client.ping().then(res => console.log('connection success', res)).catch(err => console.error('wrong connection', err));client.index({index: 'students',type: '_doc',body: {name: 'John Doe',age: 17,hobby: 'basketball'}
})
.catch(err => console.error(err));
复制代码
我们接着执行:
npm start
复制代码
我们使用 index 方法,并指定索引名称,类型(您无需过多考虑是什么 type,因为在将来的 Elasticsearch 版本中不再使用该类型)和学生信息。
通过输入以下命令,验证在 Kibana 中的创建。
GET students/_search
复制代码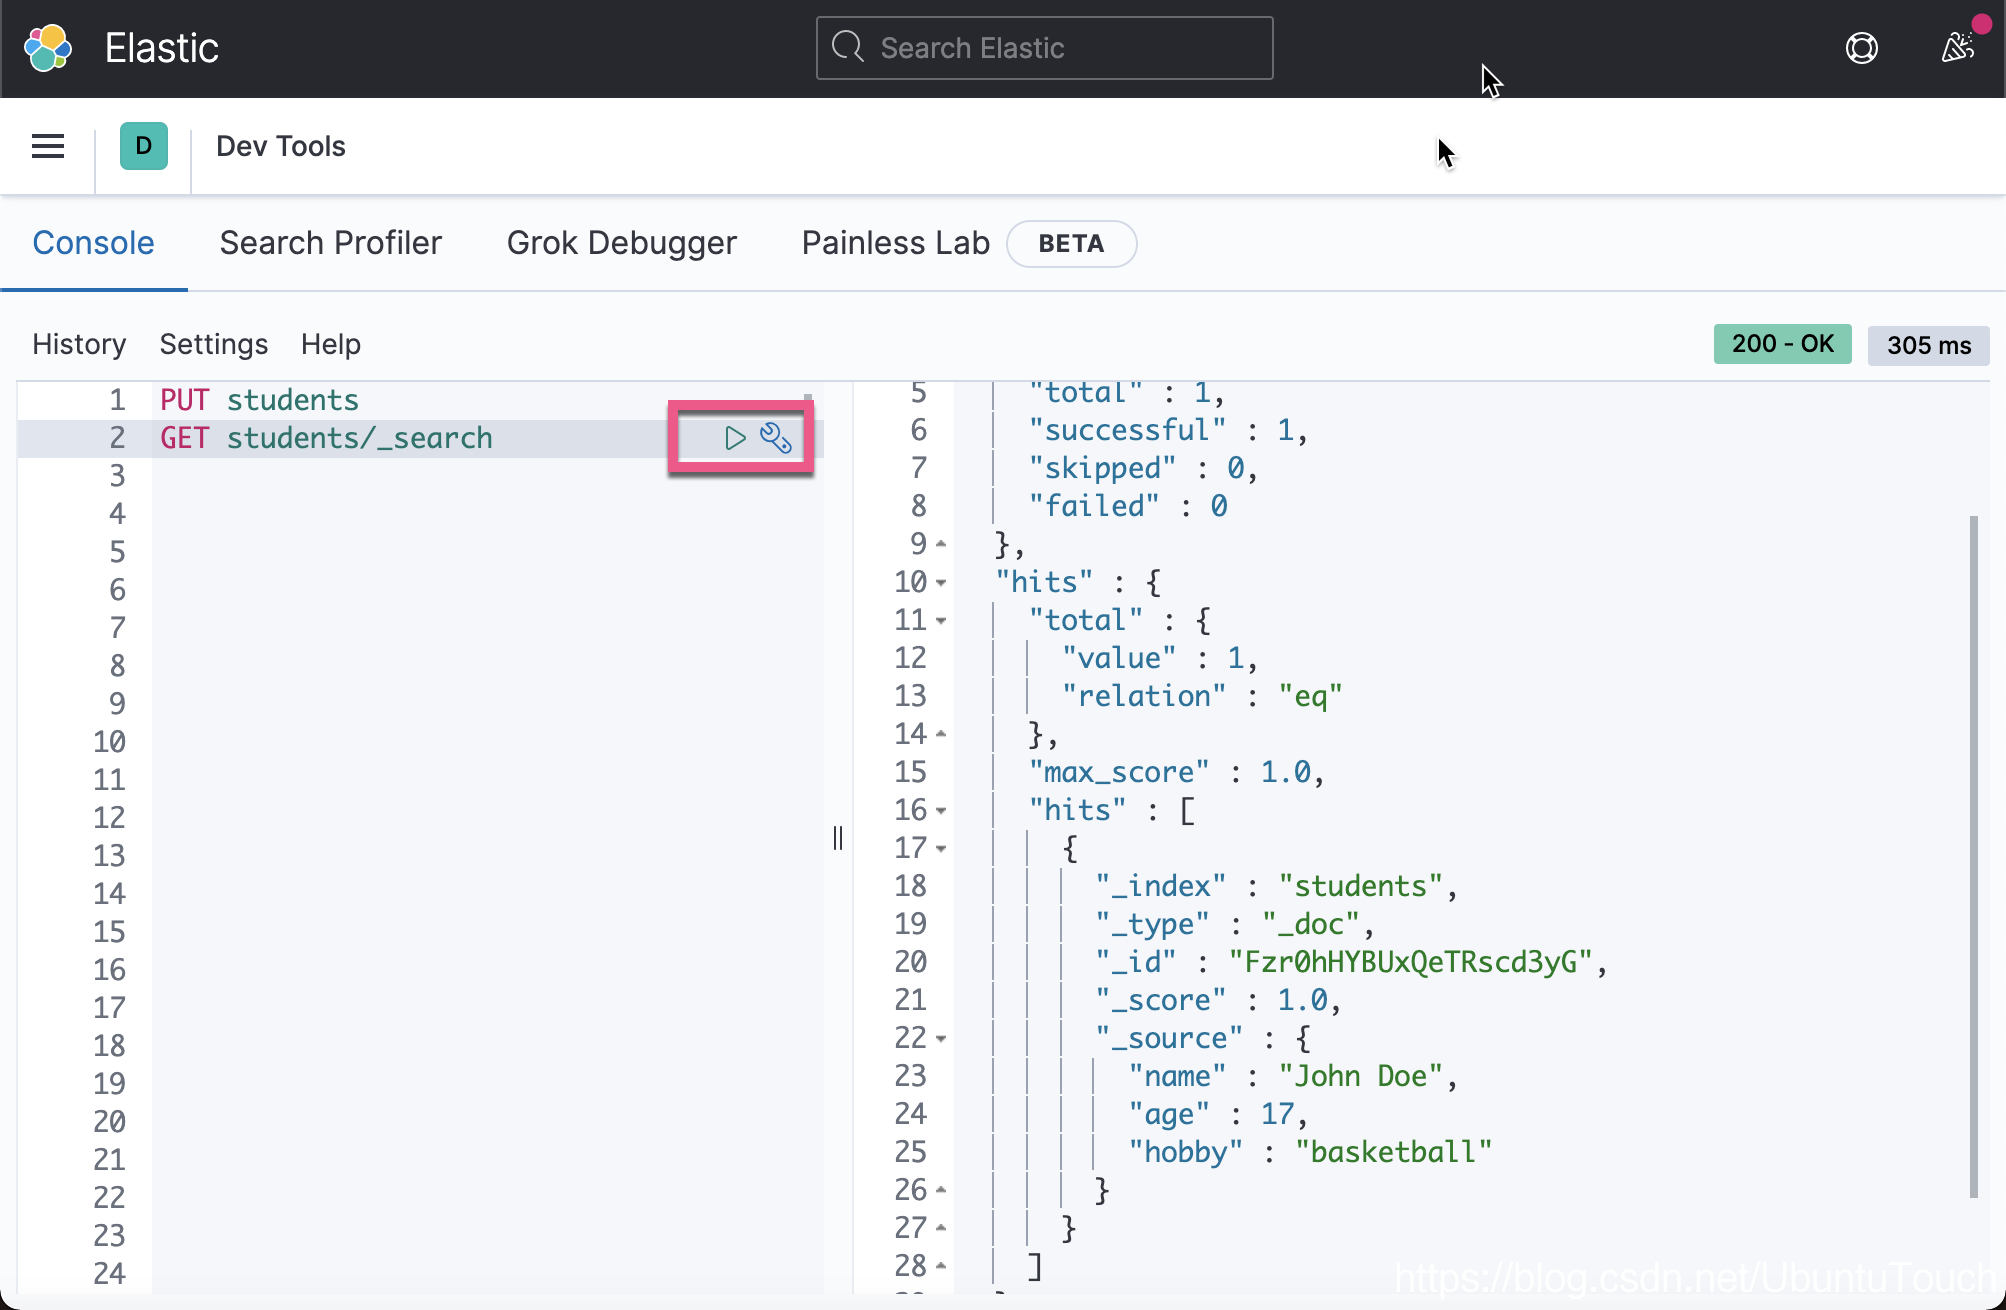
学生信息存储在 hits 中。 我们还会在 _id 字段中获得自动生成的 ID。 这是因为我们不为学生提供 ID,因此 Elasticsearch 会慷慨地为我们生成 ID。
这是有关在创建文档时如何提供 ID 的示例。 看一下 id 字段。
index.js
const es = require('elasticsearch');
const client = es.Client({ host: 'http://localhost:9200' });client.ping().then(res => console.log('connection success', res)).catch(err => console.error('wrong connection', err));client.index({index: 'students',type: '_doc',id: 1,  body: {name: 'C. Ronaldo',age: 33,hobby: 'football'}
})
.catch(err => console.error(err));
复制代码
重新执行:
npm start
复制代码
我们将发行有多一个 _id 为 1 的文档。到目前为止,我们有两个文档了。

你可能还会注意到每个文档的响应中的 _score 字段。 这是出于搜索目的。 分数越高意味着文档越相关
获取文档
要从我们的项目中获取学生文档,我们可以使用搜索方法。
index.js
const es = require('elasticsearch');
const client = es.Client({ host: 'http://localhost:9200' });client.ping().then(res => console.log('connection success', res)).catch(err => console.error('wrong connection', err));client.search({index: 'students',type: '_doc',
})
.then(res => console.log(JSON.stringify(res)))
.catch(err => console.error(err));
复制代码
重新运行上面的 index.js 文件:
$ npm start> node-elasticsearch@1.0.0 start /Users/liuxg/nodejs/node-elasticsearch
> node index.jsconnection success true
{"took":1,"timed_out":false,"_shards":{"total":1,"successful":1,"skipped":0,"failed":0},"hits":{"total":{"value":2,"relation":"eq"},"max_score":1,"hits":[{"_index":"students","_type":"_doc","_id":"Fzr0hHYBUxQeTRscd3yG","_score":1,"_source":{"name":"John Doe","age":17,"hobby":"basketball"}},{"_index":"students","_type":"_doc","_id":"1","_score":1,"_source":{"name":"C. Ronaldo","age":33,"hobby":"football"}}]}}
复制代码
我们的回应与我们在 Kibana 中的响应相同。
搜索文档
这是 Elasticsearch中 最重要的功能。 由于我们已经有两个文档,因此我们可以尝试搜索。 我们仍然使用 search 方法来获取文档,但是现在我们定义了一个查询。 该查询将确定每个文档的分数。
index.js
const es = require('elasticsearch');
const client = es.Client({ host: 'http://localhost:9200' });client.ping().then(res => console.log('connection success', res)).catch(err => console.error('wrong connection', err));client.search({index: 'students',type: '_doc',  body: {query: {match: { name: 'John' }}}
})
.then(res => console.log(JSON.stringify(res)))
.catch(err => console.error(err));
复制代码
$ npm start> node-elasticsearch@1.0.0 start /Users/liuxg/nodejs/node-elasticsearch
> node index.jsconnection success true
{"took":1,"timed_out":false,"_shards":{"total":1,"successful":1,"skipped":0,"failed":0},"hits":{"total":{"value":1,"relation":"eq"},"max_score":0.6931471,"hits":[{"_index":"students","_type":"_doc","_id":"Fzr0hHYBUxQeTRscd3yG","_score":0.6931471,"_source":{"name":"John Doe","age":17,"hobby":"basketball"}}]}}
复制代码由于 name 与查询匹配,因此我们将会获得如上所示的名字叫做 John 的文档。
在 Kibana 中的等效 Elasticsearch 命令:

Elasticsearch 有很多搜索配置,你可以稍后进行调整。如果你对这个感兴趣的话,请阅读我之前的文章 “开始使用Elasticsearch (2)”。
更新文档
假设我们要更新 ID 为 1 的学生的爱好。
index.js
const es = require('elasticsearch');
const client = es.Client({ host: 'http://localhost:9200' });client.ping().then(res => console.log('connection success', res)).catch(err => console.error('wrong connection', err));client.update({index: 'students',type: '_doc',id: '1',body: {doc: {hobby: 'swimming'}}
})
.then(res => console.log(JSON.stringify(res)))
.catch(err => console.error(err));
复制代码
运行上面的代码。
$ npm start> node-elasticsearch@1.0.0 start /Users/liuxg/nodejs/node-elasticsearch
> node index.jsconnection success true
{"_index":"students","_type":"_doc","_id":"1","_version":2,"result":"updated","_shards":{"total":2,"successful":1,"failed":0},"_seq_no":2,"_primary_term":1}
复制代码
这是我们更改爱好后的更新文档:
{"_index" : "students","_type" : "_doc","_id" : "1","_version" : 2,"_seq_no" : 2,"_primary_term" : 1,"found" : true,"_source" : {"name" : "C. Ronaldo","age" : 33,"hobby" : "swimming"}
}
复制代码
删除一个文档
delete 命令非常简单:
index.js
const es = require('elasticsearch');
const client = es.Client({ host: 'http://localhost:9200' });client.ping().then(res => console.log('connection success', res)).catch(err => console.error('wrong connection', err));client.delete({index: 'students',type: '_doc',id: '1'
})
.then(res => console.log(JSON.stringify(res)))
.catch(err => console.error(err));
复制代码
运行上面的代码:
$ npm start> node-elasticsearch@1.0.0 start /Users/liuxg/nodejs/node-elasticsearch
> node index.jsconnection success true
{"_index":"students","_type":"_doc","_id":"1","_version":3,"result":"deleted","_shards":{"total":2,"successful":1,"failed":0},"_seq_no":3,"_primary_term":1}
复制代码
如果我们现在到 Kibana 中重新进行查看的话,那么我们会发现只剩下一个文档了。
结论
Elasticsearch 是用于搜索和分析数据的强大强大引擎。如果你想了解更多,请阅读我的文章 “Elastic:菜鸟上手指南”。
作者:Elastic
链接:https://juejin.cn/post/6940230642315722783
来源:掘金
著作权归作者所有。商业转载请联系作者获得授权,非商业转载请注明出处。