全注解不使用配置文件
首先还是倒包 在原有的jar包:
需Spring压缩包中的四个核心JAR包
beans 、context、core 和expression
下载地址:
https://pan.baidu.com/s/1qXLHzAW
以及日志jar包
commons-logging 和log4j
下载地址:
https://pan.baidu.com/s/1mimTW5i
再增加一个
spring-aop-5.0.1.RELEASE.jar
增加注解功能的jar包名字是aop有些奇怪(不是annotation ,也不是context)
再增加一个
spring-web-4.2.4.RELEASE.jar
本例用于配置C3P0需要网络功能,还需要增加数据库连接的jar包
mysql-connector-java-5.1.7-bin.jar
本篇所需jar包打包下载地址:
https://pan.baidu.com/s/1UUKcm82DplON50W10TjX6A
然后,写一个类代替applicationContext.xml文件
如下:
package cn.itcast.c_all_annotation;import org.springframework.context.annotation.ComponentScan;
import org.springframework.context.annotation.Configuration;
import org.springframework.context.annotation.Import;//代替applicationContext.xml配置文件
@Configuration
//相当于<context:component-scan base-package="cn.itcast">
@ComponentScan("cn.itcast")
//將DataSourceConfiguration类中的配置引入(分模块开发)
//相当于<import resource="/cn/itcast/property/property_injection.xml"/>
@Import(DataSourceConfiguration.class)
public class SpringConfiguration {}
分模块开发方法,引入另一配置文件 该文件把src下的.properties文件
package cn.itcast.c_all_annotation;import javax.sql.DataSource;import org.springframework.beans.factory.annotation.Value;
import org.springframework.context.annotation.Bean;
import org.springframework.context.annotation.Configuration;
import org.springframework.context.annotation.PropertySource;
import org.springframework.context.support.PropertySourcesPlaceholderConfigurer;import com.mchange.v2.c3p0.ComboPooledDataSource;//代替applicationContext.xml配置文件
@Configuration
/** <context:property-placeholder location="classpath:db.properties" />* 读取类路径下的db.properties* spel语言*/
@PropertySource("classpath:db.properties")
public class DataSourceConfiguration {@Value("${jdbc.jdbcUrl}")private String jdbcUrl;@Value("${jdbc.driverClass}")private String driverClass;@Value("${jdbc.user}")private String user;@Value("${jdbc.password}")private String password;// c3p0连接池交给spring容器// @Bean 将方法的返回值交给spring容器管理.参数就是BeanName@Bean(name = "dataSource")public DataSource getDataSource() throws Exception {// 1 创建连接池对象ComboPooledDataSource dataSource = new ComboPooledDataSource();// 2 设置连接池参数
        dataSource.setJdbcUrl(jdbcUrl);dataSource.setDriverClass(driverClass);dataSource.setUser(user);dataSource.setPassword(password);return dataSource;}@Bean// 该对象配合@PropertySource("classpath:db.properties")注解,完成properties文件读取public static PropertySourcesPlaceholderConfigurer getPropertySourcesPlaceholderConfigurer() throws Exception {return new PropertySourcesPlaceholderConfigurer();}
}
db.properties 文件内容
jdbc.jdbcUrl=jdbc:mysql://localhost:3306/crm
jdbc.driverClass=com.mysql.jdbc.Driver
jdbc.user=root
jdbc.password=root
测试类如下:
package cn.itcast.c_all_annotation;import java.sql.SQLException;import javax.sql.DataSource;import org.junit.Test;
import org.springframework.context.ApplicationContext;
import org.springframework.context.annotation.AnnotationConfigApplicationContext;
import org.springframework.context.support.ClassPathXmlApplicationContext;import cn.itcast.domain.Car;
import cn.itcast.domain.User;public class Demo {//JUnit不能静态方法 不能返回值
    @Testpublic void fun1(){ApplicationContext ac = new AnnotationConfigApplicationContext(SpringConfiguration.class);User u = (User) ac.getBean("user");Car c = (Car) ac.getBean("car");System.out.println(u);System.out.println(c);}@Testpublic void fun2() throws SQLException{ApplicationContext ac = new AnnotationConfigApplicationContext(SpringConfiguration.class);DataSource  ds = (DataSource) ac.getBean("dataSource");System.out.println(ds.getConnection());}}
测试结果截图
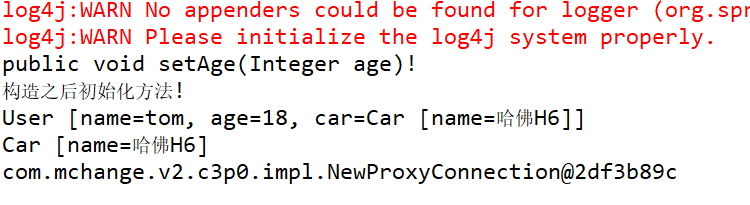
上面测试还顺带测试了一下注解的User和Car类
代码如下:
package cn.itcast.domain;import javax.annotation.PostConstruct;
import javax.annotation.PreDestroy;
import javax.annotation.Resource;import org.springframework.beans.factory.annotation.Autowired;
import org.springframework.beans.factory.annotation.Qualifier;
import org.springframework.beans.factory.annotation.Value;
import org.springframework.context.annotation.Scope;
import org.springframework.stereotype.Component;//<bean name="user" class="cn.itcast.domain.User" />
@Component("user")
/*    //注册service层对象
@Service
@Repository        //注册Dao层对象
@Controller        //注册Web层对象*/
//<bean scope="singleton|prototype" >
@Scope("prototype")
public class User {@Value("tom") //为name赋值为tomprivate String name;private Integer age;@Resource(name="car")/** @Autowired 自动注入 有就注入 默认名car开始* 注意:如果匹配到多个会抛出异常*/
//     @Autowired/**  当自动注入匹配到多个对象时,可以使用@Qualifier 指定具体注入哪一个(不常用)*/@Autowired@Qualifier("car2")private Car car;public User() {super();}public String getName() {return name;}public void setName(String name) {this.name = name;}public Integer getAge() {return age;}//将赋值注解放到set方法上,可执行方法中判断逻辑@Value("18")//为age赋值public void setAge(Integer age) {System.out.println("public void setAge(Integer age)!");this.age = age;}public Car getCar() {return car;}public void setCar(Car car) {this.car = car;}//<bean init-method="init" >
    @PostConstructpublic void init() {System.out.println("构造之后初始化方法!");}//<bean destory-method="destory" >
    @PreDestroypublic void destory() {System.out.println("销毁之前销毁方法!");}@Overridepublic String toString() {return "User [name=" + name + ", age=" + age + ", car=" + car + "]";}
}
Car类
package cn.itcast.domain;import org.springframework.beans.factory.annotation.Value;
import org.springframework.stereotype.Component;@Component
public class Car {@Value("哈佛H6")private String name;public String getName() {return name;}public void setName(String name) {this.name = name;}@Overridepublic String toString() {return "Car [name=" + name + "]";}}
以上实现了全注解的Spring设计,并整合了c3p0,且不需要修改DataSourceConfiguration 类中的内容,直接修改.properties文件即可
全注解方式虽然替换掉了XML配置文件 但操作相对繁琐 不建议使用
如果可以直接在类中修改代码就几行搞定,如果使用xml配置也就几行就可以了,比较一下哪个简便
package cn.itcast.b_datasource;import javax.sql.DataSource;
import org.junit.Test;
import org.springframework.context.ApplicationContext;
import org.springframework.context.support.ClassPathXmlApplicationContext;
import com.mchange.v2.c3p0.ComboPooledDataSource;public class Demo {
@Test
//手动创建C3p0连接池
public void fun1() throws Exception{//1 创建连接池对象ComboPooledDataSource dataSource = new ComboPooledDataSource();//2 设置连接池参数dataSource.setJdbcUrl("jdbc:mysql:///crm");dataSource.setDriverClass("com.mysql.jdbc.Driver");dataSource.setUser("root");dataSource.setPassword("root");dataSource.setMinPoolSize(1);System.out.println(dataSource.getConnection());
}
下边是xml方法
@Test
//从Spring容器中获得C3p0连接池
public void fun2() throws Exception{//1 创建spring容器ApplicationContext ac = new ClassPathXmlApplicationContext("/cn/itcast/b_datasource/dataSource.xml");//2 获得连接池DataSource ds = (DataSource) ac.getBean("dataSource");//3 测试
    System.out.println(ds.getConnection());
}
配置文件配置如下:
<?xml version="1.0" encoding="UTF-8"?>
<beans xmlns:xsi="http://www.w3.org/2001/XMLSchema-instance" xmlns="http://www.springframework.org/schema/beans" xmlns:context="http://www.springframework.org/schema/context" xsi:schemaLocation="http://www.springframework.org/schema/beans http://www.springframework.org/schema/beans/spring-beans-4.2.xsd http://www.springframework.org/schema/context http://www.springframework.org/schema/context/spring-context-4.2.xsd "><!-- 读取properties配置文件 --><context:property-placeholder location="classpath:db.properties" /><!-- ${jdbc.jdbcUrl} => 引用db.properties文件中jdbc.jdbcUrl对应的值 --><bean name="dataSource" class="com.mchange.v2.c3p0.ComboPooledDataSource" ><property name="jdbcUrl" value="${jdbc.jdbcUrl}" ></property><property name="driverClass" value="${jdbc.driverClass}" ></property><property name="user" value="${jdbc.user}" ></property><property name="password" value="${jdbc.password}" ></property><property name="minPoolSize" value="1" ></property></bean></beans>
读取的.properties文件上面已经给过
xml配置文件没有提示解决
window -->preferences-->搜索 xml catalog -->add-->在key中输入约束网址http://www.springframework.org/schema/beans/spring-beans.xsd
-->在location中点击按钮 file system-->找到spring framework 包-->schema-->beans-->最后的那个版本高的-->key type下拉菜单选schema location